
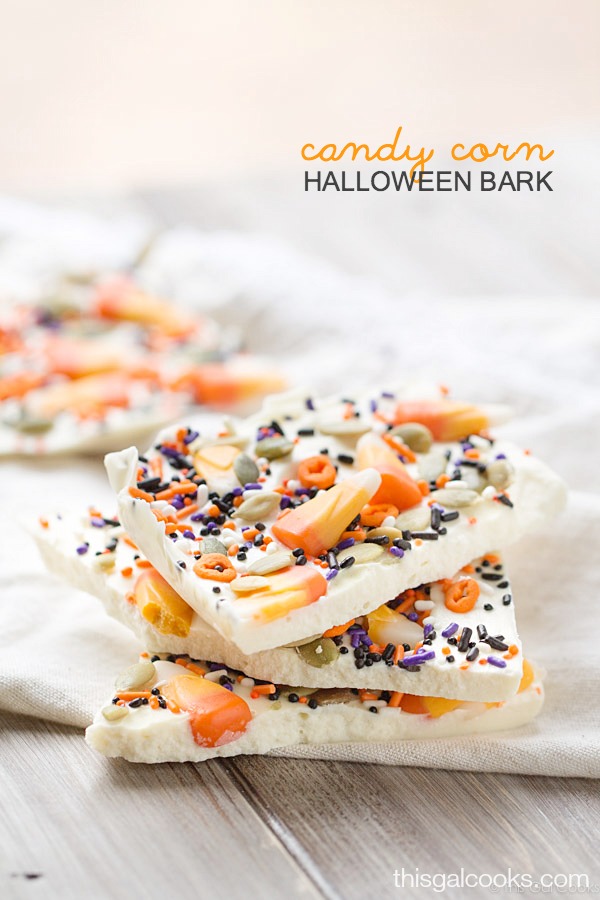
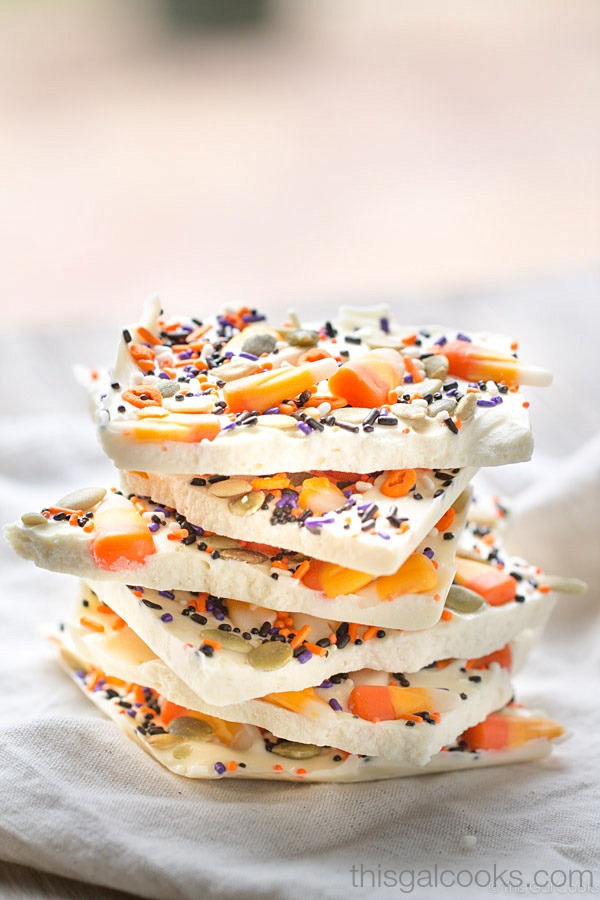
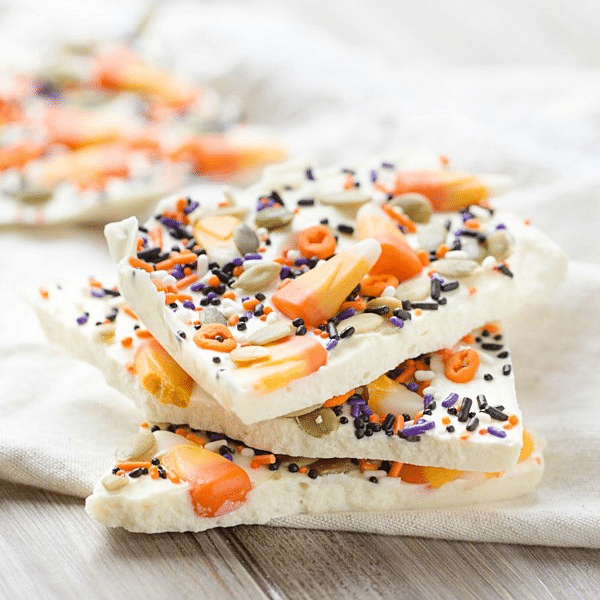
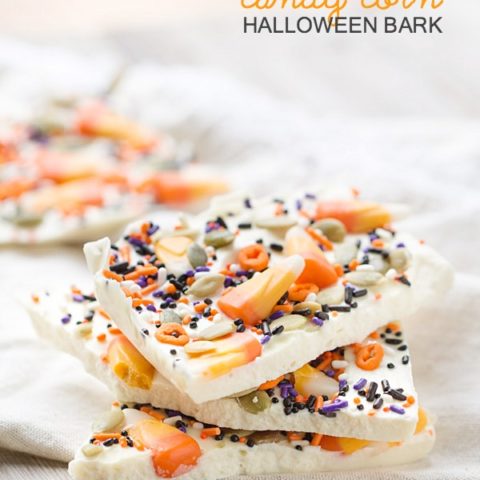
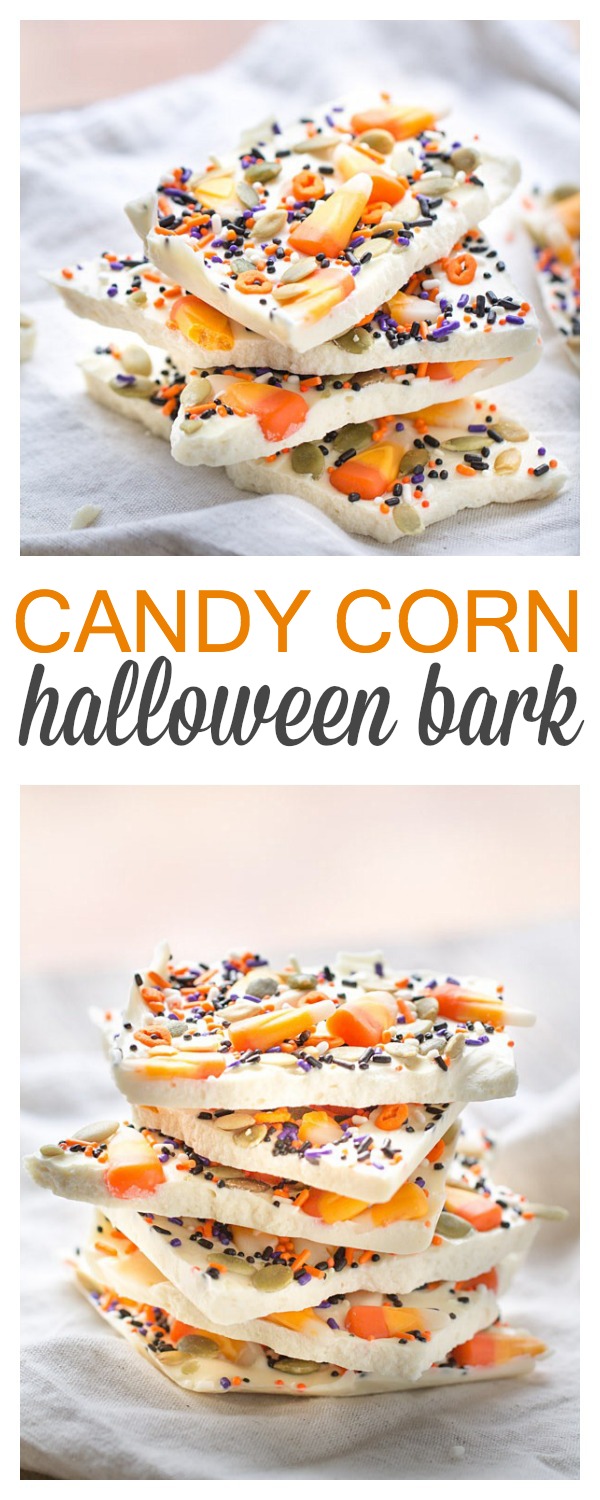
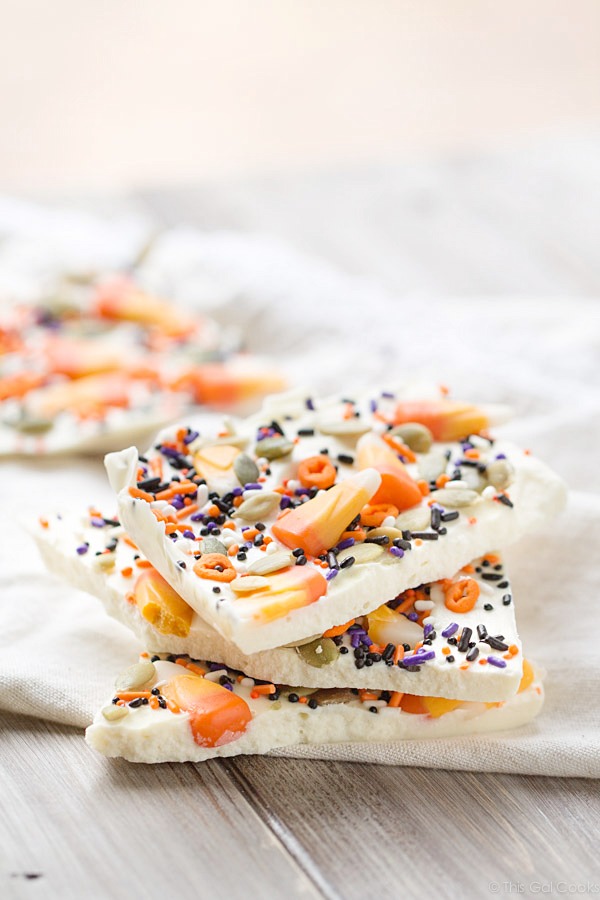
Candy Corn White Chocolate Halloween Bark
I figured it was time to make some Halloween treats.
Last year I made these Halloween Brownie Truffles and this Halloween Cake Batter Fudge. This year, I decided to kick off the Halloween season with this Candy Corn White Chocolate Halloween Bark.
It’s ridiculously easy to make. Melt white chocolate chips. Pour into a baking pan. Top with candy corn, pepitas and SPRINKLES! Then put it in your fridge for 20-30 minutes to allow it to harden. Boom. You have your own homemade Halloween candy treat.
Raise your hand if Halloween is your favorite holiday. Not your fav? Is it near the top of your favorites list? It’s my favorite holiday! I love decorating my front porch with my spooky pumpkin, pumpkin lights and gravestones. When I was a kid, I loved to go trick-or-treating. Now I love handing out candy to the trick-or-treaters in my neighborhood! Ken and I (and the dog, too!) sit outside with a big ole bowl of candy and hand out the candy as the trick-or-treaters come by. We sip on some of our favorite fall beers, too. ♥︎
I’m so excited that Halloween is on a Friday this year. After we finish handing out candy, we can stay up late and watch scary movies.
What are your plans for Halloween?
I think this Candy Corn White Chocolate Halloween Bark would be perfect to munch on while handing out candy. Don’t you? Ready to make the recipe? Just set aside about 15 minutes of your time. That’s all the time you’ll need to make this delicious recipe!
It’s the perfect balance of flavors and textures, and it still has all the festive fun of the original. Now, it’s my signature treat every October.
Why This White Chocolate Halloween Bark Recipe Works
Dessert barks have been a holiday staple for ages because they are wonderfully simple and endlessly customizable. You melt chocolate, spread it out, throw some delicious toppings on it, and let it set. It’s a fantastic recipe for getting kids involved in the kitchen, and it always looks impressive on a dessert table with very little effort.
Most Halloween bark recipes you’ll find stick to the basics, using classic candies like M&Ms or gummy worms. While those are fun, they often just add more sugar to an already sweet base. My recipe for White Chocolate Halloween Bark is designed to be better by creating a more balanced and interesting flavor profile.
The secret is in the details, specifically the roasted and lightly salted pepitas. These little pumpkin seeds add a crucial savory element that cuts through the richness of the white chocolate. You get the smooth, creamy sweetness from the chocolate, a chewy, honeyed flavor from the candy corn, and then a surprising, delightful crunch with a hint of salt from the pepitas.
This simple addition elevates the entire experience. It turns a simple kids’ treat into a more sophisticated confection that everyone can appreciate. The combination of sweet, salty, creamy, and crunchy makes every single bite a discovery. It’s familiar enough to be comforting but unique enough to make people ask, “What is in this? It’s amazing!” That’s why this recipe truly works.
Ingredients for White Chocolate Halloween Bark
The beauty of this recipe is its simplicity, which means the quality of your ingredients really shines through. You only need four items to create this festive treat, but choosing the right ones can make all the difference between a good bark and a great one.
I always recommend using ingredients you enjoy eating on their own. If you love the taste of the white chocolate chips right out of the bag, you’re going to love them even more in the finished bark.
- 2 11oz packages of white chocolate baking chips. I used Ghirardelli.
- 1 1/2 tbsp Halloween themed sprinkles. You can find Wilton brand on Amazon or at Michael’s.
- 3/4 C pumpkin spice candy corn (or regular, if you prefer).
- 1/4 C roasted, lightly salted pepitas.
Let’s talk about that white chocolate. I specify Ghirardelli because it melts beautifully smooth and has a rich, creamy flavor without being waxy or overly sweet. Cheaper white chocolate chips often contain palm oil and other additives that can prevent them from melting properly and leave an unpleasant texture. Investing in good quality chocolate is the most important step here.
For the toppings, the pumpkin spice candy corn adds a lovely hint of autumn flavor that pairs perfectly with the other ingredients. If you can’t find it or aren’t a fan, regular candy corn works just fine. The real star, though, is the roasted, lightly salted pepitas. These shelled pumpkin seeds are my secret weapon. They provide a much needed savory crunch and a touch of salt that balances the sweetness. Make sure you get roasted and salted ones for the best flavor impact.
Step-by-Step Instructions For Making White Chocolate Halloween Bark
Making this bark is one of the easiest kitchen projects you can tackle, perfect for a busy afternoon. There are no complicated techniques, but a few little tips will ensure your bark comes out perfectly every time. We’ll walk through it step by step.
Step 1: Prep Your Baking Sheet
First things first, prepare your canvas. Line a 13×9 baking sheet with aluminum foil. This step is non-negotiable as it makes cleanup an absolute breeze and ensures you can easily lift the entire slab of bark out of the pan once it’s set. After lining the pan, give it a very light mist of cooking spray. Then, take a paper towel and gently wipe away most of the excess. You want just a whisper of oil left, which will guarantee the foil peels away from the chocolate without any sticking.
Step 2: Melt the White Chocolate
Now for the main event. Place both packages of white chocolate chips into a large, microwave safe glass bowl. Glass is a great choice because it heats evenly and retains heat well. Start by microwaving on high for one minute. Remove the bowl and give the chips a good stir with a rubber spatula. They won’t be melted yet, but stirring helps distribute the heat. Return the bowl to the microwave for another minute and stir again. At this point, the chips should be mostly melted with a few lumps remaining. The residual heat in the bowl will do the rest of the work. If you still have a lot of lumps, microwave in 15 to 20 second bursts, stirring in between, until everything is smooth. Be very careful not to overheat the chocolate, or it can become thick and grainy.
Step 3: Spread and Top the Bark
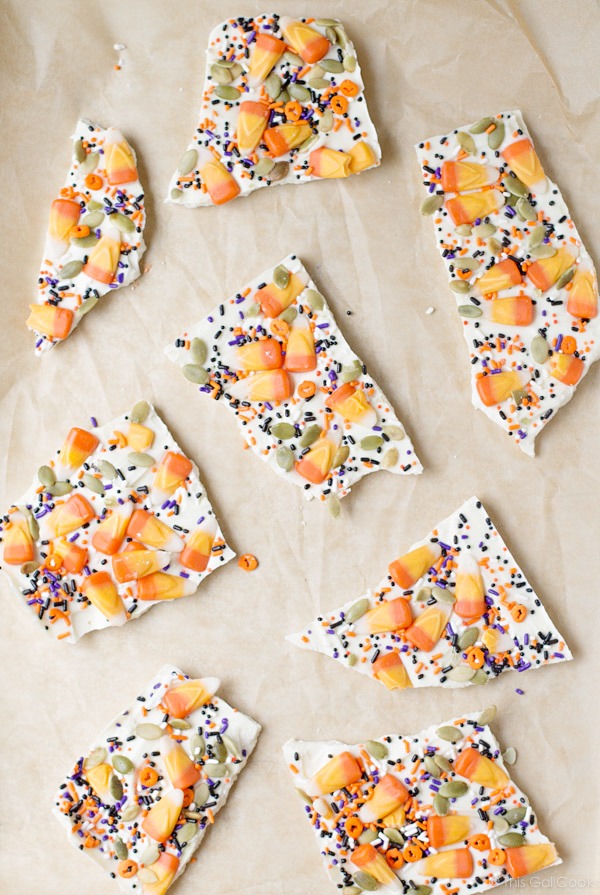
Once your white chocolate is perfectly smooth and creamy, it’s time to act quickly. Pour the melted chocolate onto your prepared baking sheet. Use the back of a spoon or an offset spatula to spread it into an even layer across the foil. It doesn’t have to be perfect; rustic is part of the charm. Immediately after spreading, sprinkle your toppings over the top. I like to scatter the pumpkin spice candy corn first, followed by the roasted pepitas, making sure to get an even distribution. Finish with a festive flourish of Halloween sprinkles. Gently press the toppings into the warm chocolate with your hands to help them adhere.
Step 4: Chill and Break
Carefully transfer the baking sheet to your refrigerator. Let the bark chill for at least 30 minutes. You’ll know it’s ready when it’s completely firm to the touch. Once it’s fully set, lift the foil out of the pan and place it on a cutting board. Now for the fun part! You can either use your hands to break the bark into irregular, snack-sized pieces or use a large knife to chop it into more uniform shapes. I prefer the rustic, hand-broken look myself.
How To Serve White Chocolate Halloween Bark
This White Chocolate Halloween Bark is as versatile as it is delicious, and there are so many fun ways to serve it up. Its vibrant colors and fun textures make it a showstopper on its own, but it also plays well with others. Whether you’re hosting a big party or just looking for a special treat, here are a few of my favorite serving ideas.
For a casual get together or a kids’ Halloween party, presentation can be simple and impactful. The easiest way to serve it is by arranging the broken pieces on a large, festive platter. The different shapes and sizes look beautiful and invite everyone to grab a piece. It’s the perfect, low fuss addition to any dessert table.
If you’re looking for more creative ways to share this delightful treat, consider these options:
- Party Favor Bags: Package a few pieces of bark in clear cellophane bags tied with black and orange ribbons. They make wonderful take home gifts for guests or sweet treats for classmates and teachers.
- Dessert Charcuterie Board: Create an epic Halloween themed dessert board. Arrange the bark alongside other treats like chocolate covered pretzels, mini cupcakes, caramel corn, and a bowl of creamy fruit dip with apple slices.
- Ice Cream Topping: Roughly chop the bark into smaller bits and use it as a decadent topping for vanilla bean or pumpkin spice ice cream. The crunch and flavor combination is absolutely divine.
- Hot Chocolate Garnish: Serve a warm mug of white hot chocolate and place a small shard of the bark on the saucer. It can be dunked or eaten alongside for a truly indulgent experience.
No matter how you choose to serve it, this bark is sure to be a hit. Its festive appearance and incredible taste make it a memorable part of any autumn celebration. Don’t be surprised when you see everyone coming back for more!
How To Store & Reuse White Chocolate Halloween Bark Leftovers
One of the best things about this recipe is that it makes a generous amount, so you’ll likely have some leftovers to enjoy after the party ends. Proper storage is key to keeping your White Chocolate Halloween Bark fresh and delicious for as long as possible. Thankfully, it’s incredibly easy to store.
The most important thing is to protect the bark from air, moisture, and heat. Chocolate can absorb odors from the refrigerator, so an airtight container is a must. I recommend storing the bark in a sealed container at a cool room temperature, like in a pantry or cupboard away from any appliances that generate heat. Stored this way, it will stay fresh for up to a week.
If your home is particularly warm, you can store it in the refrigerator. Just be aware that condensation can sometimes form on the chocolate when you take it out. If you do chill it, let the container sit on the counter for a few minutes before opening to minimize this. It will last for up to two weeks in the fridge.
Should you find yourself with extra bark, here are a few creative ways to reuse those delicious leftovers:
- Bark-Studded Cookies: Chop the bark into small, chocolate chip sized pieces and fold them into your favorite cookie dough. It adds a wonderful mix of textures and flavors to a simple sugar cookie or oatmeal cookie.
- Festive Trail Mix: Combine smaller pieces of the bark with popcorn, pretzels, dried cranberries, and extra pepitas for a sweet and salty Halloween snack mix.
- Melted for Drizzling: Gently melt down a few pieces of the bark in the microwave. Use the melted chocolate mixture to drizzle over brownies, cupcakes, or even a simple pound cake for an extra layer of flavor and decoration.
With these storage tips and reuse ideas, you can enjoy every last crumb of your Halloween creation. Nothing goes to waste in my kitchen, especially not something this tasty!
Substitutions & Variations For White Chocolate Halloween Bark
While I absolutely adore the sweet and salty combination in this recipe, one of the greatest things about bark is how easy it is to customize. Think of this recipe as a starting point for your own spooky creations. You can swap out nearly every ingredient to suit your tastes or use up what you have on hand in your pantry. It’s a wonderful way to get creative in the kitchen.
Feel free to experiment with different toppings and chocolate bases. Just remember to keep a good balance of flavors and textures, like something crunchy, something chewy, and something a little salty to complement the sweet chocolate.
Here are some fun substitutions and variations to get you started:
- Change the Chocolate: If white chocolate isn’t your favorite, this recipe works beautifully with milk chocolate, semi-sweet chocolate, or even dark chocolate. You could also get creative and swirl two types of chocolate together for a marbled effect.
- Swap the Candy: Instead of candy corn, try using chopped candy bars, Reese’s Pieces, M&Ms in Halloween colors, or even gummy worms pressed into the warm chocolate.
- Nutty Alternatives: If you don’t have pepitas, other roasted and salted nuts work wonderfully. Try chopped pecans, sliced almonds, or even pistachios for a lovely touch of green. For a nut-free version, use toasted sunflower seeds or crispy pretzel pieces.
- Add Some Fruit: For a different kind of chewiness and a touch of tartness, consider adding some dried fruit. Dried cranberries, chopped dried apricots, or dried cherries would all be delicious additions.
- Get Extra Spooky: Add a few drops of orange or green food coloring to the melted white chocolate before spreading it. You can also find edible candy eyeballs in most baking aisles, which are a super fun and spooky addition for the kids.
Don’t be afraid to mix and match these ideas. The possibilities are truly endless, and you might just discover a new family favorite variation of this White Chocolate Halloween Bark.
Candy Corn White Chocolate Halloween Bark
Ingredients
- 2 11oz packages of white chocolate baking chips. I used Ghirardelli
- 1 1/2 tbsp Halloween themed sprinkles. You can find Wilton brand on Amazon or at Michael's
- 3/4 C pumpkin spice candy corn (or regular, if you prefer regular)
- 1/4 C roasted, lightly salted pepitas
Instructions
- Line a 13x9 baking sheet with aluminum foil. Lightly spray with cooking spray. Wipe away any excess with a paper towel.
- Place the white chocolate chips in a large microwave safe bowl. I recommend a glass bowl. Heat in your microwave for 1 minute. Stir. Heat for 1 more minute. Stir. If the chips are completely melted now, you are finished. If they are not, microwave for about 20 more seconds. I microwaved for a total of 2 minutes 30 seconds.
- Pour the melted white chocolate chips into the baking pan. Smooth with the back side of a spoon. Top with the candy corn, the pepitas and then the sprinkles.
- Cover and refrigerate for 30 minutes or until firm. Once firm, break apart into pieces.
5 FAQs About White Chocolate Halloween Bark
Here are some straightforward answers to the most common questions I receive about this White Chocolate Halloween Bark recipe.
Why did my white chocolate seize when I was making Halloween bark?
Oh, seized chocolate is the worst! It goes from silky smooth to a thick, grainy mess in an instant. This almost always happens for one of two reasons: overheating or contact with water. White chocolate is particularly sensitive to high heat because it’s cocoa butter based. When you microwave it for too long or at too high a power, the cocoa butter and solids can separate and burn, causing it to clump up. That’s why I always recommend microwaving in short intervals and stirring frequently. The goal is to use the microwave to get the melting process started and then use the residual heat of the bowl and stirring to finish the job.
The other culprit is water. Even a tiny drop of water from a wet spoon or a stray bit of condensation can cause the sugar particles in the chocolate to crystallize and the entire mixture to seize. Always make sure your bowl, spatula, and any other utensils are perfectly dry before you begin. If your chocolate does seize, you can sometimes save it by vigorously stirring in a teaspoon of vegetable oil or melted shortening, but it’s best to prevent it from happening in the first place by being careful with heat and water.
Can I make this White Chocolate Halloween Bark ahead of time for a party?
Absolutely! This is one of the reasons I love this recipe so much for holiday entertaining. It’s the perfect make ahead dessert, which frees up your time on the day of the party. You can easily make this bark up to a week in advance. Simply follow the recipe as written, break the bark into pieces, and then store it in an airtight container.
For best results, I recommend keeping it in a cool, dark place like a pantry. This will protect the texture and prevent the chocolate from blooming, which is that chalky white film that can sometimes appear. If your house is very warm, the refrigerator is a safe bet. Just be sure the container is sealed tightly to prevent the chocolate from picking up any other food odors. When you’re ready to serve, just pull it out and arrange it on a platter. It will be just as delicious as the day you made it.
What are the best toppings for White Chocolate Halloween Bark besides candy corn?
The sky is the limit when it comes to toppings! While I love the classic look and taste of candy corn and pepitas, there are countless other options to explore. A great rule of thumb is to include a mix of textures and flavors. Think crunchy, chewy, salty, and sweet. For a Halloween theme, you can stick with orange, black, purple, and green colors.
Some fantastic alternatives include salty pretzels, which you can leave whole or crush into smaller pieces for a great crunch. Other candies like orange and black M&Ms or Reese’s Pieces add both color and a different chocolate or peanut butter flavor. For a different kind of crunch, try chopped nuts like pecans or walnuts, or even toasted coconut flakes. You could also crumble some cookies, like Oreos, over the top for a cookies and cream vibe. Don’t forget fun additions like edible glitter or candy eyeballs to really lean into the spooky theme. The best part is mixing and matching to find your family’s perfect combination.
How do I get clean breaks in my White Chocolate Halloween Bark?
Getting those perfect, crisp breaks is all about temperature and technique. First, make sure your bark is completely and thoroughly chilled. If it’s even slightly soft, it will bend and crumble rather than snap. I recommend at least 30 minutes in the refrigerator, but an hour is even better to be sure it’s rock solid. The thickness of your bark also plays a role; a thinner layer of chocolate will naturally snap more easily than a very thick one.
When it’s time to break it, you have two options. For a rustic, freeform look, simply lift the slab of bark and use your hands to snap it into pieces. For more control and cleaner edges, use a large, heavy chef’s knife. Place the bark on a sturdy cutting board, position the knife where you want to break it, and press down firmly and decisively. You should hear a satisfying snap. You can also score the chocolate with a knife before it fully sets if you want very uniform squares or rectangles, but I personally love the organic, shard like shapes.
Can I use a different type of chocolate for this Halloween Bark recipe?
Yes, you certainly can! This recipe is incredibly adaptable to other types of chocolate. If you’re a fan of richer flavors, semi-sweet or dark chocolate would be a wonderful base. The bitterness of dark chocolate provides a fantastic contrast to the sweet candy toppings. Milk chocolate is another great option if you’re making this primarily for kids, as it has a milder, creamier flavor that is always a crowd pleaser.
The melting process is virtually the same for all types of chocolate. Just use the same method of short intervals in the microwave with plenty of stirring to prevent scorching. You could even get creative and use two different kinds of chocolate. For a beautiful marbled effect, melt white chocolate and semi-sweet chocolate in separate bowls. Pour one onto the baking sheet, then drizzle the other over the top and use a skewer or toothpick to gently swirl them together before adding your toppings. It looks so impressive and gives you the best of both worlds in every bite.
Try These Recipes Next
If you loved how simple and festive this Halloween bark was, then I have a feeling you’ll enjoy these other sweet and spooky treats.
They are just as easy to whip up for your next party or get together.
- Halloween Cake Batter Fudge – this is a party favorite that brings a bit more flavor to the table for the non-chocolate lovers.
- Dark Chocolate Oreo Pretzel Bark – my personal favorite as an obsessive lover of dark chocolate.
- Candy Corn & M&M White Chocolate Fudge – this is another fantastic no bake recipe that puts that extra bag of candy corn to good use!
Let me know which one you decide to make first!
Love how easy this is and that you added pumpkin seeds!
Thanks so much, Karly! :)
GAH! I want to eat ALL OF THIS! Gorgeous photos too..as always!
Thanks for sharing my ghost cups! Pinned!
Thank you, Taylor!
How pretty! I love candy corn. I’ve done good by not buying any this year (yet). I love the pumpkins & the candy corn together. Yum! Thanks for sharing!
I’m not a huge candy corn fan but I like it in things. And I like it in this bark. It isn’t overpowering! Thanks so much for stopping by, Leslie. Glad you like the recipe. :)
This is so cute Julie! I think it would make such a fun party favor wrapped up in little cello bags. Love the pepitas in there ;)
Thank you, Allie!
Pingback: Candy Corn White Chocolate Halloween Bark | My Recipe Network
I am not a fan of Halloween but a fan of all the candy so my hand is up!! Love the pepitas here and white chocolate of course :)
Thank you, Zainab!
Pingback: simpleNewz - This Gal Cooks RSS Feed for 2014-10-10
Hi Julie! It’s funny. I’ve just got back to the UK after a looong time away and it seems while I’ve been away Halloween has become more of ‘a thing’. Well, at least as far as the shops are concerned! You seem to be able to buy Halloween themed everything now! I’m even thinking I should have something in stock for the trick or treaters this year, and this bark would be perfect for me! I don’t like to fuss around too much with things, so bark is one of my favourite things to make.
You’ve put the idea in my head to sit up watching scary movies this Halloween, too!
I think bark is my new favorite thing to make, Helen! I had been thinking about doing it for so long and don’t know why I didn’t do it sooner than I did. This weekend, I’m planning on making another type!
Yay for Halloween becoming more of a thing in the UK. It’s such a fun holiday! :)
This looks so good and I love how festive it is!
Thank you, Niki!
Julie, you had me at candy corn – wow, this looks like I could just reach through the screen and take a bite. I wish (maybe not, I’d eat the whole screen!) Pinned!
Thanks, Cindy!
This looks great Julie, I ‘m a total sucker for homemade candies :)
Thanks, Emily!
Halloween is my husband’s favorite holiday – he goes crazy with the decorations and costumes every year. I’m more about the treats :)This looks fantastic – love how pretty and festive it is!
I go crazy with the decorations, too. And OMG, wait until Christmas. I have always gone out of control with the Christmas lights, ever since I was a kid! So much fun. Thanks for stopping by, Kelly!
I don’t love Halloween, but I am all over this absolutely adorable bark! So SO cute. No one would be able to walk by this without grabbing some!
Thanks, Mary Frances!
This is so pretty and I love that you used the seeds!! YUM.
Thank you, Dorothy!
Wow–this recipe and your pictures got my attention in a big way. I haven’t made my own candy bark before and would like to try it. This would be such a hit at a Halloween party.
Thank you, Evie! Yes, this would be great at a Halloween party!
I cannot get enough of candy corn.. but here in Australia it is really hard to find! Definitely need to get my hands on some soon so I can create this awesome halloween bark! Great recipe.
Thank you, Thalia!
Pingback: Candy Corn White Chocolate Bark & More // Link Love - Glossy Blonde
Pingback: Show Stopper Saturday Link Party #62 with Spooky Halloween Treats
Pingback: Show Stopper Saturday Link Party #62 With Halloween Bark Features - Food Faith Fitness
This bark is so pretty!! I can’t get over how pretty it is, and it does look easy. The photos are beautiful too. I like Halloween for the baking and decorations, but it’s not my fave holiday…. It’s the pressure to come up with a costume that gets to me! Haha. I always stress about coming up with something novel and original, but never can. :) Hope you’re having a wonderful weekend!!
Thank you, Sarah! Ha, I know what you mean. I always wanted my costume to be different so I was always so indecisive as to what I would dress up as. So now I just don’t dress up!
Hope you had a great weekend and thank you for stopping by. :)
Pingback: Dark Chocolate Oreo Pretzel Bark | This Gal Cooks
Pingback: Halloween Treats
Pingback: Creative Halloween Treats
Pingback: Candy Corn M&M White Chocolate Fudge | This Gal Cooks
Pingback: Bientôt l’Halloween! De quoi avoir une faim de loup… |
Pingback: 35 Deliciously Festive Halloween Party Appetizers
Pingback: Pinterest Round Up {DIY Halloween Treats}
Pingback: Dive into these Fall Treats~ | Vizcaya
Pingback: Halloween Candy Recipes | Faithful Farmwife
Pingback: 15 Halloween Desserts That Are Spooky And Adorable All At The Same Time | Babel Buzz
Pingback: Hero Break » 15 Halloween Desserts That Are So F#%king Cute You’ll Want To Make Them ASAP
Pingback: 10 Halloween Recipes that Kids can make | The Southern Halloween Queen
Pingback: 20 Halloween Treats To Make With Kids | greens & chocolate
Pingback: 15 Recipes Using Leftover Halloween Candy (Part 2) - Style Motivation