
I Love Making This Yuzu Sushi Rice Recipe with a Bright Citrus Twist
The first time I tried to make sushi at home, my husband and I were trying to save a little money on date nights, and I figured, how hard could it be? I bought some beautiful tuna, nori, and all the fillings. The one thing I didn’t think too hard about was the rice. I just cooked up some long-grain rice we had in the pantry, and, well, it was a sticky, mushy disaster. The grains wouldn’t hold together for rolls, and the flavor was just plain flat. It was a humbling experience, to say the least.
That failure sent me down a rabbit hole. I was determined to master the heart of all good sushi: the perfectly seasoned sushi rice. I learned about the importance of rinsing, soaking, and the magic ratio of vinegar, sugar, and salt. After many, many batches, I finally nailed the texture and classic flavor. But you know me, I can never leave well enough alone. I wanted a little something extra, a signature touch that would make my homemade sushi taste like it came from a high-end restaurant.
The secret came from a tiny bottle of yuzu juice I’d picked up on a whim. Just a single teaspoon added to the vinegar seasoning completely transformed the rice. It adds this incredible, bright floral citrus note that cuts through the richness of fish and avocado without being overpowering. It’s a subtle change, but it makes all the difference. This recipe isn’t just about making rice, it’s about creating the most delicious foundation for all your sushi creations.
Why This Sushi Rice Recipe Works
Perfect sushi rice, or *shari* as it’s known in Japanese, is truly an art form, but it’s one you can absolutely master in your own kitchen. The tradition of seasoning steamed rice with vinegar dates back centuries in Japan, originally as a method of preserving fish. Over time, it evolved into the culinary staple we know and love, forming the literal foundation of every piece of sushi.
The magic of traditional sushi rice lies in its delicate balance. The vinegar provides a tangy brightness, the sugar adds a hint of sweetness that enhances the flavor of the seafood, and the salt rounds everything out. This careful balance is what makes the rice so much more than just a sticky grain. It becomes an active, flavorful component of the dish.
So, what makes my recipe stand out? It’s all about honoring that tradition while adding a modern, sophisticated twist. While the core technique is classic, the addition of yuzu juice to the seasoning is my secret weapon. Yuzu is an East Asian citrus fruit with a flavor profile that’s often described as a mix between a grapefruit and a mandarin orange, with delicate floral notes. It has a complexity that lemon or lime juice just can’t replicate.
Adding just a teaspoon of yuzu juice elevates the entire flavor profile. It introduces a fragrant, zesty aroma and a bright acidity that complements the rice vinegar beautifully. This small touch makes the rice taste lighter and cleaner, and it pairs exceptionally well with everything from rich, fatty tuna to simple cucumber and avocado. It turns great homemade sushi into unforgettable, restaurant-quality sushi. It’s that little detail that will have your guests asking for your secret.
Ingredients for Sushi Rice
The key to fantastic sushi rice is starting with the right ingredients. It’s a simple list, but the quality of each component truly matters. Don’t be tempted to swap in whatever you have in the pantry, because using the correct type of rice and vinegar is non-negotiable for achieving that authentic texture and flavor.
Here’s exactly what you’ll need to get started:
- 2 cups Japanese short-grain sushi rice
- 2 cups cold water, plus more for rinsing
- 1 (4-inch) square of kombu (dried kelp)
- 1/2 cup unseasoned rice vinegar
- 3 tablespoons granulated sugar
- 1 1/2 teaspoons fine sea salt
- Twist Ingredient: 1 teaspoon yuzu juice
Let’s talk about a few of these key players. First, the rice. You absolutely must use Japanese short-grain rice. Brands like Nishiki, Kokuho Rose, or Tamanishiki are excellent choices. This type of rice has a high starch content that gives it the perfect sticky, yet distinct, texture once cooked. Long-grain or medium-grain rice simply will not work, as they won’t cling together properly.
Next up is the kombu. This is a dried sea kelp that you can find in the international aisle of most grocery stores or at an Asian market. While you *can* make the rice without it, I highly recommend using it. Soaking it with the rice infuses the water with a subtle, savory umami flavor that adds incredible depth. It’s a background note you might not be able to pinpoint, but you’d miss it if it were gone.
Finally, my special twist, the yuzu juice. You can find bottled yuzu juice at specialty food stores, Asian markets, or online. A little goes a long way, and it brings a bright, aromatic citrus flavor that truly elevates the finished rice. It’s the secret that makes this recipe uniquely mine and soon to be uniquely yours.
Step-by-Step Instructions For Making Sushi Rice
Making perfect sushi rice is all about the technique. Follow these steps carefully, and don’t rush the process. Each stage, from rinsing to fanning, plays a crucial role in achieving that glossy, perfectly seasoned, and wonderfully textured result. Grab your apron, and let’s get cooking!
Step 1: Rinse and Soak the Rice
This is the most important step for getting the right texture. Place your two cups of short-grain rice in a large bowl. Cover it with cold water and use your hand to swirl the grains around vigorously. You’ll see the water immediately turn milky white. This is the excess surface starch, which we need to remove to prevent gummy rice. Carefully pour off the cloudy water. Repeat this process about four or five times. Your goal is for the water to be mostly clear, not perfectly crystal clear. Once rinsed, drain the rice very well in a fine-mesh sieve for a few minutes to remove all excess water.
Step 2: Cook the Rice with Kombu
Transfer the well-drained rice to your rice cooker pot or a medium, heavy-bottomed saucepan with a tight-fitting lid. Add the two cups of fresh cold water. Before adding the kombu, take a moment to gently wipe any white powder or grit from its surface with a damp cloth, but don’t wash it, as that’s where the flavor is. Submerge the kombu square in the water with the rice. Let the rice and kombu soak together for at least 30 minutes. This soaking period allows the grains to hydrate evenly, which is key for a uniform cook.
Step 3: Simmer and Steam
If you’re using a rice cooker, simply press the “cook” button. The machine will handle the rest. For the stovetop method, bring the water to a rolling boil over high heat. The moment it starts to boil, use tongs to remove and discard the kombu. Immediately place the lid on the pot, reduce the heat to the absolute lowest setting your stove can manage, and let it simmer for exactly 15 minutes. Do not peek! After 15 minutes, turn off the heat and let the pot sit, still covered, for another 10 minutes to steam. This final steaming step is crucial for perfectly fluffy grains.
Step 4: Prepare the Yuzu-Vinegar Seasoning
While the rice is steaming, you can make the seasoning. In a small saucepan (make sure it’s non-reactive, like stainless steel or enamel, as vinegar can react with metals like aluminum or copper), combine the rice vinegar, sugar, and fine sea salt. Warm this mixture over low heat, stirring constantly, just until the sugar and salt crystals have completely dissolved. You don’t want it to simmer or boil. Once everything is dissolved, remove it from the heat and stir in that lovely teaspoon of yuzu juice.
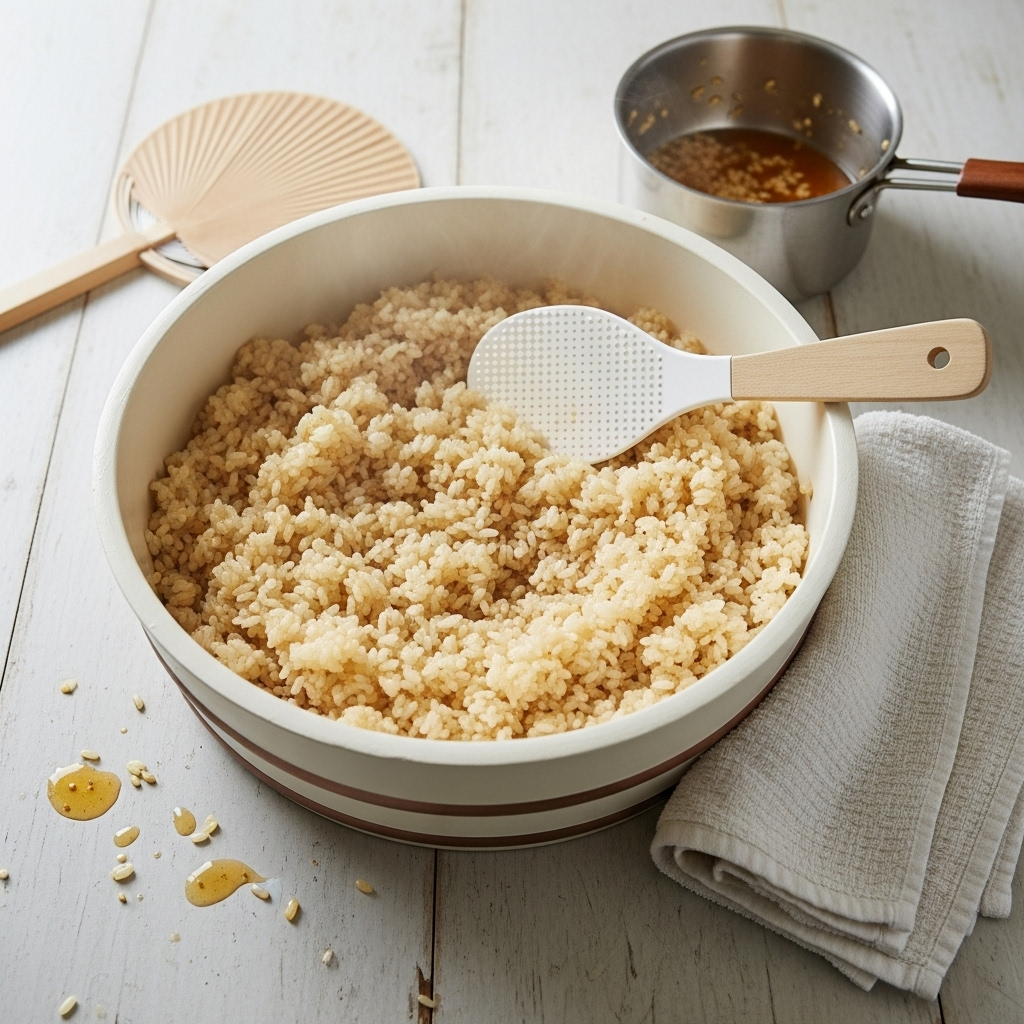
Step 5: Season and Fan the Rice
This is the final, fun part! Immediately after the rice has finished steaming, dump it into a large, non-metallic bowl. A traditional wooden bowl called a *hangiri* is ideal because it absorbs excess moisture, but a large glass or ceramic bowl will also work just fine. Use a rice paddle or a spatula to gently spread the hot rice out. Drizzle the yuzu-vinegar seasoning all over the surface of the rice. Now, using your paddle, start mixing with a gentle “cutting” or slicing motion. You want to fold the rice over itself to incorporate the seasoning, not stir or mash it. As you are cutting and folding, use your other hand to fan the rice vigorously with a fan, a magazine, or a piece of cardboard. This cools the rice down quickly, which stops the cooking process, helps evaporate extra moisture, and gives the rice its signature beautiful sheen. Continue until the seasoning is evenly distributed and the rice is about body temperature. Cover with a damp kitchen towel until you’re ready to use it.
How To Serve Sushi Rice
Once you’ve mastered this beautiful, glossy sushi rice, the possibilities are endless! Of course, the most traditional use is for making sushi, and having a great rice base will make your homemade rolls and nigiri taste a thousand times better. Don’t be intimidated by rolling. With a simple bamboo mat, it’s easier than you think to create beautiful maki rolls with your favorite fillings like cucumber, avocado, and crab or spicy tuna.
But you don’t have to stop at traditional sushi. One of my favorite easy weeknight meals is a deconstructed sushi bowl, also known as a Chirashi bowl. It gives you all the flavors of sushi with none of the rolling. Simply scoop a generous portion of this yuzu-seasoned rice into a bowl and get creative with your toppings.
Here are a few ideas to get you started on serving your perfect sushi rice:
- Classic Maki Rolls: Lay a sheet of nori on a bamboo mat, spread a thin layer of rice, add your fillings (like salmon, avocado, and cream cheese), and roll it up tight. Slice and serve with soy sauce, wasabi, and pickled ginger.
- Nigiri: This is the simplest form of sushi. Just form a small oblong mound of rice in your hand and top it with a slice of high-quality, sushi-grade fish like tuna, salmon, or yellowtail.
- Sushi Bowls (Chirashi): Top a bowl of sushi rice with cubed sashimi, edamame, sliced avocado, cucumber ribbons, shredded carrots, and a sprinkle of sesame seeds. Drizzle with a little spicy mayo or eel sauce for a complete meal.
- Onigiri (Japanese Rice Balls): Use wet, salted hands to form the rice into triangles or balls. You can tuck a small filling inside, like salted salmon or pickled plum, and wrap it in a small strip of nori. They make a perfect portable snack or lunch.
You can even use it as a base for a fantastic poke bowl. The bright, citrusy notes from the yuzu in the rice pair wonderfully with the marinated fish in a poke. No matter how you choose to serve it, this rice provides a delicious and impressive foundation.
How To Store & Reuse Sushi Rice Leftovers
Let’s be honest, fresh is always best when it comes to sushi rice. The texture and flavor are at their absolute peak on the day it’s made. The seasoning helps preserve it for a bit, but once refrigerated, the starches in the rice begin to retrograde, causing the grains to become hard and dry. It loses that wonderful soft and fluffy texture that you worked so hard to achieve.
Because of this, I always recommend trying to make just the amount of rice you think you’ll need for your meal. However, we all misjudge quantities sometimes, and it would be a shame to waste any of this delicious rice. If you do find yourself with leftovers, do not despair. While it won’t be quite the same for making delicate sushi rolls again, there are still some great ways to enjoy it.
Here’s the best way to store and revive leftover sushi rice:
- Storage: The key is to prevent the rice from drying out as much as possible. Let the rice cool completely to room temperature. Then, place it in an airtight container or wrap it tightly in plastic wrap. You can store it in the refrigerator for up to two days. Avoid leaving it out at room temperature for more than a few hours.
- Reheating: To bring some life back into the hardened rice, you’ll need to gently steam it. The easiest way is in the microwave. Place the rice in a microwave-safe bowl, cover it with a damp paper towel, and heat it in 30-second intervals. Fluff it with a fork between intervals until it’s warmed through and has softened up.
- Reusing: Once reheated, the texture is best suited for dishes where it’s a component rather than the star. It makes fantastic fried rice! The seasoned flavor is already there, so you just need to add some veggies, egg, and a protein. You can also use it to bulk up soups or even form it into patties and pan-fry them until crispy to make little rice cakes.
So while it might not be destined for another round of nigiri, your leftover sushi rice can still be transformed into another delicious and easy meal. A little creativity in the kitchen ensures nothing goes to waste.
Substitutions & Variations For Sushi Rice
While this recipe for sushi rice is crafted for a very specific outcome, there’s always a little room to play, especially if you’re in a pinch or want to experiment with different flavor profiles. The most important thing is to understand which ingredients are core to the technique and which can be swapped.
The Japanese short-grain rice is the one non-negotiable. Its unique starch content is essential for the correct texture. However, for the seasoning and aromatics, you have a few options. These substitutions can help if you’re missing an ingredient or want to accommodate a dietary need, while the variations can add a new dimension to your rice.
Here are some simple substitutions and fun variations to try:
- For the Rice Vinegar: If you don’t have unseasoned rice vinegar, you can use apple cider vinegar in a pinch. It will have a slightly fruitier, more assertive flavor, but it will work. Just be sure not to use a heavily flavored or seasoned vinegar, as it will overpower the delicate balance.
- For the Sugar: If you’re looking to reduce refined sugar, you can substitute it with an equal amount of honey or maple syrup, though they will add their own distinct flavors. For a sugar-free option, a granulated monk fruit sweetener can also work well. Dissolve it into the vinegar just as you would with regular sugar.
- For the Kombu: If you can’t find kombu, you can simply omit it. Your rice will be missing that subtle layer of umami, but it will still be delicious. Don’t try to substitute it with other seaweeds like nori, as the flavor is very different.
- Flavor Variations: Once the rice is seasoned and cooled, try folding in some extra ingredients for more flavor and texture. Toasted black or white sesame seeds are a classic addition. Finely chopped shiso leaf adds a wonderful, minty-basil note. You can also sprinkle in some furikake, a Japanese seasoning blend that often includes seaweed, sesame seeds, and dried fish.
Remember, the goal is to create a balanced and delicious foundation. Feel free to make small adjustments to the sugar or salt levels to suit your personal taste. Cooking is all about making a recipe your own, and this one is a perfect canvas for a little bit of creative flair.
Perfect Sushi Rice with a Yuzu Twist
Description: A foolproof recipe for classic sushi rice made with authentic techniques and elevated with a bright, citrusy twist of yuzu juice. Perfect for homemade sushi rolls, nigiri, and bowls.
Yield: 6 cups | Category: Side Dish | Cuisine: Japanese
Prep Time: 40 minutes | Cook Time: 25 minutes
Ingredients
- 2 cups Japanese short-grain sushi rice
- 2 cups cold water, plus more for rinsing
- 1 (4-inch) square of kombu (dried kelp)
- 1/2 cup unseasoned rice vinegar
- 3 tablespoons granulated sugar
- 1 1/2 teaspoons fine sea salt
- 1 teaspoon yuzu juice
Instructions
- Rinse rice in a bowl with cold water, swirling and draining, until water runs mostly clear (4-5 times). Drain well.
- Combine rinsed rice, 2 cups fresh water, and kombu in a rice cooker or saucepan. Let soak for 30 minutes.
- Cook rice according to rice cooker instructions. Or, on the stovetop, bring to a boil, remove kombu, cover, reduce heat to low, and simmer for 15 minutes.
- Remove from heat and let steam, covered, for 10 minutes.
- Meanwhile, warm vinegar, sugar, and salt in a small saucepan over low heat until dissolved. Do not boil. Remove from heat and stir in yuzu juice.
- Transfer hot rice to a large non-metallic bowl. Drizzle with the yuzu-vinegar seasoning.
- Use a rice paddle to “cut” and fold the seasoning into the rice while fanning vigorously to cool.
- Once cooled to body temperature, cover with a damp towel until ready to use. Best used the same day.
Notes
Using a wooden bowl (hangiri) helps absorb excess moisture for better texture. Fanning the rice is crucial for achieving the signature glossy sheen of authentic sushi rice.
Servings: 8 | Calories: 250 kcal | Fat: 0g | Carbohydrates: 55g | Protein: 4g
5 FAQs About Sushi Rice
Here are some straightforward answers to the most common questions I receive about this sushi rice recipe.
What is the best kind of rice for making sushi rice?
This is probably the most important question, because the type of rice you use is the single biggest factor in your success. The only rice you should use is a Japanese-style short-grain white rice. Brands like Nishiki, Calrose, Kokuho Rose, or Tamanishiki are specifically cultivated for this purpose. The reason comes down to starch. These varieties have a high concentration of a specific type of starch that makes the grains plump, slightly sticky, and able to cling together perfectly when cooked and seasoned.
You should absolutely avoid using other types of rice. Long-grain rice, like Basmati or Jasmine, cooks up into separate, fluffy grains and simply will not hold its shape for sushi. Medium-grain rice, like Arborio (used for risotto), is also not ideal as it creates a creamy texture rather than the distinct-yet-sticky one you need. Brown rice can be used, but it has a much firmer texture and requires different water ratios and cooking times, so it’s not a simple one-to-one swap for this recipe. For authentic results, stick with the short-grain white rice.
Can I make sushi rice without a rice cooker?
Yes, you absolutely can! While a Japanese rice cooker is designed to cook short-grain rice to perfection and is incredibly convenient, you can achieve fantastic results on the stovetop with a good, heavy-bottomed saucepan or pot that has a tight-fitting lid. The heavy bottom is important because it distributes heat more evenly, which helps prevent the rice at the bottom from scorching before the rice at the top is cooked.
The key to the stovetop method is heat management and resisting the urge to peek. Following the instructions in the recipe is critical: bring it to a boil, immediately drop the heat to the absolute lowest setting, and let it simmer without lifting the lid for the full 15 minutes. The final 10-minute steaming period off the heat is also mandatory. This allows the moisture to redistribute evenly throughout the pot, ensuring every grain is perfectly cooked. As long as you have a good pot and follow the timing precisely, your stovetop sushi rice will be just as good as any made in a machine.
Why is my sushi rice mushy or hard?
The texture of sushi rice is a delicate balance, and it’s easy to end up with a batch that’s too mushy or too hard. If your rice is mushy, the most likely culprit is either too much water or insufficient rinsing. If you don’t rinse the rice enough, the excess surface starch will gelatinize and create a gummy, paste-like consistency. Similarly, if your rice-to-water ratio is off, even by a little, it can turn the rice into mush. Always measure carefully and rinse until the water is mostly clear.
On the other hand, if your rice is hard or crunchy in the center, it’s usually due to not enough water, or not allowing the rice to soak and steam properly. The 30-minute soaking period is crucial for allowing the grains to absorb water before the cooking process begins. If you skip this, the outside of the grain can cook before the inside has had a chance to hydrate. Similarly, skipping the final 10-minute steam means the rice doesn’t have time to finish cooking in the residual heat, leaving you with undercooked grains. Follow the ratios and times exactly for the best results.
Do I have to use rice vinegar in sushi rice?
For the most authentic flavor, unseasoned rice vinegar is the gold standard for making sushi rice. It has a mild, clean acidity that is less harsh than many other kinds of vinegar, which allows it to complement the rice and fish without overpowering them. It’s specifically chosen for its delicate flavor profile. You’ll also want to make sure you buy “unseasoned” rice vinegar. “Seasoned” rice vinegar already contains sugar and salt, so if you use it, you’ll need to omit the sugar and salt from the recipe, and you won’t be able to control the balance of flavors yourself.
If you are in a situation where you absolutely cannot find rice vinegar, you could substitute it with apple cider vinegar or white wine vinegar. However, be aware that both of these are more acidic and have stronger flavors. You may want to use slightly less and adjust the sugar to balance the sharpness. I would avoid using plain white distilled vinegar, as its flavor is much too harsh and sharp for the delicate nature of sushi.
What is the purpose of fanning the sushi rice?
Fanning the rice while you mix in the vinegar seasoning is a critical and classic step in the process, and it does two very important things. First, it cools the rice down rapidly. This is important because it stops the rice from continuing to cook in its own residual heat, which helps prevent it from becoming mushy. It also helps to evaporate any excess surface moisture from both the rice and the liquid seasoning you just added.
Second, and perhaps more importantly, this rapid cooling and evaporation process is what gives authentic sushi rice its beautiful, characteristic sheen or gloss. As the starchy surface of the rice cools quickly, it creates a lovely, appealing luster on each grain. This step simultaneously seasons the rice, cools it to the proper temperature for making sushi, and gives it the perfect cosmetic finish. It might feel a little dramatic, but don’t skip the fanning. It truly makes a difference in the final product.
Try These Recipes Next
Now that you’re a pro at making perfect sushi rice, here are a few delicious recipes where you can put it to good use!
- Spicy California Sushi Bowl: All the classic flavors of a California roll, deconstructed in an easy and satisfying bowl.
- A Really Good Salmon Rice Bowl: A simple, healthy, and incredibly flavorful bowl featuring perfectly cooked salmon over a bed of your amazing rice.
- Teriyaki Salmon with Sesame Asparagus: While not a traditional sushi dish, this teriyaki salmon is a perfect partner for a side of your citrus-kissed sushi rice.
I hope you enjoy making these dishes just as much as my family and I do.