
My Favorite Sourdough Bread Recipe After Five Years Of Weekly Baking
My journey with sourdough bread began like many others during those long, uncertain days of lockdown, when flour became as precious as gold and everyone suddenly became amateur bakers.
I’d always been intimidated by sourdough. The whole process seemed so mysterious and scientific, with all that talk of “feeding” starters and “developing gluten structure.”
But with time suddenly on my hands and nowhere to go, I figured, why not give it a shot?
Little did I know that first humble loaf would spark a full-blown obsession that’s still going strong years later. There’s something almost magical about creating something so delicious from just flour, water, and salt: ingredients so basic they’ve been pantry staples since, well, forever
My first attempts were… let’s just say they were better suited as doorstops than dinner companions. Flat, dense discs that barely resembled bread.
But each failure taught me something, and eventually, those sad little pancakes transformed into gorgeous, crackling loaves with that perfect open crumb that makes sourdough enthusiasts swoon.
What I love most about sourdough isn’t just the incredible flavor (though that tangy, complex taste is definitely worth the effort). It’s the connection to something ancient and fundamental. People have been making naturally leavened bread for thousands of years, long before commercial yeast existed. When I pull a golden loaf from my oven, I feel connected to that tradition in a way that’s hard to describe but deeply satisfying.
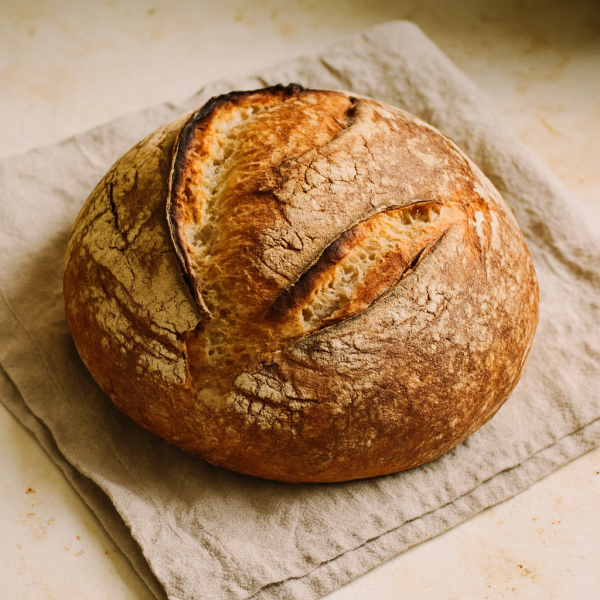
The recipe I’m sharing today is my go-to, never-fail sourdough bread. It’s approachable enough for beginners but produces results that will make you feel like a professional baker. The crust shatters when you slice into it, revealing a tender, chewy interior with those beautiful irregular holes that catch pools of melting butter or olive oil.
And that smell? There’s nothing that makes a house feel more like a home than the aroma of freshly baked sourdough.
Yes, this recipe takes time. But most of that time is hands-off, letting the dough do its thing while you go about your day. The actual work involved is minimal, I promise.
So grab your starter (don’t have one yet? I’ll share how to make or obtain one), and let’s create some sourdough magic together. Trust me, once you’ve experienced the satisfaction of pulling your very own perfect loaf from the oven, there’s no going back to store-bought bread.
INGREDIENTS YOU’LL NEED
For the Levain (Pre-ferment):
- 50g active sourdough starter (fed within the last 12 hours)
- 50g bread flour
- 50g whole wheat flour
- 100g filtered water, room temperature
For the Main Dough:
- All of the prepared levain
- 400g bread flour
- 100g whole wheat flour
- 350g filtered water, room temperature
- 10g fine sea salt
- Rice flour for dusting (optional, but helps prevent sticking)
NOTES ABOUT THE INGREDIENTS
When the ingredient list is this simple, the qualities of each ingredient make a huge difference, so we need to talk each ingredient a bit more in-depth than I usually do for recipes.
Sourdough Starter
Your starter should be active and bubbly before using it in this recipe. If you pull a spoonful of it and it floats in water, that’s a good sign it’s ready to use. Don’t have a starter yet? You can make your own (which takes about 7-10 days) or ask a friend for some of theirs. Many local bakeries will also share or sell starter if you ask nicely!
Flour Choices
I use a combination of bread flour and whole wheat for the perfect balance of structure and flavor. The bread flour provides the gluten strength needed for those beautiful air pockets, while the whole wheat adds a nutty depth that makes this bread special. You can adjust the ratio slightly, but I wouldn’t go below 70% bread flour if you want that classic open crumb.
Water Quality
Chlorinated tap water can inhibit fermentation, so I recommend using filtered water if possible. If you only have tap water, let it sit out overnight to allow the chlorine to dissipate before using it in your dough.
Salt
Fine sea salt dissolves more easily in dough than kosher salt, but either will work. Just don’t skip it! Salt not only adds flavor but also strengthens the gluten structure and controls fermentation rate.
Rice Flour
While optional, a light dusting of rice flour in your proofing basket creates a beautiful contrast on the finished loaf and is much more effective at preventing sticking than regular flour. It’s worth keeping some on hand if you plan to bake sourdough regularly.
HOW TO MAKE SOURDOUGH BREAD
Time to get started. Keep in mind that this is a two-day process.
STEP 1: BUILD YOUR LEVAIN
In a medium bowl, combine 50g active sourdough starter, 50g bread flour, 50g whole wheat flour, and 100g filtered water. Mix until no dry flour remains. Cover with a clean kitchen towel or plastic wrap and let sit at room temperature (68-72°F) for 4-6 hours, or until doubled in size with a bubbly surface.
Tip: Timing matters here! Your levain should be at its peak when you mix the final dough. If your kitchen is cold, it might take longer; if it’s warm, it could be ready sooner. Look for a domed surface with bubbles and a pleasant, yogurty smell.
STEP 2: AUTOLYSE THE FLOUR
About 1 hour before your levain is ready, in a large mixing bowl, combine 400g bread flour, 100g whole wheat flour, and 325g of the water (reserve 25g for later). Mix by hand until no dry flour remains. Cover and let rest for 1 hour. This step allows the flour to fully hydrate and begins gluten development.
Tip: Use your hands for mixing—you’ll get a better feel for the dough, and it’s actually easier to clean up than a spoon or spatula!
STEP 3: COMBINE LEVAIN AND DOUGH
When your levain is ready, add all of it to the autolysed dough. Use wet hands to pinch and fold the dough to fully incorporate the levain. Cover and rest for 30 minutes.
Tip: Keep a bowl of water nearby to wet your hands whenever the dough gets sticky. This works much better than adding more flour, which can make your bread dense.
STEP 4: ADD SALT
Sprinkle 10g salt over the dough and add the remaining 25g water. Use your fingers to work the salt into the dough until fully incorporated. The dough will initially feel like it’s coming apart, but keep working it gently and it will come back together.
Tip: Don’t rush this step! Proper salt incorporation is crucial for flavor and dough strength.
STEP 5: BULK FERMENTATION WITH STRETCH AND FOLDS
This is where the magic happens! Over the next 4-6 hours, you’ll perform a series of “stretch and folds” to develop the dough’s strength while it ferments.
First stretch and fold: Wet your hands, then grab one side of the dough, stretch it up and fold it over to the opposite side. Rotate the bowl 90 degrees and repeat. Do this for all four sides of the dough. Cover and rest for 30 minutes.
Remaining stretch and folds: Repeat this process 4-6 more times, with 30-minute rests in between. You’ll notice the dough becoming smoother, stronger, and more cohesive with each set.
After your final stretch and fold, cover the dough and let it continue to ferment until it has increased in volume by about 50% and you can see bubbles around the edges and on the surface. This usually takes 1-2 more hours after the final fold.
Tip: The bulk fermentation is complete when the dough feels puffy and alive, with a slightly domed surface. If you’re not sure, it’s better to slightly under-ferment than over-ferment at this stage.
STEP 6: PRE-SHAPE THE DOUGH
Gently turn the dough out onto a lightly floured work surface. Using a bench scraper or your hands, fold the edges toward the center to create a rough round shape. Flip the dough over so the seam side is down. Let it rest, uncovered, for 20-30 minutes.
Tip: This brief rest, called the “bench rest,” allows the gluten to relax before the final shaping, making it easier to create tension in the next step.
STEP 7: FINAL SHAPE
Lightly dust a banneton (proofing basket) or a bowl lined with a clean kitchen towel with rice flour.
For the final shape, gently flip your dough so the smooth side is down. Pull the edges toward the center again, creating a tight package. Flip the dough over and, using your hands or a bench scraper, drag the dough toward you on the countertop. The friction between the dough and the surface will create tension on the top of the loaf. Rotate and repeat until you have a tight, smooth ball.
Carefully transfer the dough to your prepared banneton or bowl, seam side up.
Tip: The final shaping is crucial for a well-risen loaf. You want to create enough surface tension without tearing the dough or pressing out too many air bubbles.
STEP 8: COLD PROOF
Cover your banneton with a plastic bag or damp towel and place it in the refrigerator for 12-16 hours. This slow, cold fermentation develops flavor and makes the dough easier to handle and score.
Tip: The dough can stay in the fridge for up to 24 hours if needed, giving you flexibility with your baking schedule.
STEP 9: PREHEAT YOUR OVEN
Place a Dutch oven with its lid on in your oven and preheat to 500°F (260°C) for at least 45 minutes.
Tip: A proper preheat is essential! The hot Dutch oven creates steam that helps your bread rise and develop that beautiful crispy crust.
STEP 10: SCORE AND BAKE
When your oven is preheated, remove the dough from the refrigerator. Cut a piece of parchment paper slightly larger than your loaf and place it over the banneton. Place a cutting board or plate over the parchment, then flip everything over so the dough is now on the parchment paper.
Using a very sharp knife, razor blade, or bread lame, score the top of your dough with a single confident slash about ¼-inch deep, or create a more decorative pattern if you’re feeling artistic.
Carefully remove the hot Dutch oven from the oven. Using the parchment paper as a sling, lower your dough into the Dutch oven. Cover with the lid and return to the oven.
Reduce the oven temperature to 450°F (230°C) and bake for 20 minutes with the lid on.
After 20 minutes, remove the lid and continue baking for another 20-25 minutes, until the crust is deep golden brown.
Tip: Don’t be afraid of a dark crust! That’s where the flavor is. If your bread is getting too dark too quickly, you can lower the temperature slightly for the final 10 minutes.
STEP 11: COOL COMPLETELY
Remove the bread from the Dutch oven and place it on a wire rack. The hardest part comes next—waiting! Allow the bread to cool completely, at least 2 hours, before slicing.
Tip: I know it’s tempting to cut into that warm, fragrant loaf right away, but the cooling period is actually part of the baking process. Cutting too soon will give you a gummy texture instead of that perfect chewy crumb.
TROUBLESHOOTING TIPS
- f your dough feels excessively sticky after adding the levain, you can add a tablespoon or two of additional flour during the stretch and fold process.
- If your bread doesn’t rise, make sure your starter is very active before beginning, perform enough stretch and folds, and ensure your Dutch oven is properly preheated.
- If your crust is too pale, you might need to bake longer with the lid off. Don’t be afraid of a deeply caramelized crust—it’s full of flavor!
- If your crumb is too dense at the bottom, try extending the bulk fermentation by 30-60 minutes before shaping.

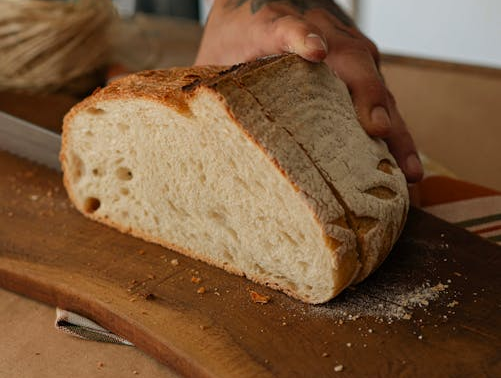
5-Year Sourdough Bread Recipe
This classic sourdough bread features a crackling crust and tender, open crumb with that distinctive tangy flavor. Made with just flour, water, salt, and active sourdough starter, this recipe produces bakery-quality bread right in your home kitchen.
Ingredients
- For the Levain
- 50g active sourdough starter (fed within the last 12 hours)
- 50g bread flour
- 50g whole wheat flour
- 100g filtered water, room temperature
- For the Main Dough
- All of the prepared levain
- 400g bread flour
- 100g whole wheat flour
- 350g filtered water, room temperature
- 10g fine sea salt
- Rice flour for dusting (optional)
Instructions
Day 1: Prepare the Levain
- In a medium bowl, combine 50g active sourdough starter, 50g bread flour, 50g whole wheat flour, and 100g filtered water.
- Mix until no dry flour remains. Cover with a clean kitchen towel or plastic wrap.
- Let sit at room temperature (68-72°F) for 4-6 hours, or until doubled in size with a bubbly surface.
Make the Dough
- About 1 hour before your levain is ready, in a large mixing bowl, combine 400g bread flour, 100g whole wheat flour, and 325g of the water (reserve 25g for later).
- Mix by hand until no dry flour remains. Cover and let rest for 1 hour.
- When your levain is ready, add all of it to the autolysed dough. Use wet hands to pinch and fold the dough to fully incorporate the levain. Cover and rest for 30 minutes.
- Sprinkle 10g salt over the dough and add the remaining 25g water. Use your fingers to work the salt into the dough until fully incorporated. Cover and rest for 30 minutes.
- Perform the first stretch and fold: Wet your hands, then grab one side of the dough, stretch it up and fold it over to the opposite side. Rotate the bowl 90 degrees and repeat. Do this for all four sides of the dough. Cover and rest for 30 minutes.
- Repeat the stretch and fold process 4-6 more times, with 30-minute rests in between.
- After your final stretch and fold, cover the dough and let it continue to ferment until it has increased in volume by about 50% and you can see bubbles around the edges and on the surface (usually 1-2 more hours).
Shape and Cold Proof
- Gently turn the dough out onto a lightly floured work surface. Using a bench scraper or your hands, fold the edges toward the center to create a rough round shape. Flip the dough over so the seam side is down. Let it rest, uncovered, for 20-30 minutes.
- Lightly dust a banneton or a bowl lined with a clean kitchen towel with rice flour.
- For the final shape, gently flip your dough so the smooth side is down. Pull the edges toward the center again, creating a tight package. Flip the dough over and, using your hands or a bench scraper, drag the dough toward you on the countertop to create tension on the top of the loaf. Rotate and repeat until you have a tight, smooth ball.
- Carefully transfer the dough to your prepared banneton or bowl, seam side up.
- Cover your banneton with a plastic bag or damp towel and place it in the refrigerator for 12-16 hours.
Day 2: Bake the Bread
- Place a Dutch oven with its lid on in your oven and preheat to 500°F (260°C) for at least 45 minutes.
- When your oven is preheated, remove the dough from the refrigerator. Cut a piece of parchment paper slightly larger than your loaf and place it over the banneton. Place a cutting board or plate over the parchment, then flip everything over so the dough is now on the parchment paper.
- Using a very sharp knife, razor blade, or bread lame, score the top of your dough with a single confident slash about ¼-inch deep, or create a more decorative pattern.
- Carefully remove the hot Dutch oven from the oven. Using the parchment paper as a sling, lower your dough into the Dutch oven. Cover with the lid and return to the oven.
- Reduce the oven temperature to 450°F (230°C) and bake for 20 minutes with the lid on.
- After 20 minutes, remove the lid and continue baking for another 20-25 minutes, until the crust is deep golden brown.
- Remove the bread from the Dutch oven and place it on a wire rack. Allow the bread to cool completely, at least 2 hours, before slicing.
Notes
Your starter should be active and bubbly before using it in this recipe. If you pull a spoonful of it and it floats in water, that's a good sign it's ready to use.
Use your hands for mixing—you'll get a better feel for the dough, and it's actually easier to clean up than a spoon or spatula!
Keep a bowl of water nearby to wet your hands whenever the dough gets sticky. This works much better than adding more flour, which can make your bread dense.
The bulk fermentation is complete when the dough feels puffy and alive, with a slightly domed surface. If you're not sure, it's better to slightly under-ferment than over-ferment at this stage.
Don't be afraid of a dark crust! That's where the flavor is. If your bread is getting too dark too quickly, you can lower the temperature slightly for the final 10 minutes.
I know it's tempting to cut into that warm, fragrant loaf right away, but the cooling period is actually part of the baking process. Cutting too soon will give you a gummy texture instead of that perfect chewy crumb.
SOURDOUGH BREAD RECIPE VARIATIONS & SUBSTITUTIONS
This sourdough bread recipe can be adjusted in many different ways, depending on your needs and preferences.
Flour Alternatives
If you don’t like regular flour, use one of these instead.
All-Purpose Flour Instead of Bread Flour
If you don’t have bread flour, you can substitute all-purpose flour. Your bread will still turn out delicious, though the crumb might be slightly less open and the crust a bit softer. For the best results with all-purpose flour, reduce the water by about 25g since it doesn’t absorb quite as much moisture as bread flour.
Whole Wheat Variations
Want a heartier loaf? You can increase the whole wheat flour up to 50% of the total flour weight. Just be aware that more whole wheat will result in a denser loaf with a more pronounced wheat flavor. You may need to add an extra 25-50g of water, as whole wheat flour absorbs more moisture.
Specialty Flour Additions
For interesting flavor variations, replace up to 50g of the bread flour with:
- Rye flour for a complex, slightly tangy flavor
- Spelt flour for a nutty, sweet character
- Einkorn flour for a buttery, ancient grain experience
Tip: When working with specialty flours, start with small amounts (10-20% of total flour) until you get comfortable with how they affect your dough handling and final bread texture.
Add-Ins for Flavor
Adding these into the dough will provide additional flavor profiles.
Seeded Sourdough
For a seeded variation, add 75-100g of mixed seeds during the final stretch and fold. Try combinations of:
- Sunflower seeds
- Pumpkin seeds
- Sesame seeds
- Flax seeds
- Poppy seeds
Toast the seeds lightly before adding for enhanced flavor.
Herb and Garlic Sourdough
During the final stretch and fold, incorporate:
- 2-3 tablespoons fresh rosemary, chopped
- 4-6 cloves roasted garlic, roughly chopped
- 1 tablespoon olive oil (optional, adds richness)
Olive Sourdough
Fold in 100g of pitted, chopped olives (Kalamata, green, or a mix) during the final stretch and fold. Pat them dry first to avoid adding too much moisture to the dough.
Cranberry Walnut Sourdough
Add 75g dried cranberries and 75g toasted, chopped walnuts during the final stretch and fold for a sweet-savory combination that makes incredible toast.
No Dutch Oven? Try These Alternatives
The baking method makes a big difference. Adjust the recipe as follows if you need to use something other than a dutch oven.
Baking Stone or Steel with Steam
If you have a baking stone or steel, preheat it in the oven. Place the dough on parchment paper on a pizza peel or inverted baking sheet, then slide it onto the hot stone. Create steam by placing a cast iron pan on the bottom rack during preheating, then carefully pouring 1 cup of boiling
water into it when you add the bread.
Covered Roasting Pan
A stainless steel or cast iron roasting pan with a lid can work similarly to a Dutch oven. Preheat the pan and lid separately, then carefully place your dough in the hot pan and cover.
Bread Cloche
If you have a ceramic bread cloche, it works perfectly as a Dutch oven alternative and is actually designed specifically for bread baking.
Oven-Safe Pot with Foil
In a pinch, use any large oven-safe pot with a tight-fitting lid. If your pot doesn’t have a lid, heavy-duty aluminum foil crimped tightly around the edges can create a similar steam environment.
Timing Alternatives
Adjusting the timing on a few different steps can make a big difference as well.
Faster Timeline Option
Short on time? After shaping, instead of the cold proof, let the dough rise at room temperature for 2-3 hours until noticeably puffy, then bake. The flavor won’t be quite as complex, but you’ll still get a delicious loaf.
Extended Cold Proof
If you need to delay baking, your shaped dough can stay in the refrigerator for up to 36 hours. This extended cold fermentation will develop even more complex flavors.
Freezing Option
You can freeze the dough after shaping. Wrap it well and freeze for up to 3 months. Thaw overnight in the refrigerator, then let it come to room temperature for 2-3 hours before baking.
Dietary Adaptations
If you have specific dietary needs, adjust your recipe as follows.
Lower Sodium Version
For those watching their sodium intake, you can reduce the salt to 5g (about 1 teaspoon). Don’t eliminate it completely, as salt is important for controlling fermentation and developing gluten structure.
Whole Grain Focus
For a more nutritious loaf, use 300g whole wheat flour and 200g bread flour. Increase water by 50g to account for the higher absorption of whole wheat flour.
Tip: When making a high-percentage whole wheat loaf, consider adding 1 tablespoon of vital wheat gluten to help with rise and texture.
Gluten-Free Sourdough
Unfortunately, traditional sourdough requires gluten development for its structure. For those with gluten sensitivities, I recommend seeking out specialized gluten-free sourdough recipes that use alternative methods and binding agents.
HOW TO SERVE & STORE SOURDOUGH BREAD
Sourdough bread is one of those versatile staples that feels just as at home on a fancy charcuterie board as it does next to a bowl of soup. Its tangy flavor and chewy crust make it the kind of bread you want to serve in ways that let it shine. Whether you’re working with a fresh loaf straight from the oven or slices from your favorite bakery, here are a few of the best ways to serve sourdough bread.
1. Serve it warm
Warm sourdough is practically irresistible. If the loaf is fresh, simply slice and serve. If it’s a day or two old, pop it in the oven at 350°F for 5–10 minutes, or toast individual slices for a warm, crusty finish. You can even rub a cut garlic clove over the surface right after toasting for a rustic touch.
2. Pair with spreads
You really can’t go wrong with a thick slather of salted butter, but sourdough also plays well with:
- Soft cheeses like brie or goat cheese
- Fruit preserves or honey
- Herbed cream cheese
- Avocado with lemon and sea salt
- Hummus or olive tapenade
Arrange a few of these options together and you’ve got an easy appetizer board.
3. Use it for dipping
Sourdough is made for dipping thanks to its sturdy texture. Serve it alongside:
- Olive oil and balsamic vinegar
- Tomato-based soups like roasted red pepper or minestrone
- Creamy soups like potato leek or wild mushroom
- Stews, chili, or hearty braises
Tear the loaf into chunks or slice into strips for dunking.
4. Make it the base
Sourdough makes the perfect base for open-faced sandwiches, tartines, or crostini. Toast slices and top with:
- Roasted veggies and a swipe of goat cheese
- Smoked salmon, cream cheese, and dill
- Ricotta and honey with a pinch of sea salt
- Tomatoes, fresh mozzarella, and basil
It also holds up beautifully in grilled cheese sandwiches and paninis.
5. Serve it rustic-style
Sometimes, less is more. Serve whole or halved slices of sourdough in a linen-lined basket with a bread knife, allowing guests to tear and slice as they go. It’s casual, interactive, and perfect for communal meals.
How to Store & Reheat Sourdough Bread
Sourdough bread is best enjoyed fresh, but that doesn’t mean you have to finish a whole loaf in one day. Here’s how to keep it tasting great—whether you’re enjoying it tomorrow or next month.
Storing Sourdough in the First 24 Hours
If you’ve just baked or bought a fresh loaf, resist the urge to seal it up right away. For the first day, simply store it cut-side down on a wooden cutting board. This helps the crust stay crisp while keeping the inside soft. If you want to cover it, lay a clean kitchen towel over the top—no plastic or airtight containers needed just yet.
Short-Term Storage (2 to 4 Days)
For the next few days, your best bet is a bread box or a paper bag. Both allow for some air circulation, which protects the crust and prevents it from getting soggy or rubbery.
No bread box? No problem. Wrap the loaf in a clean kitchen towel and then tuck it into a paper bag. Keep it at room temperature, away from direct sunlight or heat.
Important tip: Don’t refrigerate sourdough. It might seem like a good idea, but cold temperatures actually make bread stale faster.
Freezing Sourdough for Long-Term Storage
Sourdough freezes beautifully, especially if you prep it right.
Here’s how to do it:
- Let the bread cool completely.
- Slice the entire loaf so you can grab only what you need later.
- Wrap the slices tightly in plastic wrap or foil.
- Place the wrapped slices in a freezer-safe bag, removing as much air as possible.
- Freeze for up to 3 months.
To reheat, toast frozen slices straight from the freezer.
For a whole loaf, let it thaw at room temperature, then refresh in a 350°F oven for 10–15 minutes to bring back that crisp crust.
How to Refresh Stale Sourdough
Even great sourdough starts to lose its edge after a couple of days. Luckily, it’s easy to revive.
- In the Oven: Preheat your oven to 350°F. Lightly sprinkle the crust with water (don’t soak it), wrap the loaf loosely in foil, and warm it for about 10–15 minutes. For an extra-crusty finish, remove the foil for the last 5 minutes.
- Using Steam for Slices: Boil a kettle, and carefully hold a slice over the steam for about 30 seconds. Then pop it in the toaster. This works surprisingly well to soften the inside and refresh the texture.
- Pan-Toasting or Grilling: For slightly stale slices, brush with a little olive oil and grill them or toast them in a cast iron skillet. It turns ordinary bread into golden, crunchy crostini—perfect for soups, salads, or charcuterie boards.
I think that covers everything.
More Bread Recipes To Try Next
If you’re craving more comforting, carb-filled goodness, here are three standout bread recipes from This Gal Cooks that pair beautifully with soups, make excellent breakfast treats, or shine all on their own:
🥖 Beer Batter Bread
This no-knead recipe is a dream for busy bakers. With a crisp crust and buttery, tender crumb, it’s perfect for dipping into soups or slathering with butter. Bonus: it comes together in one bowl with minimal effort.
👉 Get the Beer Batter Bread recipe
🍌 Sour Cream Banana Bread
Moist, rich, and loaded with banana flavor, this classic loaf is ideal for breakfast or an afternoon snack. The sour cream adds a tender texture that keeps the bread soft for days.
👉 Get the Sour Cream Banana Bread recipe
🍞 Oatmeal Molasses Rolls
These soft, buttery rolls are slightly sweet with a hearty texture—perfect for serving alongside soups or stews. They’re a cozy, homemade alternative to store-bought dinner rolls.
👉 Get the Oatmeal Molasses Rolls recipe
Each of these recipes brings its own unique flavor and texture to the table, making them excellent additions to your baking repertoire.
Happy baking!