
Not Your Average Homemade Cherry Pie Recipe
There are some things that are just sacred in a Southern kitchen, and a classic homemade cherry pie is one of them. My grandmother made a cherry pie that was legendary in our family. It was sweet, comforting, and the crust was always perfectly golden. For years, I made it exactly her way, never daring to change a single thing. It was perfect, after all.
Then, one anniversary, my husband took me to a fancy little restaurant downtown. For dessert, I ordered a panna cotta that came with a cherry compote drizzled with what the menu called a balsamic glaze. I was skeptical, I’ll admit. Vinegar with my dessert? But one bite and I understood. The deep, tangy flavor of the balsamic didn’t overpower the cherries, it made them taste even more like themselves. It was a revelation.
The whole drive home, my mind was racing. I couldn’t wait to get back into my own kitchen and try this idea out. After a few tries, tweaking the amounts and perfecting the method, this recipe was born. It has all the soul of my grandmother’s classic pie, but with a little secret that makes the cherry filling sing in a whole new way. This is the homemade cherry pie that gets requested for every single potluck and holiday gathering.
Why This Homemade Cherry Pie Recipe Works
Cherry pie is an undisputed American icon. It’s a staple at summer barbecues, a star on the Thanksgiving dessert table, and the very definition of comfort food. Its popularity lies in that perfect balance of sweet and tart fruit wrapped in a flaky, buttery crust. It tastes like nostalgia and celebration all in one slice.
What makes this particular homemade cherry pie recipe stand out from the crowd is one simple, yet transformative, ingredient: balsamic vinegar. Now, before you raise an eyebrow, let me explain. We’re not adding enough to make your pie taste tangy or savory. Instead, we’re using just a touch of high-quality balsamic vinegar, reduced down to a slightly syrupy consistency.
This little bit of culinary magic does something incredible to the cherries. The acidity in the vinegar cuts through the sweetness of the sugar, preventing the filling from becoming one-note or cloying. It deepens the natural fruit flavor, making the cherries taste richer and more complex. It adds an almost indescribable depth that has people pausing after their first bite, trying to figure out what that wonderful flavor is.
Paired with a hint of almond extract and a whisper of cinnamon, the balsamic-infused filling becomes truly special. Combine that with a no-fail, all-butter crust that bakes up impossibly flaky and tender, and you have a homemade cherry pie that’s both familiar and excitingly new. It’s the kind of recipe that respects tradition while giving it a little nudge into the spectacular.
Ingredients for Homemade Cherry Pie
The beauty of a pie is its simple foundation of fruit, sugar, and pastry. For this recipe, we’re sticking to the classics but paying close attention to quality, especially for our secret ingredient that truly makes this pie shine. Each component is chosen to create the best possible flavor and texture.
Our star ingredient is, without a doubt, the high-quality balsamic vinegar. This is not the place for the thin, harsh vinegar you might use for a basic salad dressing. You want to look for an aged balsamic from Modena, if possible. It will be thicker, sweeter, and have a much more complex flavor profile that will complement the cherries beautifully instead of clashing with them. It’s the key to that “what is that amazing flavor?” reaction you’ll get.
For the fruit, I find that a mix of sweet and tart cherries provides the most balanced filling. If you can find them, fresh Bing and Montmorency cherries are a wonderful combination. When cherries aren’t in season, frozen pitted cherries work just as well, and they save you the trouble of pitting them all. For the crust, using cold, high-fat, unsalted butter is non-negotiable for achieving those flaky layers we all dream of.
- For the Balsamic-Infused Cherry Filling:
- 6 cups fresh or frozen pitted cherries (a mix of sweet and tart is ideal)
- 3/4 cup granulated sugar
- 1/4 cup cornstarch
- 2 tablespoons high-quality balsamic vinegar
- 1 tablespoon fresh lemon juice
- 1/2 teaspoon almond extract
- 1/4 teaspoon ground cinnamon
- Pinch of salt
- 2 tablespoons unsalted butter, cut into small pieces
- For the All-Butter Pie Crust:
- 2 1/2 cups all-purpose flour
- 1 teaspoon salt
- 1 tablespoon granulated sugar
- 1 cup (2 sticks) cold unsalted butter, cubed
- 1/2 cup ice water
- For the Egg Wash:
- 1 large egg
- 1 tablespoon milk
- Coarse sugar, for sprinkling (optional)
Step-by-Step Instructions For Making Homemade Cherry Pie
Making a pie from scratch can feel intimidating, but I promise it’s just a series of simple steps. We’ll walk through it together, from making the flakiest butter crust to assembling a beautiful pie that’s ready for the oven. Just take your time and enjoy the process.
1. Prepare the Pie Crust
Start by getting your butter and water as cold as possible. In a large bowl, whisk together the flour, salt, and sugar. Add your cold, cubed butter. Using a pastry blender or just your fingertips, cut the butter into the flour until it looks like coarse crumbs with some larger, pea-sized pieces of butter still visible. Those little butter pockets are what create steam and make the crust flaky, so don’t overmix. Sprinkle the ice water over the mixture, one tablespoon at a time, and gently toss with a fork until the dough just starts to come together in a shaggy ball. Don’t add too much water.
2. Chill the Dough
Turn the dough out onto a clean surface and gently bring it together. Divide it in half, pat each half into a flat disk, and wrap them tightly in plastic wrap. Refrigerating the dough for at least one hour is a crucial step. It allows the gluten to relax, which makes the dough easier to roll out, and it ensures the butter is very cold, which is the key to a tender, flaky crust.
3. Create the Balsamic Reduction
While the dough chills, make the simple balsamic reduction. Pour your two tablespoons of high-quality balsamic vinegar into a small saucepan. Bring it to a gentle simmer over medium heat. Let it bubble away for just 2 to 3 minutes. You’ll notice it starts to thicken slightly and will coat the back of a spoon. It will reduce by about half. Remove it from the heat and set it aside to cool completely. This concentrates the flavor beautifully.
4. Make the Cherry Filling
In a large mixing bowl, combine your pitted cherries, sugar, cornstarch, lemon juice, almond extract, cinnamon, and a pinch of salt. Give it a gentle stir to coat all the cherries. Once your balsamic reduction has cooled to room temperature, pour it over the cherry mixture and stir it in. The filling is now ready for the pie.
5. Assemble the Pie
Preheat your oven to 425°F and place a baking sheet on the lower rack to get hot. This will help cook the bottom crust and prevent it from getting soggy. Take one disk of dough from the fridge and roll it out on a lightly floured surface into a 12-inch circle. Gently transfer it to your 9-inch pie plate. Pour the delicious cherry filling into the crust and dot the top with the small pieces of cold butter.
6. Add the Top Crust
Roll out the second disk of dough into an 11-inch circle. You can place this directly on top of the pie and cut a few slits in the center for steam to escape. Or, for a classic look, use a knife or pastry wheel to cut the dough into strips and weave a lattice top. Trim any excess dough from the edges, fold the edge of the top crust under the bottom crust, and crimp the edges together with your fingers or a fork to seal.
7. Apply Egg Wash and Bake
Whisk the egg and milk together in a small bowl to create an egg wash. Brush this mixture lightly over the entire top crust. This will give your pie a beautiful, shiny, golden-brown finish. If you like a little sparkle and crunch, sprinkle some coarse sugar over the top. Place the assembled pie onto the preheated baking sheet in the oven.
8. Bake to Perfection
Bake at 425°F for 15 minutes. This initial blast of high heat helps set the bottom crust. Then, reduce the oven temperature to 375°F and continue baking for another 35 to 45 minutes. The pie is done when the crust is a deep golden brown and the filling is thick and bubbling vigorously through the vents or lattice. If the edges of the crust start to get too dark, you can cover them with a pie shield or strips of aluminum foil.
9. Cool Completely
This is the hardest step of all, I know! You must let the pie cool on a wire rack for at least 4 hours before slicing. This allows the cornstarch-thickened filling to fully set up. If you cut into it while it’s still hot, the filling will be runny and spill out. Patience here is truly a virtue, and you’ll be rewarded with perfect, clean slices.
How To Serve Homemade Cherry Pie
Serving this homemade cherry pie is all about celebrating its classic charm while letting its unique flavor shine. Once the pie has cooled and set completely, you can serve it slightly warm or at room temperature. Both are absolutely delicious, so it really comes down to personal preference. A quick 10-15 seconds in the microwave is perfect for warming up a single slice without making it too hot.
While a slice of this pie is a masterpiece on its own, the right accompaniment can take it to another level. There’s a reason some pairings are timeless, and they work beautifully here, even with our balsamic twist. Here are a few of my favorite ways to serve it up.
- A La Mode: The most classic pairing of all. A scoop of high-quality vanilla bean ice cream melting slowly over a warm slice of cherry pie is pure heaven. The creamy, cool vanilla is the perfect counterpoint to the rich, warm fruit filling.
- With Whipped Cream: A dollop of lightly sweetened, homemade whipped cream adds a wonderful lightness and creaminess. For an extra touch, you can even flavor the whipped cream with a little almond extract to echo the flavor in the filling.
- A Dusting of Sugar: For a simple, elegant presentation, a light dusting of powdered sugar over the top of the pie or an individual slice looks beautiful and adds just a touch of extra sweetness.
- With a Savory Note: For something a little different, try serving a small slice with a sharp cheddar cheese. It’s a classic combination in many parts of the country for a reason, the sharp, salty cheese contrasts wonderfully with the sweet-tart pie.
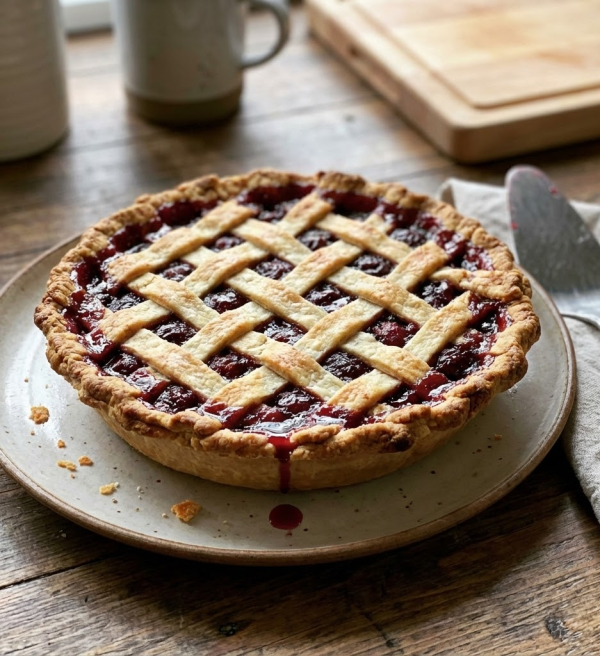
No matter how you choose to serve it, this homemade cherry pie is meant to be shared. It’s perfect for ending a holiday meal, bringing to a neighborhood get-together, or simply enjoying with a cup of coffee for a special afternoon treat. The rich colors and beautiful lattice top make it a stunning centerpiece for any dessert table.
How To Store & Reuse Homemade Cherry Pie Leftovers
If you find yourself with leftovers of this delicious homemade cherry pie, which is a rare occasion in my house, storing it properly will keep it tasting fresh and wonderful. Because it’s a fruit pie, it has a bit more flexibility than a custard or cream pie, but a few simple steps will ensure your second slice is just as good as the first.
For short-term storage, you can keep the pie right on the counter. Simply cover it loosely with aluminum foil or an inverted bowl. It will stay fresh at room temperature for up to two days. Keeping it covered prevents it from drying out while still allowing some air to circulate, which helps keep the crust from getting soggy. After two days, it’s best to move it to the refrigerator for longer storage.
Proper storage ensures you can enjoy your pie for days. Here’s how to handle both short-term and long-term storage, plus my favorite way to reheat it.
- Refrigerating: Tightly wrap the pie or individual slices in plastic wrap or place them in an airtight container. The pie will keep well in the refrigerator for up to five days. The crust might soften slightly in the fridge, but a quick reheat will fix that right up.
- Reheating: The best way to revive a slice of pie is in the oven or a toaster oven. Place a slice on a baking sheet and heat it at 350°F for about 10-15 minutes, or until the filling is warm and the crust has crisped up again. While you can use a microwave in a pinch, it can make the crust soft, so the oven is always my first choice.
- Creative Reusing: If you have just a little bit of pie left that isn’t quite a full slice, don’t let it go to waste! Crumble the leftover pie, crust and all, over a bowl of vanilla ice cream or Greek yogurt. It creates a delicious deconstructed cherry pie sundae or a decadent breakfast parfait. It’s a fantastic way to enjoy every last crumb.
Following these simple tips will ensure that your homemade cherry pie is a treat you can savor for several days. Proper storage preserves the wonderful textures and flavors you worked so hard to create, making every leftover slice a delightful experience.
Substitutions & Variations For Homemade Cherry Pie
While I believe this homemade cherry pie recipe is pretty perfect as is, one of the best things about baking at home is the ability to make a recipe your own. Your kitchen, your rules! This recipe is a wonderful template that you can adapt based on the season, your personal taste, or what you happen to have on hand. Don’t be afraid to experiment a little.
The filling is especially easy to customize. The balsamic vinegar trick works wonders on many different fruits, not just cherries. In the summer, you could try this with a mix of fresh berries like raspberries and blackberries, or even with sliced peaches or plums. In the fall, it would be absolutely divine with apples or pears, adding a surprising complexity to a traditional apple pie. The possibilities are endless.
Here are a few tested and approved substitutions and variations to get your creative juices flowing. Whether you need a dietary modification or just want to try a new flavor combination, these ideas can help you customize your pie.
- Different Fruits: As mentioned, feel free to swap the cherries for other fruits. A mix of berries, sliced peaches, or apricots would be lovely. Adjust the sugar level based on the sweetness of the fruit you choose.
- Spice It Up: If you’re not a fan of almond extract, vanilla extract is a classic choice. You can also play with the spices. A pinch of cardamom, a dash of ground ginger, or a bit of allspice can add a different kind of warmth and complexity to the filling.
- Crust Variations: If you’re short on time, a high-quality store-bought pie crust can be used in a pinch. For a different texture, you could opt for a crumble or streusel topping made with flour, butter, sugar, and oats instead of a second pie crust. For a gluten-free version, simply substitute your favorite gluten-free all-purpose flour blend in the crust recipe.
- Flavor Boosters: For an extra layer of flavor, consider adding the zest of one orange or lemon to the filling mixture. It brightens the fruit flavor and adds a lovely fragrance to the pie.
Feel free to mix and match these ideas to create your own signature homemade cherry pie. Baking should be fun and creative, and this recipe provides a solid, delicious foundation for you to build upon. I can’t wait to hear about the wonderful variations you come up with!
Homemade Cherry Pie with a Balsamic Twist
Description: A classic homemade cherry pie with a flaky, all-butter crust, elevated with a secret ingredient: a whisper of balsamic vinegar for a rich, complex flavor that will have everyone asking for your recipe.
Yield: 8 servings | Category: Dessert | Cuisine: American
Prep Time: 30 minutes | Cook Time: 55 minutes | Chill Time: 1 hour
Ingredients
- For the Balsamic-Infused Cherry Filling:
- 6 cups fresh or frozen pitted cherries
- 3/4 cup granulated sugar
- 1/4 cup cornstarch
- 2 tablespoons high-quality balsamic vinegar
- 1 tablespoon fresh lemon juice
- 1/2 teaspoon almond extract
- 1/4 teaspoon ground cinnamon
- Pinch of salt
- 2 tablespoons unsalted butter, cut into small pieces
- For the All-Butter Pie Crust:
- 2 1/2 cups all-purpose flour
- 1 teaspoon salt
- 1 tablespoon granulated sugar
- 1 cup (2 sticks) cold unsalted butter, cubed
- 1/2 cup ice water
- For the Egg Wash:
- 1 large egg
- 1 tablespoon milk
- Coarse sugar, for sprinkling (optional)
Instructions
- Prepare Pie Crust: Whisk flour, salt, and sugar. Cut in cold butter until coarse crumbs form. Add ice water until dough just comes together. Divide in half, form into disks, wrap, and refrigerate for 1 hour.
- Make Balsamic Reduction: Simmer balsamic vinegar in a small saucepan for 2-3 minutes until slightly thickened. Cool completely.
- Make Cherry Filling: In a large bowl, combine cherries, sugar, cornstarch, lemon juice, almond extract, cinnamon, and salt. Stir in the cooled balsamic reduction.
- Assemble Pie: Preheat oven to 425°F. Roll one dough disk and fit into a 9-inch pie plate. Pour in filling and dot with butter.
- Top the Pie: Roll out the second dough disk for the top crust or a lattice. Trim and crimp edges to seal.
- Bake: Brush with egg wash and sprinkle with sugar. Bake at 425°F for 15 minutes. Reduce heat to 375°F and bake for another 35-45 minutes, until golden and bubbly.
- Cool: Let the pie cool on a wire rack for at least 4 hours before slicing to allow the filling to set.
Notes
Using a mix of sweet and tart cherries will give the best flavor. If the crust edges are browning too quickly, cover them with aluminum foil.
Servings: 8 | Calories: 450 kcal | Fat: 22g | Carbohydrates: 60g | Protein: 5g
5 FAQs About Homemade Cherry Pie
Here are some straightforward answers to the most common questions I receive about this homemade cherry pie recipe.
Can I use fresh and frozen cherries interchangeably in this homemade cherry pie?
Absolutely! This is one of the most frequent questions I get, and the great news is that this recipe works beautifully with both fresh and frozen cherries. When fresh cherries are in season, their flavor is unparalleled, but they do require the extra step of pitting. If you’re using fresh cherries, just pit them, and you’re good to go. There’s no need to pre-cook them; they will soften perfectly as the pie bakes.
When using frozen cherries, which are a fantastic and convenient option year-round, there is one important step you should not skip. You need to thaw the cherries completely first. As they thaw, they will release a significant amount of juice. It’s best to drain this excess juice before mixing the cherries with the other filling ingredients. If you add them to the pie while still frozen or without draining, you’ll introduce too much liquid, which can lead to a runny filling and a dreaded soggy bottom. Once thawed and drained, you can proceed with the recipe exactly as written.
What’s the secret to preventing a soggy bottom on my homemade cherry pie?
Ah, the soggy bottom, the baker’s nemesis! I have a few tried-and-true tricks to ensure your bottom crust is as crisp and flaky as the top. First, the two-temperature baking method is key. Starting the pie in a very hot 425°F oven for the first 15 minutes helps to set and “fry” the bottom crust quickly before the filling has a chance to make it wet. Then, we reduce the temperature to allow the rest of the pie to cook through without burning.
Another crucial tip is to place your pie plate on a preheated baking sheet. I put a heavy-duty baking sheet in the oven while it preheats. When you place the cold pie directly onto that hot surface, it gives the bottom crust an immediate blast of heat, which helps it start browning right away. Finally, make sure your filling is properly thickened. The cornstarch in this recipe is essential. If you’re using very juicy cherries, you might consider adding an extra teaspoon of cornstarch just to be safe. And remember, letting the pie cool completely is vital, as this allows the filling to set and prevents a liquidy slice.
Why add balsamic vinegar to a cherry pie filling?
I know it sounds unusual, but trust me on this one. The purpose of the balsamic vinegar is not to make the pie taste sour or like a salad. We use a very small amount of high-quality, aged balsamic vinegar and reduce it down to concentrate its flavor. This process mellows its sharpness and brings out its inherent sweetness and complexity. In the filling, the balsamic vinegar acts as a flavor enhancer, much like a pinch of salt enhances sweetness in cookies.
The acidity in the vinegar balances the sweetness of the sugar and cherries, preventing the filling from tasting overly sweet or one-dimensional. It adds a subtle, deep, rich note in the background that makes the cherries taste more vibrant and intensely cherry-like. It’s a sophisticated, secret ingredient that elevates the pie from simply “good” to “unforgettable.” Most people won’t be able to pinpoint the flavor, they’ll just know it’s the best cherry pie they’ve ever had.
Can I prepare the pie dough for this homemade cherry pie in advance?
Yes, and I highly recommend it! Making pie dough ahead of time is a fantastic way to break up the baking process and make pie-making day feel less overwhelming, especially around the holidays. The all-butter pie dough can be prepared, wrapped tightly in plastic wrap, and stored in the refrigerator for up to three days. This extended chilling time is actually beneficial for the dough, as it allows the flour to fully hydrate and the gluten to relax, resulting in a more tender and easy-to-roll crust.
For longer-term storage, the dough disks freeze beautifully. After wrapping them in plastic wrap, I like to place them in a freezer-safe zip-top bag to prevent any freezer burn. The dough can be frozen for up to three months. When you’re ready to bake, simply transfer the frozen dough from the freezer to the refrigerator and let it thaw overnight. It will be perfectly chilled and ready to roll out the next day.
How can I tell when my homemade cherry pie is perfectly baked?
Knowing when your pie is done is key to success. There are a few visual cues to look for. First, look at the crust. It should be a deep, uniform golden brown all over, not pale or blonde. If the edges are browning too quickly, you can gently cover them with strips of foil or a pie shield for the last 15-20 minutes of baking. A beautifully browned crust is a delicious, flaky crust.
Next, and most importantly, look at the filling. You should see the filling bubbling vigorously through the slits in the top crust or the openings in your lattice. This is a critical sign. The bubbling indicates that the filling has reached a boiling temperature, which is necessary to activate the cornstarch and ensure it thickens properly. If the filling is just simmering lightly, it probably needs a little more time. A vigorously bubbling, thick filling and a golden-brown crust are the two signs of a perfectly baked homemade cherry pie.
Try These Recipes Next
If you loved the rich fruit flavor of this homemade cherry pie, I have a few other recipes I think you’ll enjoy just as much.
- Easy Cherry Crisp: A wonderfully simple dessert with a sweet cherry filling and a crunchy, buttery oat topping. It’s perfect when you want a cherry dessert without the effort of a pie crust.
- No Churn Cherry Cobbler Ice Cream: All the flavors of a classic cherry cobbler swirled into a creamy, dreamy, no-churn ice cream. It’s a fun and delicious summer treat.
- Cherry Danish Coffee Cake: A moist and tender coffee cake with a ribbon of cherry filling and a sweet glaze. It makes for an absolutely perfect breakfast or brunch centerpiece.
I hope you give these a try and find a new family favorite!