
My Secret To Creamy, Savory, Ground Beef Enchiladas
There are some dishes that just feel like a warm hug, and for the longest time, I thought I had enchiladas all figured out. I’d make them for weeknight dinners, and they were always good, but never great. Then, a few years back at a neighborhood potluck, my friend Maria brought a pan of the most incredible Ground Beef Enchiladas I had ever tasted. The filling wasn’t just seasoned beef, it was luxuriously creamy and rich, clinging together in a way that made every bite perfect.
Of course, I had to ask for her secret. I was expecting some rare chile or a complicated technique, but she just smiled and said, “A little bit of cream cheese, honey.” It was a revelation! I went home and immediately started tinkering with my own recipe. The cream cheese was the missing piece I never knew I needed.
It completely transforms the texture of the ground beef, turning it from a simple crumble into a velvety, decadent filling. It melts right in with the spices and chiles, balancing the savory beef and the zesty red sauce. This isn’t just another enchilada recipe, it’s the one that will make your family and friends ask for your secret, too. It’s comfort food elevated, and it’s become one of my absolute go-to recipes for a guaranteed crowd-pleaser.
Why This Ground Beef Enchiladas Recipe Works
Ground beef enchiladas are a cornerstone of Tex-Mex and American comfort food for a good reason. They are hearty, cheesy, and satisfying in a way few other dishes are. The combination of savory meat, zesty sauce, and melted cheese wrapped in a soft corn tortilla is a classic formula for a delicious meal that pleases just about everyone. It’s a dish that feels special enough for a Friday night but is easy enough to pull together on a busy weeknight.
The problem I often found with other recipes was in the filling. While flavorful, the ground beef could sometimes be a little dry or crumbly, falling out of the tortilla as you tried to get a perfect bite. That’s where my special twist comes in and truly makes this recipe stand out. The secret is adding softened cream cheese to the seasoned beef mixture.
This simple addition is a complete game changer. The cream cheese melts into the beef and spices, creating a cohesive and incredibly creamy filling. It adds a subtle tang and a luxurious richness that perfectly complements the smoky spices and the tangy red enchilada sauce. The filling stays moist and velvety even after baking, ensuring every single bite is as good as the first. This little touch elevates a classic dish from simply good to absolutely unforgettable.
It’s the kind of small change that makes a huge impact, turning a standard recipe into your signature dish. The creaminess ensures the filling holds together beautifully, making for prettier enchiladas and a much more pleasant eating experience. Trust me, once you try these creamy Ground Beef Enchiladas, you’ll never go back to the old way.
Ingredients for Ground Beef Enchiladas
The beauty of this recipe is how it uses simple, easy-to-find ingredients to create something truly special. The magic is all in how they come together. Having everything prepped and ready to go, or “mise en place” as the chefs say, makes the whole process smooth and enjoyable. Here’s what you’ll need to make these incredible enchiladas.
- 1 tbsp olive oil
- 1 lb ground beef (85/15)
- 1/2 cup diced yellow onion
- 2 cloves garlic, minced
- 1 (4 oz) can diced green chiles, drained
- 4 oz cream cheese, softened and cut into cubes
- 1 tsp chili powder
- 1/2 tsp smoked paprika
- 1/2 tsp ground cumin
- 1/4 tsp dried oregano
- Salt and freshly ground black pepper to taste
- 1 (15 oz) can red enchilada sauce
- 8-10 corn tortillas
- 2 cups shredded Monterey Jack cheese
- Optional for garnish: chopped fresh cilantro, diced avocado, sour cream, crumbled cotija cheese
The star of the show here is, without a doubt, the cream cheese. This is the secret ingredient that creates that unbelievably creamy filling. I highly recommend using a full-fat block of cream cheese for the best texture and flavor. Let it soften on the counter for about 30 minutes before you start cooking, it will melt into the beef mixture much more easily.
For the ground beef, I find that an 85/15 blend offers the perfect balance. It has enough fat to provide rich flavor and keep the meat from drying out, but not so much that the final dish feels greasy, especially since we drain the excess. When it comes to the cheese, please do yourself a favor and shred your own Monterey Jack from a block. Pre-shredded cheeses are often coated with anti-caking agents that prevent them from melting as smoothly. The little bit of extra effort is so worth it for that glorious, gooey cheese pull.
Step-by-Step Instructions For Making Ground Beef Enchiladas
Now for the fun part, bringing it all together! This recipe is straightforward, but a few key techniques will ensure your enchiladas come out perfectly every time. Just follow along, and you’ll have a bubbling, cheesy pan of goodness in no time.
Step 1: Prepare Your Oven and Pan
First things first, preheat your oven to 375°F. This is crucial for ensuring the enchiladas cook evenly and the cheese gets perfectly melted. While it’s heating up, grab your 9×13 inch baking dish and give it a light coating of cooking spray or a thin layer of oil. This simple step prevents the tortillas from sticking to the bottom.
Step 2: Sauté the Aromatics and Brown the Beef
In a large skillet, heat your olive oil over medium-high heat. Once it shimmers, add the diced yellow onion. Cook, stirring occasionally, until the onion softens and becomes translucent, which usually takes about 3 to 4 minutes. Now, add the ground beef to the skillet. Use a wooden spoon or a spatula to break it apart into small crumbles as it cooks. Continue cooking until it’s fully browned, then carefully drain off any excess grease from the pan.
Step 3: Add Spices and Chiles
With the beef browned, it’s time to build the flavor. Stir in the minced garlic and cook for just a minute until you can smell that wonderful aroma. Be careful not to let it burn. Next, add the drained green chiles, chili powder, smoked paprika, cumin, and oregano. Stir everything together and let it cook for another minute. This step, called “blooming,” toasts the spices and deepens their flavor.
Step 4: Create the Creamy Filling
Here comes the secret! Reduce the heat to low and add your softened, cubed cream cheese to the skillet. Stir constantly. The cream cheese will begin to melt into the beef mixture. Keep stirring until it’s completely incorporated and the filling looks uniform, creamy, and luscious. Season it with salt and pepper to your taste.
Step 5: Prep the Baking Dish
Pour about half a cup of the red enchilada sauce into the bottom of your prepared baking dish. Use a spatula or the back of a spoon to spread it evenly. This creates a bed for the enchiladas and prevents them from sticking.
Step 6: Warm the Tortillas
This is a non-negotiable step for preventing your tortillas from cracking and breaking as you roll them. You have a couple of options. You can wrap the stack of corn tortillas in a damp paper towel and microwave them for about 30 to 60 seconds. Alternatively, you can quickly fry them in a lightly oiled skillet for about 10 seconds per side. You just want them warm and pliable.
Step 7: Fill and Roll
Working one tortilla at a time, spoon a generous line of the creamy beef filling down the center. Don’t overfill, or it will be difficult to roll. Roll the tortilla up snugly and place it in the baking dish with the seam side facing down. Repeat with the remaining tortillas and filling, arranging them side by side in the dish.
Step 8: Sauce the Enchiladas
Once all your enchiladas are nestled in the pan, pour the rest of the red enchilada sauce evenly over the top. Make sure to cover them from end to end so they all get saucy and delicious.
Step 9: Add the Cheese
Now for the crowning glory. Sprinkle the shredded Monterey Jack cheese evenly over the top of the sauced enchiladas. Be generous here, you want a nice, thick layer of cheesy goodness.
Step 10: Bake to Perfection
Place the dish in your preheated oven and bake for 20 to 25 minutes. You’ll know they’re done when the sauce is bubbly all around the edges and the cheese is completely melted, gooey, and just starting to turn a beautiful golden brown.
Step 11: Rest and Garnish
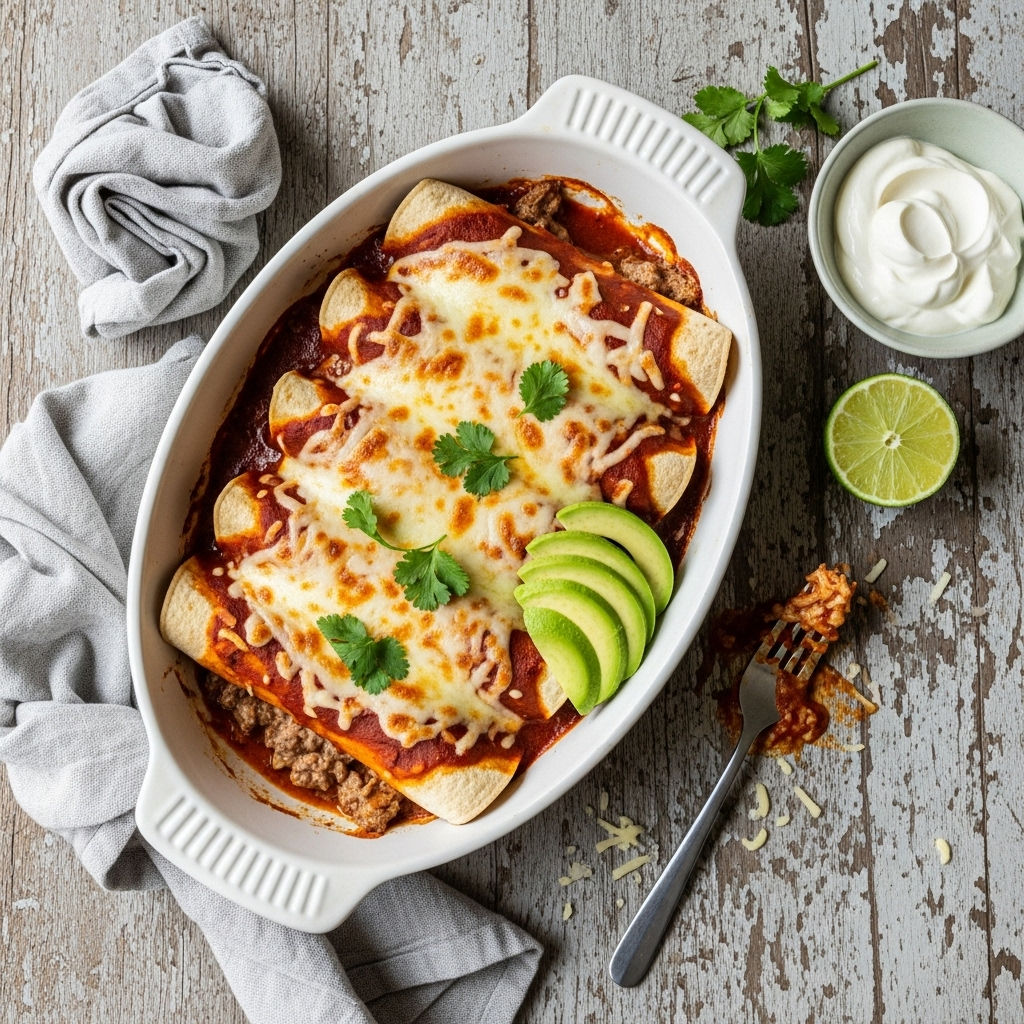
This is probably the hardest step, but it’s important! Let the enchiladas rest for 5 to 10 minutes after you pull them from the oven. This allows them to set up a bit, making them easier to serve. Garnish with your favorite toppings like fresh cilantro, diced avocado, a dollop of sour cream, or some salty cotija cheese before serving.
How To Serve Ground Beef Enchiladas
These creamy Ground Beef Enchiladas are a showstopper all on their own, but the right accompaniments can turn a great dinner into an unforgettable feast. The key is to balance the rich, savory enchiladas with fresh, bright flavors and textures. Toppings are a great place to start, as they allow everyone to customize their plate just the way they like it.
A simple “toppings bar” is always a hit at my house. I’ll set out small bowls of fresh cilantro, diced avocado or guacamole, cool sour cream or Mexican crema, and maybe some sliced jalapeños for those who like a little extra heat. The coolness of the sour cream and the freshness of the cilantro cut through the richness of the cheese and beef beautifully. The creamy avocado adds another layer of texture that is just heavenly.
To round out the meal, consider adding a couple of simple side dishes. You don’t need anything too complicated, as the enchiladas should remain the star of the plate. Here are a few of my favorite pairings:
- Spanish or Mexican Rice: A classic for a reason. The fluffy, seasoned rice is perfect for soaking up any extra enchilada sauce on your plate.
- Refried Beans or Black Beans: Another staple side that complements the flavors perfectly. I like to top my refried beans with a little sprinkle of cotija cheese.
- Simple Corn Salad: A bright and crunchy salad made with corn, black beans, red onion, and a lime vinaigrette adds a wonderful freshness and textural contrast to the meal.
- A Crisp Green Salad: A simple salad with romaine lettuce, cherry tomatoes, and a light citrusy dressing can provide a refreshing counterpoint to the hearty enchiladas.
For drinks, a cold Mexican lager or a fun margarita always feels right. For a non-alcoholic option, a sparkling limeade or a classic agua fresca would be wonderful. No matter what you choose to serve alongside them, these enchiladas are sure to be the main attraction.
How To Store & Reuse Ground Beef Enchiladas Leftovers
One of the best things about making a big pan of enchiladas is that the leftovers are just as delicious the next day, if not more so! As they sit, the flavors have a chance to meld together even further. Proper storage is key to making sure your second-day enchiladas are just as good as the first.
Once the enchiladas have cooled completely, you can store them directly in the baking dish covered tightly with plastic wrap or aluminum foil. They will keep well in the refrigerator for up to 4 days. If you want to transfer them to a smaller airtight container to save space, that works perfectly too. Just be gentle when moving them.
When it comes to reheating, my preferred method is in the oven. This helps the cheese get bubbly and melty again. Simply preheat your oven to 350°F, cover the dish with foil to prevent the tops from getting too brown, and bake for about 15-20 minutes, or until heated through. If you’re in a hurry, you can certainly reheat individual portions in the microwave. They’ll still be delicious, just a bit softer. I find that reheating at 50% power helps them heat more evenly.
While eating them as-is is fantastic, you can also get creative with your leftovers. Here are a few fun ideas:
- Enchilada Breakfast Scramble: Chop up a leftover enchilada and scramble it with a couple of eggs. It’s a hearty and incredibly flavorful way to start the day.
- Enchilada Bowls: Deconstruct the leftovers by serving them over a bed of rice or lettuce, topped with fresh salsa, corn, and avocado for a quick and easy lunch bowl.
- Enchilada-Stuffed Bell Peppers: Chop up the leftovers, mix with a little cooked rice, and stuff the mixture into hollowed-out bell peppers. Top with cheese and bake until the peppers are tender.
These enchiladas are also great for freezing! You can freeze the entire baked and cooled casserole, or assemble them up to the baking step and freeze. Thaw in the refrigerator overnight before baking as directed. They are a perfect freezer meal to have on hand for a busy night.
Substitutions & Variations For Ground Beef Enchiladas
While I believe this recipe is pretty perfect as it is, one of the joys of cooking is making a dish your own! This Ground Beef Enchiladas recipe is a fantastic base for all sorts of delicious tweaks and variations. Whether you need to accommodate a dietary preference or just want to experiment with different flavors, there are plenty of easy swaps you can make.
The filling is a great place to start. If you’re not a fan of ground beef or just want to try something different, ground turkey or shredded chicken would both be wonderful substitutes. For a vegetarian option, you could use a plant-based ground “meat” crumble or even a hearty mixture of black beans, corn, and sautéed mushrooms. The cream cheese trick works beautifully to make any of these fillings rich and creamy.
Don’t be afraid to play around with the other components to suit your taste. Here are a few of my favorite variations:
- Switch up the Sauce: Instead of red enchilada sauce, try using a green enchilada sauce (salsa verde) for a tangier, brighter flavor profile. It pairs wonderfully with the creamy beef filling.
- Add a Little Heat: If you like your food spicy, feel free to add a finely diced jalapeño or serrano pepper to the skillet along with the onion. A pinch of cayenne pepper or chipotle powder in the filling will also do the trick.
- Vary the Veggies: Boost the nutritional content by adding more vegetables to the filling. Sautéed bell peppers, zucchini, corn, or spinach would all be delicious additions.
- Change the Cheese: While Monterey Jack is a classic for its melting qualities, you could easily swap it for a sharp cheddar, a spicy pepper jack, or a convenient Mexican cheese blend.
- Flour Tortillas: Though corn tortillas are traditional for enchiladas, you can use flour tortillas if that’s your preference. They will result in a softer, more burrito-like texture.
No matter how you choose to customize it, the core technique of adding cream cheese to the filling will ensure a delicious, crowd-pleasing result. Have fun in the kitchen and make this recipe your own signature dish!
Creamy Ground Beef Enchiladas
Description: A classic Tex-Mex comfort food gets a delicious upgrade with a secret ingredient! These ground beef enchiladas feature a rich, creamy filling made with cream cheese, savory spices, and green chiles, all rolled into soft corn tortillas and smothered in red sauce and melted cheese.
Yield: 8-10 enchiladas | Category: Main Course | Cuisine: Tex-Mex
Prep Time: 15 minutes | Cook Time: 25 minutes
Ingredients
- 1 tbsp olive oil
- 1 lb ground beef (85/15)
- 1/2 cup diced yellow onion
- 2 cloves garlic, minced
- 1 (4 oz) can diced green chiles, drained
- 4 oz cream cheese, softened and cut into cubes
- 1 tsp chili powder
- 1/2 tsp smoked paprika
- 1/2 tsp ground cumin
- 1/4 tsp dried oregano
- Salt and freshly ground black pepper to taste
- 1 (15 oz) can red enchilada sauce
- 8-10 corn tortillas
- 2 cups shredded Monterey Jack cheese
- Optional for garnish: chopped fresh cilantro, diced avocado, sour cream, crumbled cotija cheese
Instructions
- Preheat oven to 375°F (190°C) and lightly grease a 9×13 inch baking dish.
- Heat olive oil in a large skillet over medium-high heat. Cook onion until soft, then add ground beef and cook until browned. Drain grease.
- Stir in garlic, green chiles, and all spices. Cook for 1 minute until fragrant.
- Reduce heat to low, add cubed cream cheese, and stir until fully melted and incorporated. Season with salt and pepper.
- Spread 1/2 cup of enchilada sauce in the bottom of the baking dish.
- Warm tortillas in the microwave or a skillet to make them pliable.
- Spoon the beef filling into each tortilla, roll tightly, and place seam-side down in the dish.
- Pour remaining enchilada sauce over the top, then sprinkle with shredded Monterey Jack cheese.
- Bake for 20-25 minutes, until bubbly and the cheese is golden.
- Let rest for 5-10 minutes before garnishing and serving.
Notes
Shredding your own cheese from a block will result in a smoother, meltier topping. Don’t skip warming the corn tortillas, as this is the key to preventing them from cracking when you roll them.
Servings: 4-5 | Calories: 550 kcal | Fat: 35g | Carbohydrates: 25g | Protein: 30g
5 FAQs About Ground Beef Enchiladas
Here are some straightforward answers to the most common questions I receive about this Ground Beef Enchiladas recipe.
Why do my corn tortillas break when I roll my Ground Beef Enchiladas?
This is probably the most common frustration when making enchiladas, and the good news is that it’s an easy fix! Corn tortillas will almost always crack and fall apart if you try to roll them straight out of the package. They need to be warmed and softened first to become pliable. The steam and heat make them flexible enough to roll without breaking.
My favorite quick and easy method is to wrap a stack of tortillas in a damp paper towel and microwave them for 30 to 60 seconds. You can also warm them one by one in a dry skillet over medium heat for about 15 seconds per side. For an even more traditional and flavorful approach, you can lightly fry them in a bit of hot oil for about 10 seconds per side. This not only makes them pliable but also adds a layer of flavor and helps create a slight barrier against the sauce, preventing them from getting too soggy. Whichever method you choose, don’t skip this step, it is truly the key to perfectly rolled enchiladas.
Can I make these Ground Beef Enchiladas ahead of time?
Absolutely! This is a fantastic recipe to prepare in advance, which makes it perfect for busy weeknights or for entertaining. You have two main options. You can prepare the entire dish, assemble the enchiladas in the baking dish, cover it tightly with plastic wrap or foil, and store it in the refrigerator for up to 24 hours before you plan to bake it. When you’re ready, just pop it in the preheated oven. You might need to add about 5 to 10 minutes to the baking time since you’re starting with a cold dish.
These enchiladas also freeze beautifully. You can assemble the entire dish in a freezer-safe pan, cover it tightly with a layer of plastic wrap followed by a layer of aluminum foil, and freeze for up to 3 months. For best results, let it thaw overnight in the refrigerator before baking as directed. This makes for an incredible freezer meal to have on hand for those nights when you just don’t have time to cook.
What’s the best kind of ground beef for these enchiladas?
I find that an 85/15 ground beef is the sweet spot for this recipe. The 15% fat content provides a wonderful richness and flavor that you just don’t get with leaner options. It ensures the beef filling stays moist and tender, even after baking. Since the instructions call for draining any excess grease after browning, you get all the flavor without the final dish being overly greasy.
If you prefer to use a leaner ground beef, like a 90/10 or even 93/7, you certainly can. The dish will still be delicious. However, because the cream cheese adds a lot of richness, the recipe is very forgiving. If you do use a leaner beef, just be mindful not to overcook it during the browning stage to keep it from drying out. You could also substitute ground turkey or ground chicken if you prefer, both work wonderfully with the creamy filling.
Is it better to use canned or homemade enchilada sauce for this recipe?
Honestly, both options can yield fantastic results, and the best choice really depends on your personal preference and how much time you have. A good quality canned red enchilada sauce is a wonderful shortcut that makes this dish achievable on a busy weeknight. There are many excellent brands out there, so I recommend trying a few to find one you love. Look for one with a robust, chile-forward flavor.
That being said, if you have a little extra time, making your own enchilada sauce is surprisingly easy and allows you to control the ingredients, spice level, and salt content. A homemade sauce made from dried chiles, tomatoes, and spices will always have a depth of flavor that is hard to beat. If you’ve never tried it, I encourage you to give it a go on a weekend. But for everyday cooking, don’t hesitate to reach for a can. The creamy, flavorful filling in these Ground Beef Enchiladas will shine either way.
How can I make my Ground Beef Enchiladas less soggy?
Soggy enchiladas can be a real letdown, but there are a few simple tricks to ensure yours come out with the perfect texture. The first line of defense is the tortilla prep. As mentioned before, quickly frying the tortillas in a bit of hot oil for a few seconds per side does more than just make them pliable. It creates a slight barrier that helps prevent them from absorbing too much of the sauce and turning to mush.
Another key is to not go overboard with the sauce on the bottom of the pan. A thin layer is all you need to prevent sticking. The majority of the sauce should go over the top of the rolled enchiladas. Finally, letting the enchiladas rest for 5 to 10 minutes after they come out of the oven is crucial. This allows the sauce to thicken slightly and the enchiladas to set, making them easier to serve and helping them hold their shape. Following these simple tips will give you perfectly saucy, but never soggy, enchiladas.
Try These Recipes Next
If you loved these enchiladas, here are a few other recipes from the blog that I know you’ll enjoy.
- Easy Ground Beef Recipes: A fantastic collection of my go-to recipes for when you have a pound of ground beef and need some delicious inspiration.
- Over 30 Delicious Cinco de Mayo Recipes: Get ready for your next fiesta with this roundup of festive and flavorful dishes perfect for any celebration.
- Homemade Enchilada Sauce: Ready to take your enchilada game to the next level? This recipe will show you just how easy and rewarding it is to make your own sauce from scratch.
I hope you have fun exploring these other dishes from my kitchen!