
Mocha Peppermint Cookie Bars
Peppermint and chocolate is one of my favorite flavor combinations. Get the best of both with these Mocha Peppermint Cookie Bars.

Well folks, there you have it. My first Christmas-esque recipe of the season. Despite vowing to not bake Christmas goodies until after Thanksgiving, these somehow made it out of my oven before Thanksgiving. But I’m not complaining. And neither are my fellow co-workers. And neither is Ken. These were a huge hit with everyone. They taste amazing topped with vanilla ice cream. Mocha. Peppermint. Cookie. Mmm. That does go good with vanilla ice cream!
The breaking of my Christmas baking vows all began with an impromptu trip to Wal-Mart. Cough Cough. That doesn’t happen too often but it was early. Wal-Mart wasn’t yet filled with hoards of zombies people so I figured why not?
I stumbled upon some sweet baking goods (no pun intended) while browsing the isles of the food section. Mini M&Ms and Andes Peppermint Chips. This gal cannot resist fun baking accessories like that. So I quietly snuck them into my cart and went on my way. Ah fine. Who am I kidding. No sneaking involved with these. When I found Ken wandering in the video game section of the store, I was like yo, check out this sweet stash of baking goodies I just found.
Psst, I didn’t really say it in those exact words. I just replayed the scenario in my head like that. But you get the picture, right?
I had a little fun with photography on the day I made the cookie bars.
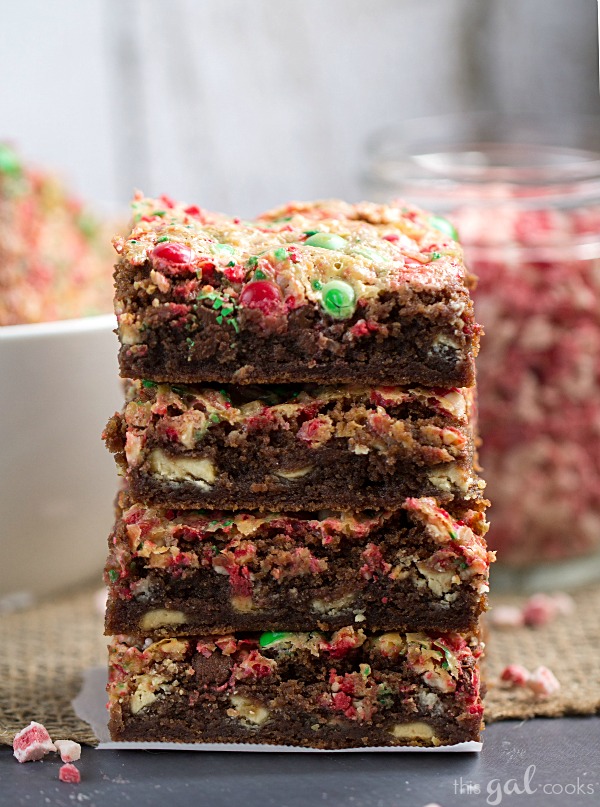
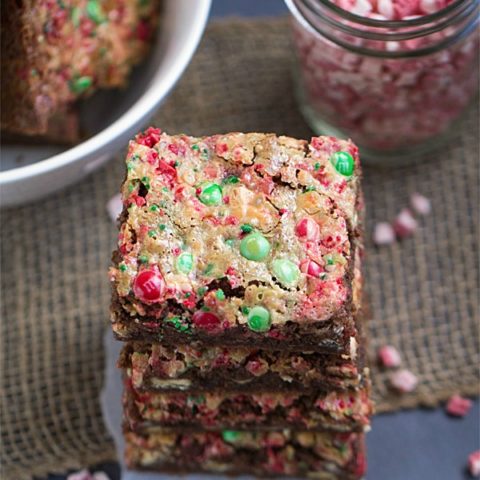
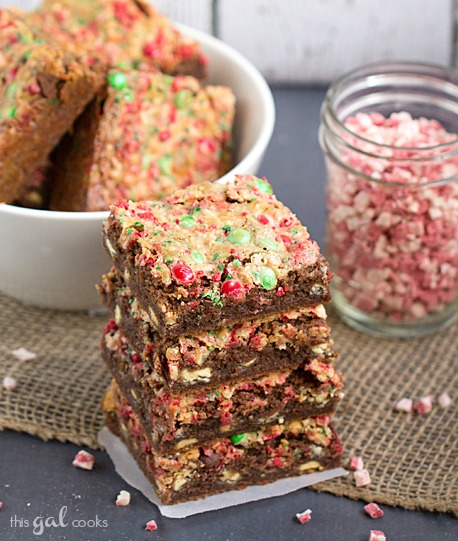
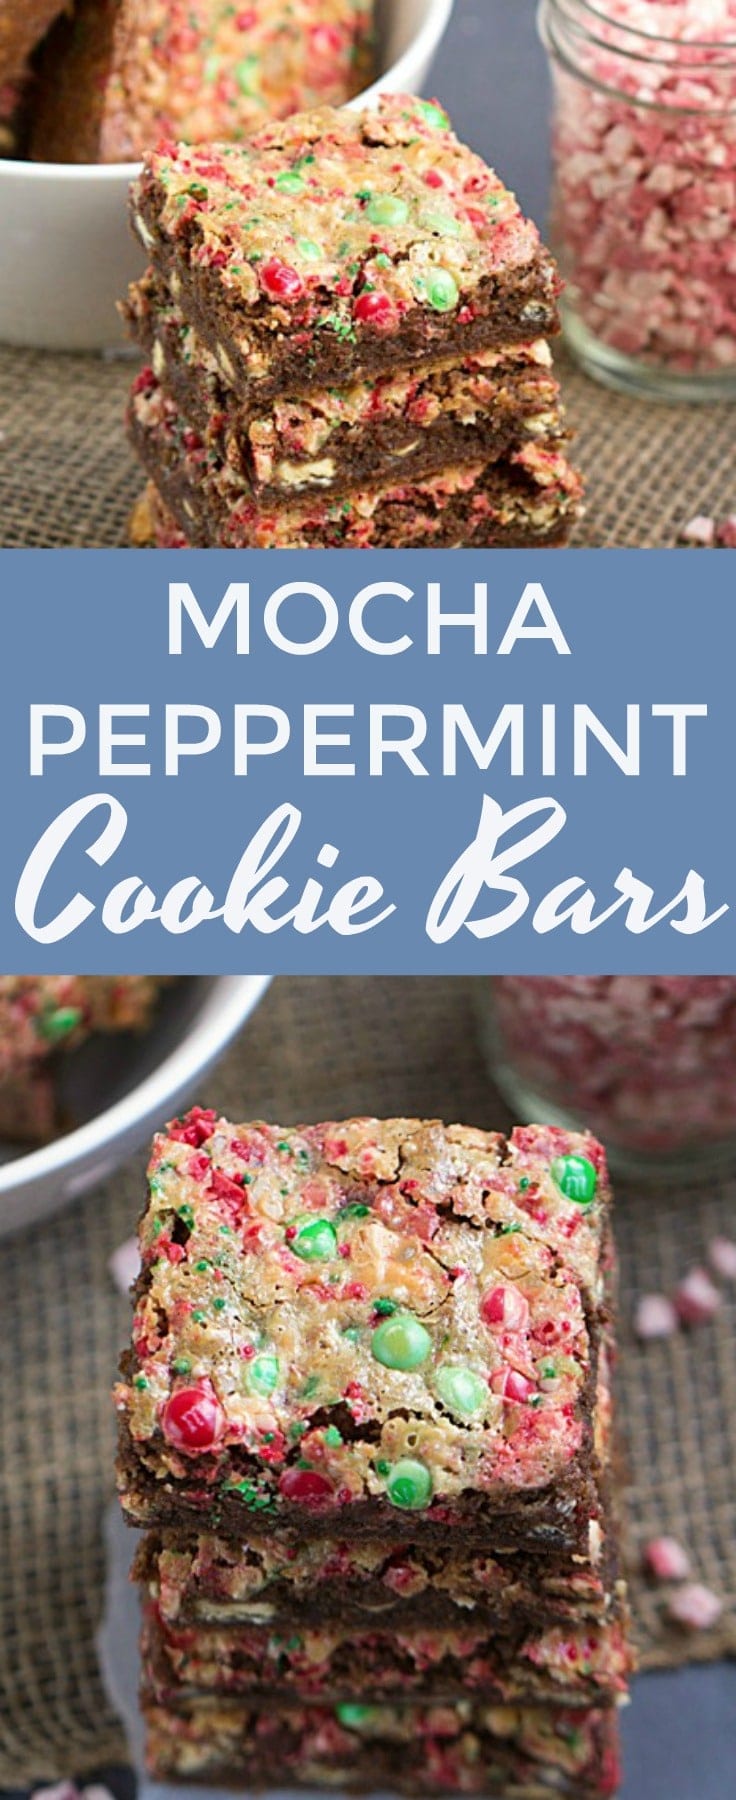
For the base of these bars, I made a chocolate cookie crust that was adapted from the Williams Sonoma Baking Cookbook. I doubled the recipe, replaced the vanilla extract with coffee extract and added white chocolate chips to the dough. After pressing the dough into a baking pan, I baked it for a few minutes and then went to town topping it with a variety of toppings. I baked it again until bubbly and then I enjoyed Mocha Peppermint Cookie Bars. I hope you enjoy them too!
Why This Mocha Peppermint Cookie Bars Recipe Works
The magic of these Mocha Peppermint Cookie Bars lies in a few key details that elevate them from a standard holiday treat to something truly memorable. At its heart, this recipe celebrates the timeless pairing of chocolate and peppermint, a flavor combination that just screams holiday cheer. It’s a classic for a reason, beloved by generations and a staple on dessert tables everywhere from Thanksgiving to New Year’s Day. People are drawn to that comforting, festive taste, and this recipe delivers it in a wonderfully satisfying bar form.
What makes my version stand out is the thoughtful layering of flavors and textures. The base isn’t just a plain cookie, it’s a deep, dark chocolate cookie foundation made with both melted unsweetened chocolate and a mix of brown and white sugars. This creates a soft, chewy texture with a profound chocolate flavor. This is where my first twist comes in, the coffee extract. It doesn’t make the bars taste like coffee, it simply amplifies the chocolate notes, making them richer and more complex. It’s a subtle touch that makes a world of difference.
The second, and most important, twist is the sweetened condensed milk topping. This is my secret weapon. By pouring it over the peppermint chips and M&Ms before the second bake, we create a gooey, fudgy layer that is absolutely heavenly. As it bakes, the milk caramelizes slightly around the edges, adding a delightful chewiness that contrasts beautifully with the soft cookie base and the crunchy candies. It ensures every single bite is moist, decadent, and packed with flavor. This technique turns a simple bar cookie into a multi layered dessert experience that always gets rave reviews.
Ingredients for Mocha Peppermint Cookie Bars
Gathering your ingredients is the first step to creating these incredible bars. Quality really matters here, as each component plays a crucial role in the final flavor and texture. The list might seem a little long, but trust me, every single item has a purpose in building the perfect holiday treat.
The star of the show, the ingredient that gives these bars their signature twist, is the pure coffee extract. This is not the same as coffee flavored syrup. You want the concentrated, pure extract, which you can usually find in the baking aisle near the vanilla. A little goes a long way in deepening the chocolate flavor of the cookie base without screaming “coffee.” It’s the secret that will have people wondering what makes your bars so incredibly rich. When it comes to the chocolate, I recommend using a good quality unsweetened baking chocolate bar that you chop yourself. It melts more smoothly and has a more intense flavor than chocolate chips. For the fats, the combination of real butter and vegetable shortening is intentional. The butter provides that rich flavor we all love, while the shortening helps create a wonderfully tender, soft cookie crust that doesn’t get too tough or dry.
- 2oz unsweetened chocolate, coarsely chopped
- 2 C all purpose flour
- 3 tsp baking powder
- 1/2 tsp salt
- 12 tbsp butter, room temp
- 4 tbsp vegetable shortening
- 1 1/3 C packed brown sugar
- 1/2 C granulated sugar
- 2 eggs, room temp
- 2 tsp pure coffee extract
- 1 C white chocolate chips
- 1 C peppermint baking chips
- 1/2 C mini M&M Baking Bits
- About 3/4 of a 14oz can of sweetened condensed milk
- 1 tsp Christmas colored sprinkles
Step-by-Step Instructions For Making Mocha Peppermint Cookie Bars
Making these Mocha Peppermint Cookie Bars is a two step baking process, but it is very straightforward. Don’t let the extra step intimidate you, it’s what creates the distinct layers and incredible texture. Taking your time with each step will ensure your bars come out perfectly gooey and delicious. Let’s get started!
Step 1: Prepare Your Pan and Dry Ingredients
First things first, preheat your oven to 350°F. Then, line a 13×9 inch baking pan with parchment paper, leaving a little overhang on the sides. This overhang will act as handles later, making it super easy to lift the entire slab of bars out for cutting. In a medium mixing bowl, whisk together your all purpose flour, baking powder, and salt. Whisking helps distribute the leavening agents evenly, which is key for a uniform texture. Set this bowl aside for now.
Step 2: Melt the Chocolate
Next, we’ll melt the unsweetened chocolate. The best way to do this is with a double boiler. If you don’t have one, don’t worry, you can easily make your own. Simply fill a small saucepan with about an inch of water and bring it to a gentle simmer. Place a heatproof glass or metal bowl on top of the saucepan, making sure the bottom of the bowl doesn’t touch the water. Add your chopped chocolate to the bowl and stir occasionally until it’s completely melted and smooth. The most important thing here is to avoid getting any water or steam into your chocolate, as it can cause it to seize up and become grainy.
Step 3: Mix the Wet Ingredients and Combine
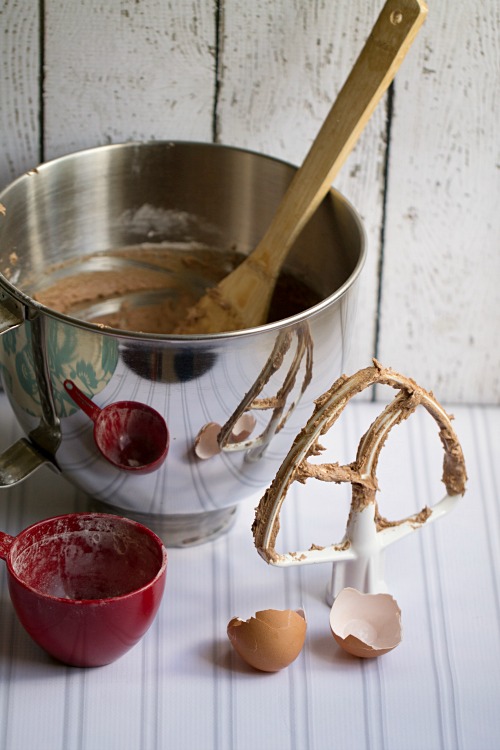
In the bowl of your stand mixer fitted with the paddle attachment, beat together the room temperature butter, shortening, brown sugar, and granulated sugar on medium speed. You want to cream them until they are well blended and fluffy. Then, with the mixer on low, beat in the melted chocolate you just prepared. Add the room temperature eggs one at a time, followed by the pure coffee extract, mixing until everything is smooth and incorporated. Finally, add the flour mixture you set aside earlier, mixing on low speed until it’s just combined. Be careful not to overmix here. Overmixing can develop the gluten in the flour too much, resulting in a tough cookie base. Gently stir in the white chocolate chips with a spatula.
Step 4: The First Bake
Now, take your thick, wonderful dough and press it evenly into the bottom of your parchment lined baking pan. An offset spatula or even your hands can be helpful here. Bake this cookie crust for 15 to 20 minutes. You are not baking it all the way through at this point. You want it to be set and slightly puffed, but still soft. This par-baking step is crucial to prevent a soggy bottom once we add the liquid topping.
Step 5: Add the Topping and Final Bake
Remove the pan from the oven. Working quickly, sprinkle the peppermint baking chips and mini M&M baking bits evenly over the hot crust. Add about half of your festive sprinkles. Now for the magic. Slowly and evenly, pour about three quarters of the can of sweetened condensed milk over all the toppings. Try to cover as much of the surface as you can. Add a few more sprinkles on top for good measure. Return the pan to the 350°F oven and bake for another 20 to 25 minutes. You’ll know it’s done when the topping is bubbly and the edges are a beautiful golden brown.
Step 6: Cool and Cut
This might be the hardest step of all, you have to let the bars cool completely in the pan. I mean completely. If you try to cut them while they are still warm, you will have a delicious, gooey mess. Patience is key! Once they are fully cooled, use the parchment paper handles to lift the entire slab out of the pan and onto a cutting board. Use a large, sharp knife to cut them into squares. Enjoy your decadent creation!
How To Serve Mocha Peppermint Cookie Bars
Serving these Mocha Peppermint Cookie Bars is just as fun as making them. They are so rich and festive on their own that they really don’t need much dressing up, but a little creative presentation can make them feel even more special. Their beautiful, colorful layers make them a standout on any dessert platter, especially during the holidays. I love arranging them on a simple white plate to let the colors of the M&Ms and sprinkles really pop.
For an everyday treat, nothing beats a warm cup of coffee or a cold glass of milk alongside one of these bars. The coffee brings out the mocha notes in the cookie base, making it a perfect afternoon pick me up. If you’re serving them to kids or for a cozy family night, a mug of rich hot chocolate is a wonderful companion. The creaminess of the hot cocoa complements the peppermint and chocolate flavors beautifully.
If you want to turn these bars into a more elaborate dessert for a dinner party or special occasion, here are a few of my favorite ways to serve them:
- A La Mode: Gently warm a cookie bar in the microwave for about 10 to 15 seconds until it’s soft and the chips are slightly melty. Top it with a generous scoop of high quality vanilla bean or peppermint stick ice cream. The contrast of the warm, gooey bar and the cold, creamy ice cream is absolutely divine.
- Dessert Platter Star: Cut the bars into smaller, bite sized squares. Arrange them on a large platter alongside other holiday treats like mini cheesecakes, chocolate truffles, and classic sugar cookies. This creates a beautiful and varied dessert spread that has something for everyone.
- Giftable Goodies: These bars make fantastic homemade gifts. Stack a few in a clear cellophane bag and tie it with a festive ribbon, or arrange them neatly in a holiday cookie tin lined with wax paper. It’s a thoughtful and delicious present for neighbors, teachers, or coworkers.
No matter how you choose to serve them, these Mocha Peppermint Cookie Bars are sure to be a hit. Their unique flavor and texture make them feel like a gourmet treat, and they bring a little bit of homemade joy to any occasion.
How To Store & Reuse Mocha Peppermint Cookie Bars Leftovers
While these Mocha Peppermint Cookie Bars have a tendency to disappear quickly, on the off chance you have leftovers, storing them properly is key to keeping them fresh and delicious. Because of the gooey sweetened condensed milk layer, they need to be stored with a bit of care to maintain their perfect texture. The goal is to keep them from drying out while also preventing them from becoming too sticky or soggy.
The best way to store these bars is in a single layer in an airtight container. If you need to stack them, I highly recommend placing a sheet of parchment or wax paper between the layers. This is very important, as it will prevent the gooey tops from sticking to the bottoms of the bars above them, which can create a real mess. You can store them at room temperature for up to three days. If you need to keep them for longer, they will last in the refrigerator for up to a week. Just be aware that chilling them will make them firmer. I personally enjoy them cold straight from the fridge, but you can also let them sit out for about 20 minutes to come back to room temperature before serving.
If you find yourself with leftovers and want to enjoy them in a new way, there are a few fun things you can do. Here are some ideas for reusing your cookie bars:
- Ice Cream Topping: My absolute favorite way to reuse these bars is to crumble them up and use them as a topping for ice cream. The different textures of the soft cookie, chewy topping, and crunchy candies make it the ultimate mix in for a bowl of vanilla, chocolate, or even coffee ice cream.
- Mocha Peppermint Milkshake: For a truly decadent treat, blend a couple of leftover cookie bars with a few scoops of vanilla ice cream and a splash of milk. The result is a thick, creamy, and incredibly flavorful milkshake that tastes like a holiday celebration in a glass.
- Trifle Layers: Cut the bars into small cubes and use them as a layer in a dessert trifle. Alternate layers of the cookie bar cubes with layers of chocolate pudding, whipped cream, and maybe some extra crushed peppermint candies for a stunning and easy dessert.
Proper storage ensures you can enjoy these tasty treats for days, and getting creative with leftovers means not a single crumb of these delicious Mocha Peppermint Cookie Bars will go to waste.
Substitutions & Variations For Mocha Peppermint Cookie Bars
One of the things I love most about a good recipe is its flexibility, and these Mocha Peppermint Cookie Bars are wonderfully adaptable. While I think the recipe is perfect as is, you can certainly make some swaps and changes to suit your taste preferences or what you happen to have in your pantry. Playing around with the ingredients is part of the fun of baking at home, so don’t be afraid to get creative and make this recipe your own.
The toppings are the easiest place to start experimenting. The combination of peppermint and M&Ms is festive and fun, but there are so many other possibilities. You can create different flavor profiles just by changing up what you sprinkle on top before that final bake. Think of the cookie base as your canvas and the toppings as your paint. Just be sure to use ingredients that can stand up to the heat of the oven and will taste good with the mocha chocolate base.
Here are a few substitutions and variations that work beautifully with this recipe:
- Chocolate Swaps: If you’re not a fan of white chocolate, you can easily substitute it with semi sweet, milk chocolate, or dark chocolate chips in the cookie base. For the topping, instead of peppermint baking chips, try using Andes mint baking bits, caramel bits, or even butterscotch chips for a completely different flavor profile.
- Candy and Nut Additions: The mini M&Ms can be swapped for a variety of other candies or nuts. Try using crushed Oreos, chopped Reese’s Peanut Butter Cups, or toffee bits. For a bit of crunch, consider adding chopped pecans, walnuts, or almonds to the topping layer along with the other chips. A sprinkle of flaky sea salt on top before the final bake would also be a fantastic addition to balance the sweetness.
- Dietary Considerations: For a gluten free version, you can substitute the all purpose flour with a good quality one to one gluten free baking flour blend. Make sure your blend contains xanthan gum. The results are quite comparable, though the texture of the cookie base may be slightly different.
- Flavor Extracts: If you don’t have coffee extract or want to lean more heavily into the mint flavor, you can omit the coffee extract and add half a teaspoon of pure peppermint extract to the cookie dough instead. This will give you a double dose of minty goodness.
Feel free to mix and match these ideas. You could create a caramel nut version with caramel bits and pecans, or a peanut butter cup version with chopped Reese’s. The possibilities are nearly endless, making these Mocha Peppermint Cookie Bars a recipe you can return to again and again with a new twist each time.
Mocha Peppermint Cookie Bars
Ingredients
- 2oz unsweetened chocolate, coarsely chopped
- 2 C all purpose flour
- 3 tsp baking powder
- 1/2 tsp salt
- 12 tbsp butter, room temp
- 4 tbsp vegetable shortening
- 1 1/3 C packed brown sugar
- 1/2 C granulated sugar
- 2 eggs, room temp
- 2 tsp pure coffee extract
- 1 C white chocolate chips
- 1 C peppermint baking chips
- 1/2 C mini M&M Baking Bits
- About 3/4 of a 14oz can of sweetened condensed milk
- 1 tsp Christmas colored sprinkles
Instructions
- Line a 13x9 baking pan with parchment paper
- Combine the flour, baking powder, and salt in a mixing bowl.
- Using the double boiler method, melt the chocolate. I don't have a double boiler so I filled a sauce pan with some water and then place a hefty glass bowl over top of it and melted the chocolate in the glass bowl.
- In the bowl of a stand mixer, beat together the butter, shortening and sugars on medium speed until blended. Beat in the melted chocolate, egg and coffee extract until the mixture is smooth.
- Beat in the flour mixture until just combined. Stir in the white chocolate chips.
- Press into the parchment lined baking sheet and bake at 350 for 15-20 minutes. Do not bake it all the way.
- Remove from the oven and top with the peppermint chips, M&Ms, sprinkles and then pour over the sweetened condensed milk. Add a few more sprinkles, if desired.
- Bake at 350 for another 20-25 minutes or until bubbly.
- Cool completely and then lift out of the baking ban and cut into squares.
Notes
Cookie crust adapted from Williams Sonoma Baking Cookbook
5 FAQs About Mocha Peppermint Cookie Bars
Here are some straightforward answers to the most common questions I receive about this Mocha Peppermint Cookie Bars recipe.
Can I make these Mocha Peppermint Cookie Bars ahead of time?
Absolutely! These bars are actually a great candidate for making ahead, which is a lifesaver, especially during the busy holiday season. You have a couple of options depending on how far in advance you need to prepare them. If you’re just looking to get a head start by a day or two, you can bake them completely, let them cool, cut them, and store them in an airtight container at room temperature. They will stay perfectly fresh and delicious for up to three days.
If you need to make them further in advance, you can prepare and bake the cookie base, let it cool completely in the pan, and then wrap the entire pan tightly in plastic wrap and then foil. You can store this in the refrigerator for up to two days. When you’re ready to finish them, simply unwrap the pan, add all your toppings and the sweetened condensed milk, and proceed with the second bake as instructed in the recipe. This method ensures that the topping is fresh, bubbly, and gooey right when you serve them. This is my preferred make ahead method for parties.
Why did my Mocha Peppermint Cookie Bars turn out dry or crumbly?
There are a few culprits that could lead to dry or crumbly bars, and it almost always comes down to either measurements or baking time. The most common reason is overbaking. The two part baking process can be a little tricky if you’re not watching carefully. It’s especially important not to overbake the crust during the first bake. It should be just set, not fully baked through. If the crust is baked for too long initially, it will continue to bake during the second round and can become hard and dry. Using an oven thermometer can ensure your oven is at the correct temperature, as many home ovens can run hot.
Another potential issue is the measurement of your flour. When you measure flour, it’s best to use the “spoon and level” method. This means you should use a spoon to scoop the flour into your measuring cup and then use the back of a knife to level it off. Scooping the measuring cup directly into the bag of flour can compact it, causing you to use too much flour, which will result in a drier, denser cookie base. Finally, be sure you don’t overmix the dough after adding the flour. Mix only until the flour is just combined to keep the bars tender.
Do I have to use sweetened condensed milk in these Mocha Peppermint Cookie Bars?
The sweetened condensed milk is really the secret ingredient that gives these bars their signature gooey, chewy, fudgy topping. It performs a specific function by caramelizing during the bake and binding all of the toppings together into a decadent layer. There isn’t a perfect one to one substitute that will give you the exact same result. Leaving it out would result in a bar with a simple cookie base and loose toppings that would likely fall off when you cut them.
If you are unable to use it or simply don’t have it on hand, you could try a different approach, though the final product will be quite different. One option would be to bake the cookie base with all the toppings for the full amount of time, and then once it’s out of the oven, drizzle it with a melted chocolate or a caramel sauce. This would help hold things together and add moisture, but you would lose that uniquely chewy, baked-in layer that makes these bars so special. I highly recommend sticking with the sweetened condensed milk if at all possible for the true experience.
What is the best way to cut Mocha Peppermint Cookie Bars cleanly?
Getting clean, sharp cuts can be tricky with any gooey bar cookie, but a few simple tricks will give you bakery perfect squares every time. The most critical step is to let the bars cool completely. I cannot stress this enough. If they are even slightly warm, the topping will be too soft and will smear, and the cookie base may crumble. I often pop the cooled pan into the refrigerator for about 30 minutes before cutting to help everything firm up even more.
Once they are fully chilled, lift the entire slab out of the pan using your parchment paper handles and place it on a sturdy cutting board. Use a large, heavy, sharp knife. A long chef’s knife works much better than a small paring knife. For the cleanest cuts, run the knife blade under hot water and then wipe it dry before making each cut. The heat from the blade will melt the chocolate and gooey bits just enough to slice through cleanly. After each single cut, wipe the blade clean with a paper towel. This prevents you from dragging crumbs and melted chocolate across the top of the next bar. It’s a little extra work, but the beautiful results are well worth it.
Can I freeze Mocha Peppermint Cookie Bars?
Yes, these bars freeze surprisingly well, which is another reason they are great for the holidays. You can bake a big batch and save some for later. To freeze them, first let them cool completely and then cut them into individual squares. The key to successful freezing is to prevent them from sticking together and to protect them from freezer burn. I recommend placing the cut bars on a parchment lined baking sheet in a single layer and putting the sheet in the freezer for about an hour, or until the bars are firm. This is called flash freezing.
Once the bars are frozen solid, you can wrap each one individually in plastic wrap, and then place all the wrapped bars into a larger freezer safe zip top bag or an airtight container. This double wrapping provides extra protection. They can be stored in the freezer for up to three months. When you’re ready to enjoy them, you can thaw them in the refrigerator overnight or on the counter for a few hours. They taste just as good as the day they were made.
Try These Recipes Next
If you loved the festive combination of chocolate and peppermint in these bars, you’re in luck! I have a few other recipes you’re sure to enjoy.
- 40 Chocolate Peppermint Recipes: A huge roundup of my favorite chocolate and peppermint treats, perfect for holiday baking inspiration.
- Mint Chocolate Mocha Cookie Dough Bites: If you love the mocha twist, these no bake cookie dough bites are an easy and delicious treat.
- Chocolate Peppermint Fudge: A classic, rich, and creamy fudge recipe that’s a must have for any holiday dessert platter.
Happy baking, y’all!
I am obsessed with those Andes baking chips! I have already gone through a bag and need to get more! these look great Julie!
Thank you so much, Nancy!
A perfect intro into holiday baking!! So festive!
Thank you, Nicole!
I love these cookie bars, they look wonderful and so festive Julie! Hehe, I can’t seem to resist all the seasonal chocolate and candy either, they’re so much fun :)
I am obsessed with peppermint and mocha and as much as I tried waiting until after Thanksgiving before breaking into the mints I caved the week before Thanksgiving as well. I am so glad you did too because these bars are beautiful and everything the winters should be made of!
I sure wouldn’t mind a few of these floating around my office either!
Mmm, gotta love office treats!
I love christmassy treats like this! The flavor combo sounds fab, and I’m sure they taste lovely with some ice-cream on top indeed ;)
I just can’t get enough of those peppermint chips this year! These bars are so crazy good looking!!!
These look awesome Julie! I love how festive these treats are. YUM and pinned! Have a great week. :)
Pingback: Marvelous Mondays Link Party 76 - This Gal Cooks
Pingback: Chocolate Peppermint Fudge | This Gal Cooks
Pingback: Friday Four 14: Christmas Desserts | This Gal Cooks
Pingback: Over 40 Chocolate Peppermint Recipes | This Gal Cooks
These cookies look amazing! Peppermint Mochas are my favorite holiday drink, so this recipe is perfect! Pinning for later, thanks for sharing!
Thanks for sharing on the What’s for Dinner link up!
Such a perfect treat for the holidays!! Thanks for sharing with us at the Share the Wealth Sunday link up!!
Those look wonderful Julie! I had to tweet and G+ share them :-) Thanks for sharing this with us at the DI & DI Link party. Hope you had fun, and have a great weekend!
Pingback: Great Ideas -- 17 Perfect Peppermint Ideas!
These sound delish! Thanks for linking up with Funtastic Friday!
Pingback: 17 Peppermint Treats ⋆ Cupcakes and Crinoline
I just pinned y our fabulous Mocha Peppermint Cookie Bars, can’t wait to try them! I really appreciate you sharing with us at Full Plate Thursday. Hope you have a great week and come back soon!
Miz Helen
Pingback: 12 Peppermint Recipes & More | Whimsy & Hope
These sound amazing! Thanks for sharing with us at Funtastic Friday…I have chosen this post to be featured as one of my favorites on this coming Friday’s Funtastic Friday!
Pingback: Funtastic Friday 105 | Olives & Okra
Pingback: Funtastic Friday 105 » Homespun Engineer
Pingback: Funtastic Friday Link Party 105 - Easy Peasy Pleasy
Pingback: Funtastic Friday 105 | ambient wares
Pingback: 25 HOLIDAY COOKIE FAVORITES! | Cooking on the Front Burner