
Unforgettable Apple Pie Recipe With Bourbon and Salted Caramel
There are certain smells that just feel like home, and the scent of a bubbling apple pie baking in the oven is at the very top of my list. My grandmother’s apple pie was legendary in our family. It was the centerpiece of every holiday, the comfort after a long week, and the sweet reward for a good report card. She made a perfect, traditional pie with a flaky crust and perfectly spiced apples, and for years, I never dreamed of changing a single thing.
But as I got older and started developing my own style in the kitchen, I found myself wanting to put my own little spin on the classics. I wanted to create a version that paid tribute to her perfect apple pie but had a little something extra, something that would make people pause after the first bite and say, “Wow, what is in this?”
One evening, while my husband and I were enjoying a small glass of Kentucky bourbon on the porch, the idea struck me. The warm, oaky notes of the bourbon would be the perfect companion to sweet apples and warm spices. I went to work the next day, adding a splash of good bourbon and a touch of sea salt to create a rich, complex caramel sauce right in the pan with the apples. The result was this Bourbon-Infused Salted Caramel Apple Pie, a dessert that is deeply comforting and familiar, yet excitingly new. It’s my little secret for turning a classic into a showstopper.
This is the apple pie I make when I really want to impress. It’s got all the heart of grandma’s recipe, with a sophisticated little kick that’s all my own.
Why This Apple Pie Recipe Works
Apple pie is more than just a dessert, it’s a piece of Americana. It’s a staple that has graced family tables for generations, beloved for its simple, honest flavors. The combination of tender, spiced apples and a buttery, flaky crust is a timeless classic for a reason. It evokes feelings of warmth, comfort, and celebration. Everyone has a memory tied to apple pie, which is what makes it so special to bake and to share. It’s the standard by which all other fall desserts are measured.
So, why mess with a good thing? Because sometimes, a little twist can elevate a classic from wonderful to truly unforgettable. This apple pie recipe works because it respects the tradition while adding a modern layer of flavor that makes it stand out. The secret is in the filling. Instead of just tossing raw apples with sugar and spices, we take the time to precook them. This simple step draws out excess moisture, which is the key to preventing a soggy bottom crust. It also ensures the apples are perfectly tender and won’t shrink during baking, so you get a full, beautiful pie without that dreaded gap under the top crust.
The real magic, though, comes from the bourbon and salted caramel notes. As the apples cook with dark brown sugar, butter, and spices, they create their own rich caramel sauce right in the skillet. Adding a splash of good bourbon at the end cuts through the sweetness with its complex, oaky warmth. The fine sea salt balances everything, enhancing the caramel and making the apple flavor pop. This isn’t just a pie, it’s a complete flavor experience where every single ingredient has a purpose. The result is a sophisticated apple pie that will have everyone asking for your secret.
Ingredients for Apple Pie
Great ingredients are the foundation of any fantastic recipe, and this apple pie is no exception. While the list might look familiar, the quality and type of each component play a huge role in the final flavor and texture. We are building layers of flavor from the crust to the filling, so let’s make sure we start with the best.
The star of our filling is, of course, the bourbon. This is where you can really have fun. You don’t need to use the most expensive bottle on your shelf, but I recommend using a bourbon that you would happily sip. Its warm, vanilla, and oak notes are going to infuse the entire filling, so a smoother, mid-range brand will yield the best results. The dark brown sugar is another key player, providing that deep molasses flavor essential for a true caramel taste, far richer than granulated sugar alone.
For the apples, using a mix is my secret weapon. Tart Granny Smith apples hold their shape beautifully and provide a wonderful acidic backbone that keeps the pie from being too sweet. I pair them with a sweeter, crisper apple like Honeycrisp or Braeburn, which breaks down just a little more to create a lovely, jammy texture within the filling. And for the crust, nothing beats the flavor of all-butter. Make sure your butter is very cold, as those little pieces of solid butter are what will create steam in the oven, leading to an irresistibly flaky texture.
- For the All-Butter Pie Crust:
- 2 ½ cups all-purpose flour
- 1 teaspoon salt
- 1 tablespoon granulated sugar
- 1 cup (2 sticks) cold unsalted butter, cut into ½-inch cubes
- ½ cup ice water
- For the Salted Bourbon Caramel Apple Filling:
- 6-7 medium apples (a mix of Granny Smith and Honeycrisp is recommended), peeled, cored, and sliced ¼-inch thick
- ¾ cup packed dark brown sugar
- ¼ cup granulated sugar
- ¼ cup all-purpose flour
- 1 teaspoon ground cinnamon
- ¼ teaspoon ground nutmeg
- ⅛ teaspoon ground allspice
- ½ teaspoon fine sea salt
- 2 tablespoons unsalted butter
- 3 tablespoons bourbon
- 1 tablespoon fresh lemon juice
- For Assembly and Finishing:
- 1 large egg, beaten with 1 tablespoon of milk (for egg wash)
- 2 tablespoons turbinado sugar, for sprinkling
Step-by-Step Instructions For Making Apple Pie
Making a homemade apple pie from scratch might seem intimidating, but I promise it’s just a series of simple steps. We’ll walk through each one together, and I’ll share my best tips for getting it right every time. The key is patience, especially when it comes to chilling the dough and cooling the pie.
1. Prepare the Pie Crust
In a big bowl, whisk your dry ingredients, the flour, salt, and sugar. Then, add your very cold, cubed butter. I like to use a pastry blender to cut the butter into the flour until it looks like coarse meal with some pea-sized butter chunks still visible. Those chunks are flavor pockets that will make your crust flaky. Drizzle in the ice water one tablespoon at a time, mixing gently with a fork just until the dough comes together. Don’t overmix. Divide the dough in two, shape each half into a flat disk, wrap it tightly in plastic wrap, and let it rest in the fridge for at least an hour. This chill time is non-negotiable, it lets the gluten relax and keeps the butter firm.
2. Make the Filling
While the dough chills, get your filling ready. After you peel, core, and slice your apples, toss them in a large bowl with the lemon juice. This simple step prevents them from turning brown while you prepare the other ingredients. In a separate, smaller bowl, mix together your sugars, flour, and all those wonderful warm spices like cinnamon, nutmeg, and allspice, plus the sea salt. Having this mixture ready to go makes the cooking process smooth and easy.
3. Cook the Filling
Now for the part that guarantees no soggy bottom. Melt the butter in a large skillet or a Dutch oven over medium heat. Add your apple slices and cook them for about 5 to 7 minutes. You want them to start softening but not turn to mush. Sprinkle in your sugar and spice mixture and stir gently. As it cooks for another 5 minutes, the sugars will melt and combine with the apple juices to create a beautiful, syrupy sauce.
4. Incorporate the Twist
This is my favorite part. Carefully pour the bourbon into the skillet. It will bubble up and sizzle, so stand back for a moment. Let it cook for about a minute, stirring gently. This brief cooking time allows some of the raw alcohol to burn off while locking in that delicious, complex bourbon flavor. Now, remove the skillet from the heat and let the filling cool completely. I mean completely. Putting hot filling into a pie crust is a recipe for disaster.
5. Assemble the Pie
Preheat your oven to 425°F. On a floured surface, roll out one of your chilled dough disks into a 12-inch circle and gently place it in your 9-inch pie plate. Don’t stretch the dough, just let it settle in. Then, spoon your completely cooled apple filling into the crust, mounding it slightly in the center.
6. Add the Top Crust
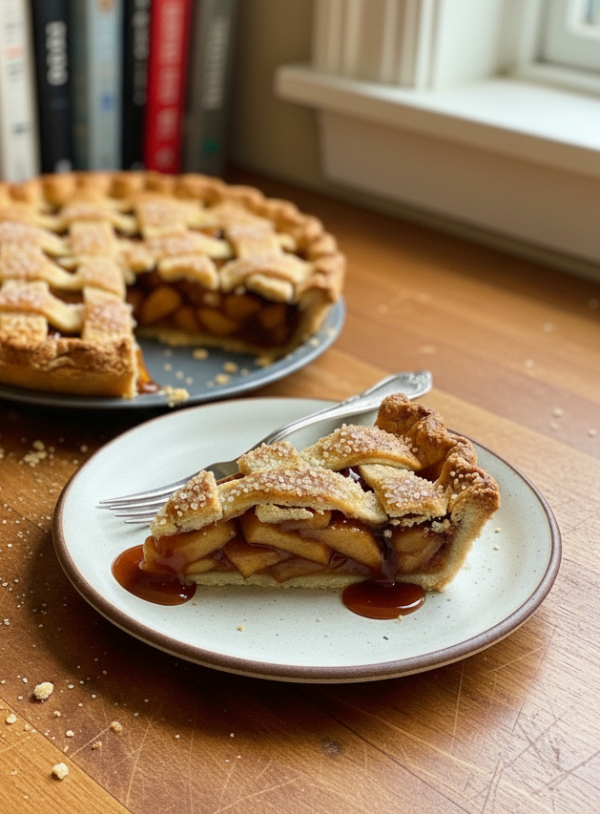
Roll out your second disk of dough. You can either place this on top as a solid crust, making sure to cut a few vents for steam to escape, or you can get creative and cut it into strips to weave a beautiful lattice top. Trim any excess dough from the edges and crimp them together with your fingers or a fork to create a tight seal.
7. Finishing Touches
For that professional, bakery-style finish, brush the top crust with a simple egg wash, which is just an egg beaten with a little milk. This will give the pie a gorgeous golden-brown shine. Then, sprinkle generously with turbinado sugar. This coarse sugar won’t dissolve completely, giving you a delightful crunchy texture on top.
8. Bake
Place your pie on a baking sheet to catch any drips, because this filling is juicy and likes to bubble over. Bake at the high temperature of 425°F for 15 minutes to set the crust, then reduce the heat to 375°F and bake for another 35 to 45 minutes. The pie is done when the crust is a deep golden brown and you can see the filling bubbling thickly through the vents. If the edges start getting too dark, just tent them with some aluminum foil.
9. Cool and Serve
This is the hardest step, I know. You must let the pie cool on a wire rack for at least 3 to 4 hours before you even think about slicing it. This allows the caramel filling to set up properly. If you cut into it while it’s still hot, you’ll have a soupy, delicious mess. Patience here is rewarded with perfect, clean slices.
How To Serve Apple Pie
Serving this Bourbon-Infused Salted Caramel Apple Pie is almost as much fun as making it. The rich aroma alone will have everyone gathered in the kitchen, but a little extra flair in the presentation can make the experience even more special. Of course, there is absolutely nothing wrong with a simple, unadorned slice. It’s magnificent all on its own, especially when it’s slightly warm from the oven.
However, if you want to take it to the next level, there are a few classic pairings that are simply divine. A warm slice of this pie practically begs for something cold and creamy to go with it. The contrast in temperature and texture is what dessert dreams are made of. Think about complementing the warm, spicy, and boozy notes of the pie with flavors that will enhance them without overpowering them. A little bit of extra effort in serving shows your guests how much care you put into the entire dessert.
Here are a few of my favorite ways to serve this apple pie:
- Classic à la Mode: You can never go wrong with a generous scoop of high-quality vanilla bean ice cream. The cold, creamy vanilla melts into the warm, gooey bourbon caramel filling, creating an absolutely irresistible combination. For a twist, try butter pecan or even salted caramel ice cream.
- A Dollop of Cream: Freshly whipped heavy cream, sweetened with just a touch of powdered sugar and vanilla, is a lighter but equally delicious option. For a truly grown-up version, whip a tablespoon of bourbon right into the cream.
- Sharp Cheddar Slice: This might sound unusual to some, but it’s a time-honored tradition in places like New England and the Midwest. A thin slice of sharp cheddar cheese served on top of or alongside a slice of warm apple pie creates an amazing sweet and savory contrast. The saltiness of the cheese is a perfect foil for the sweet caramel filling.
- Extra Caramel Drizzle: If you’re a caramel lover like me, why not add more? A little drizzle of your favorite salted caramel sauce over the top of the slice and the plate adds a beautiful finishing touch and an extra layer of decadence.
No matter how you choose to serve it, this apple pie is best enjoyed warm. A quick 15 seconds in the microwave or a few minutes in a warm oven is all it takes to bring a room-temperature slice back to its full glory.
How To Store & Reuse Apple Pie Leftovers
While this pie is so delicious it rarely lasts long in my house, it’s good to know how to properly store any leftovers to keep them tasting fresh. The good news is that apple pie holds up quite well, so you can enjoy it for several days after baking. The storage method depends on how quickly you plan to finish it.
For short-term storage, you can leave the pie right in its dish. Just cover it loosely with aluminum foil or plastic wrap. An airtight container isn’t ideal, as it can trap moisture and make the crust soggy. You want to let it breathe a little. Stored this way, the pie is perfectly fine on the countertop for up to two days. After that, it’s best to move it to the refrigerator to prolong its life for another two or three days. The crust will soften a bit in the fridge, but we can fix that when we reheat it.
Reheating is key to reviving that day-one deliciousness. While you can eat it cold or at room temperature, warming it up brings back the flaky texture of the crust and makes the filling gooey and wonderful again. Here are the best ways to store and reheat your pie:
- Room Temperature Storage: Cover loosely with foil and keep on the counter for up to 2 days. This is the best method for maintaining the crust’s texture.
- Refrigerator Storage: For longer storage, cover and place in the fridge for up to 5 days. The crust may become a little less crisp.
- Reheating in the Oven: The best way to reheat a slice is in an oven or toaster oven. Place the slice on a baking sheet and warm it at 350°F for about 10-15 minutes, or until the filling is warm and the crust is crisp again.
- Reheating in the Microwave: If you’re in a hurry, you can use the microwave, but be warned, it will make the crust soft. Heat a slice for 30-45 seconds. It’ll still be delicious, just not crispy.
If you find yourself with just a slice or two left, don’t just let it sit there. Get creative! Crumble a piece over a bowl of vanilla yogurt or your morning oatmeal for a decadent breakfast treat. My personal favorite way to reuse the last slice is to blend it with a couple of scoops of vanilla ice cream and a splash of milk to make an incredible, thick apple pie milkshake. It’s an amazing way to make sure not a single crumb goes to waste.
Substitutions & Variations For Apple Pie
One of the best things about a classic recipe like apple pie is that it serves as a fantastic canvas for your own creativity. While I think this Bourbon-Infused Salted Caramel version is just perfect as is, I always encourage folks to play around in the kitchen and make a recipe their own. There are plenty of simple swaps and additions you can make based on what you have on hand or what your personal tastes are.
The most obvious place for variation is in the “twist” ingredients. If you’re not a fan of bourbon or don’t keep it in the house, there are other spirits that work wonderfully. A spiced rum or an apple brandy (Calvados) would be a fantastic substitute, each bringing its own unique character to the caramel filling. If you prefer to keep the pie entirely non-alcoholic, that’s easy too. Simply replace the bourbon with an equal amount of good quality apple cider. To mimic some of the complexity lost from the bourbon, you could add an extra splash of vanilla extract.
You can also adjust the spices or add some texture to the filling. The possibilities are nearly endless, allowing you to tailor this apple pie perfectly to your next holiday gathering or family dinner. Here are a few ideas to get you started:
- Alcohol-Free Version: As mentioned, substitute the 3 tablespoons of bourbon with 3 tablespoons of apple cider and add ½ teaspoon of vanilla extract to the filling when you would have added the bourbon.
- Different Spirits: Try using a dark or spiced rum for a more tropical, molasses-forward flavor, or an apple brandy to double down on the apple taste.
- Add Nuts for Crunch: For a wonderful textural contrast, toss ½ cup of toasted chopped pecans or walnuts in with the apple filling before spooning it into the crust.
- Spice It Up: Feel free to play with the spice blend. Add a pinch of ground cardamom for a floral note, a bit of ground ginger for some zing, or even a tiny pinch of black pepper to enhance the other spices.
- Crumble Topping: If you’re not in the mood to make a double crust or a lattice top, you can easily top this pie with a delicious crumble topping instead. Just combine 1 cup of flour, ½ cup of brown sugar, ½ cup of cold cubed butter, and ½ cup of rolled oats until crumbly, then sprinkle it over the filling before baking.
- Gluten-Free Pie: You can make this pie gluten-free by using your favorite measure-for-measure gluten-free flour blend in both the crust and as the thickener in the filling. Results will vary based on the brand of flour used, so be sure to use one you trust for pie crusts.
Bourbon-Infused Salted Caramel Apple Pie
Description: A classic apple pie with a sophisticated twist. Tender apples are cooked in a homemade salted caramel sauce infused with the warm, oaky notes of Kentucky bourbon, all baked inside a flaky, all-butter crust.
Yield: 8 servings | Category: Dessert | Cuisine: American
Prep Time: 45 minutes | Cook Time: 55 minutes
Ingredients
- For the All-Butter Pie Crust: 2 ½ cups all-purpose flour, 1 tsp salt, 1 tbsp granulated sugar, 1 cup cold unsalted butter, ½ cup ice water.
- For the Filling: 6-7 medium apples (Granny Smith & Honeycrisp), ¾ cup dark brown sugar, ¼ cup granulated sugar, ¼ cup all-purpose flour, 1 tsp cinnamon, ¼ tsp nutmeg, ⅛ tsp allspice, ½ tsp fine sea salt, 2 tbsp unsalted butter, 3 tbsp bourbon, 1 tbsp lemon juice.
- For Assembly: 1 large egg, 1 tbsp milk, 2 tbsp turbinado sugar.
Instructions
- Crust: Combine dry ingredients. Cut in cold butter until coarse crumbs form. Add ice water until dough forms. Divide in half, form into disks, wrap, and chill for at least 1 hour.
- Filling Prep: Toss sliced apples with lemon juice. In a separate bowl, whisk sugars, flour, spices, and salt.
- Cook Filling: Melt butter in a skillet. Cook apples for 5-7 minutes until softened. Stir in sugar mixture and cook 5 more minutes until a syrup forms.
- Add Twist: Stir in bourbon and cook for 1 minute. Remove from heat and cool completely.
- Assemble: Preheat oven to 425°F. Roll out one dough disk and place in a 9-inch pie plate. Fill with cooled apple mixture.
- Top Crust: Roll out second dough disk and place on top, or create a lattice. Trim and crimp edges to seal.
- Finish: Brush with egg wash (egg + milk) and sprinkle with turbinado sugar.
- Bake: Bake at 425°F for 15 minutes. Reduce heat to 375°F and bake for 35-45 minutes, until golden and bubbly.
- Cool: Let pie cool on a wire rack for at least 3-4 hours before slicing.
Notes
Ensuring the filling is completely cool before adding it to the crust is the most important step for preventing a soggy bottom. Do not rush this step!
Servings: 8 | Calories: 550 kcal | Fat: 28g | Carbohydrates: 70g | Protein: 5g
5 FAQs About Apple Pie
Here are some straightforward answers to the most common questions I receive about this apple pie recipe.
How do I prevent a soggy bottom crust on my apple pie?
Ah, the dreaded soggy bottom. It’s the bain of many a pie baker’s existence, but I promise, it’s completely avoidable with a few key techniques. The biggest culprit is excess moisture from the apple filling soaking into the bottom crust before it has a chance to bake and get crispy. This recipe has the main solution built right in, which is precooking the filling. By simmering the apples on the stovetop first, you cook off a significant amount of their water content and thicken the juices with flour before the filling ever touches the raw dough. This step is a game-changer.
The second critical part of this method is letting the filling cool completely, and I mean to room temperature, before you assemble the pie. If you pour hot or even warm filling into your delicate, butter-laden crust, that butter will melt instantly, and you’ll lose all potential for flakiness. The dough will become greasy and heavy. Another trick is to bake the pie on a preheated baking sheet placed on the lowest rack of your oven. The direct, intense heat from the baking sheet helps to cook and set that bottom crust quickly, creating a barrier against any remaining moisture. Following these steps will give you a perfectly crisp, golden-brown bottom crust every single time.
What are the best apples for making apple pie?
The type of apple you use can make a huge difference in the final outcome of your pie. You want apples that have a firm texture and will hold their shape during baking, not turn into a mushy, applesauce-like mess. You also want a good balance of sweet and tart flavors to create a complex and interesting filling. That’s why I always recommend using a combination of at least two different varieties.
My go-to combination is Granny Smith and Honeycrisp. Granny Smith apples are very firm and distinctly tart, providing a wonderful acidic backbone that cuts through the richness of the caramel. They hold their shape perfectly. Honeycrisp apples are also firm and incredibly juicy and crisp, with a lovely sweet-tart balance. They soften a little more than the Granny Smiths, helping to create a nice, jammy consistency in the filling. Other fantastic baking apples include Braeburn, Jonagold, Golden Delicious, and Gala. The apples you want to avoid for pies are generally softer eating apples, like Red Delicious or McIntosh, as they tend to break down too much when cooked.
Can I make this apple pie ahead of time?
Yes, absolutely! This is a great recipe to prep in stages, which is especially helpful during busy holiday seasons. You have a few options for making it ahead. You can prepare the pie dough up to three days in advance. Just keep the two disks wrapped tightly in plastic wrap and stored in the refrigerator. You can also freeze the dough disks for up to three months. Just let them thaw in the refrigerator overnight before you plan to roll them out.
You can also make the entire filling a day or two ahead of time. Once it has cooked and cooled completely, store it in an airtight container in the refrigerator. When you’re ready to bake, all you have to do is roll out your crust, assemble, and pop it in the oven. You can even assemble the entire pie, place it unbaked in the freezer until firm, then wrap it tightly in plastic wrap and then foil. It will keep for up to 3 months. You can bake it directly from frozen, just add about 20-25 minutes to the total baking time. Or, you can bake the entire pie a day in advance. Let it cool completely and store it at room temperature. The flavor is often even better the next day as the filling has more time to set and the flavors meld.
Why is my apple pie filling watery?
A watery or runny apple pie filling is a common issue, and it usually comes down to one of a few things. The primary reason is often related to the apples themselves and the thickener. Apples release a lot of liquid as they cook. If there isn’t enough thickener, like the all-purpose flour used in this recipe, to absorb that liquid and turn it into a gel, the filling will be soupy. This recipe helps by precooking the filling, which allows you to see how thick the sauce is before it even goes into the pie.
Another reason could be not baking the pie long enough. The thickener needs to reach a certain temperature (around 200°F) to fully activate and do its job. A good visual cue is to look for the filling bubbling thickly through the vents in the top crust. If it’s bubbling, it’s hot enough. Finally, the most common mistake is slicing the pie while it’s still too hot. As the pie cools, the starches in the flour and the pectin from the apples continue to set and firm up the filling. If you cut into it straight from the oven, the molten filling will just pour out. You must practice patience and let it cool for at least 3-4 hours for clean, perfect slices.
Does the bourbon in this apple pie recipe make it alcoholic?
This is a great question, especially if you plan on serving the pie to children or individuals who do not consume alcohol. When you add alcohol to a dish and cook it, a portion of the alcohol content does evaporate or “cook off.” In this recipe, the bourbon is added to a hot skillet and allowed to bubble for about a minute. This process will cause a significant amount of the alcohol to dissipate.
However, it is a myth that all of the alcohol cooks away. The amount that remains depends on the cooking time and temperature. In a recipe like this with a very short cook time after the alcohol is added, some will definitely remain. The flavor of the bourbon is quite prominent, but the actual alcohol content per slice is very, very low. For most adults, it’s completely negligible. That said, if you are serving someone who is strictly avoiding alcohol for health, religious, or personal reasons, it is always best to be cautious and use the non-alcoholic substitution of apple cider and vanilla extract instead. The pie will still be absolutely delicious.
Try These Recipes Next
If you loved the cozy, comforting flavors of this apple pie, I have a few other recipes I think you’ll enjoy just as much.
- Easy Dutch Apple Pie Recipe: If you’re a fan of a crunchy, buttery streusel topping, you have to try this version. It’s a wonderful alternative to a double-crust pie.
- Apple Pie Oatmeal: Get all the flavor of apple pie in a wholesome breakfast bowl. It’s the perfect way to start a chilly fall morning.
- Apple Pie Butterscotch Snickerdoodle Bread: This recipe is a mouthful to say, and every bite is pure bliss. It combines so many amazing flavors into one incredible quick bread.
I hope you’ll give these a try and let me know what you think!