
Rich and Creamy Brown Butter Creamed Corn
I have a confession to make. For the longest time, I thought I didn’t like creamed corn. My only experience was with the pale, soupy stuff from a can that would show up at potlucks, and I just couldn’t get on board. It felt like a culinary mystery I was happy to leave unsolved.
That all changed one summer afternoon at my Aunt Carol’s house. She brought out a bowl of the most glorious, golden, and fragrant corn I had ever seen. It wasn’t soupy at all. It was rich, creamy, and brimming with the sweet flavor of fresh corn. I took one bite of her homemade Creamed Corn and I was a changed woman.
Of course, I had to ask for her secret. She told me it was all about using fresh corn and real cream. I took her wonderful recipe home and, as I always do, started tinkering. I wanted to add a layer of flavor that was subtle but made a real difference. After a few tries, I found it.
My special twist is brown butter. By simply melting the butter and letting it cook for a few extra minutes until it turns a lovely amber color, you unlock this incredible nutty, toasty flavor that perfectly complements the sweet corn. It takes this classic Southern side dish from simply good to absolutely unforgettable.
Why This Creamed Corn Recipe Works
Creamed corn is a cornerstone of Southern cooking, a beloved side dish that evokes feelings of comfort, family gatherings, and holiday feasts. For generations, it has graced tables alongside fried chicken and Thanksgiving turkey. Its popularity lies in its beautiful simplicity, transforming humble corn into a luxurious, satisfying dish.
Traditionally, recipes rely on butter, cream, and the natural sweetness of the corn itself. Some versions use flour or cornstarch as a thickener, but I find the best texture comes from a more natural approach. This recipe utilizes a classic technique of scraping the corn cobs after the kernels are removed. This releases the starchy, sweet “corn milk” left on the cob, which acts as a natural thickener and intensifies the corn flavor beautifully.
The real magic in my version, however, is the brown butter. Regular melted butter is good, but brown butter is divine. The process of browning the milk solids in the butter creates a deep, nutty, and almost caramel-like aroma and taste. This savory depth provides a stunning contrast to the sweet corn and rich cream, elevating the entire dish from a simple side to a standout star.
By combining a classic technique like using corn milk with a simple, elegant twist like brown butter, this Creamed Corn recipe delivers a complexity of flavor you just won’t find in other versions. It’s creamy, sweet, savory, and nutty all in one perfect bite. It’s the kind of dish that makes people stop and ask, “What did you do to this? It’s amazing!”
Ingredients for Creamed Corn
The beauty of this dish is in its simple, high quality ingredients. When you start with the good stuff, you don’t need to do much to make it shine. The real star, my little secret, is browning the butter to give it that special nutty flavor that makes all the difference.
Here’s what you’ll need to gather:
- 4 tablespoons unsalted butter
- 5 cups sweet corn kernels (from 6-7 fresh ears, or frozen and thawed)
- Reserved “corn milk” (scraped from the cobs with the back of a knife after removing kernels)
- 1 large shallot, finely minced
- 1 cup heavy cream
- 1/2 cup whole milk
- 1 teaspoon granulated sugar (optional, depending on corn sweetness)
- 3/4 teaspoon kosher salt, plus more to taste
- 1/4 teaspoon freshly ground black pepper
- A pinch of freshly grated nutmeg
- 2 tablespoons finely chopped fresh chives, for finishing
A few notes on these ingredients are in order. For the corn, nothing beats fresh, sweet corn right off the cob in the middle of summer. The flavor is unparalleled. If fresh isn’t an option, a good quality frozen sweet corn is your next best bet. Just be sure to thaw it completely first.
The unsalted butter is our key flavor-booster. Using unsalted allows you to control the salt level perfectly, and it browns more predictably than salted butter. Don’t skip the browning step, y’all. It’s the heart of this recipe.
I choose a shallot over a regular onion because its flavor is milder and a bit more delicate, so it doesn’t overpower the corn. Finally, that little pinch of freshly grated nutmeg is a secret weapon. You won’t necessarily taste “nutmeg,” but it adds a subtle warmth that rounds out all the flavors. It’s that little something that makes people wonder what your secret is.
Step-by-Step Instructions For Making Creamed Corn
This recipe comes together quite easily right on the stovetop. The most important part is to give the ingredients time to simmer and meld together, creating that wonderfully thick and creamy sauce. Just follow along, and you’ll have the best creamed corn of your life.
Step 1: Prep the Corn
If you’re using fresh corn, your first job is to get those kernels off the cob. I find the easiest way is to stand the cob on its end inside a large bowl and carefully slice downwards with a sharp knife. The bowl catches all the runaway kernels. Once the kernels are removed, take the back of your knife and scrape it down the length of the bare cob. You’ll see a milky, pulpy liquid come off. That’s pure gold! This “corn milk” is a natural thickener and adds so much flavor. Collect it all in a small bowl and set it aside with your kernels.
Step 2: Brown the Butter
In a large, heavy-bottomed skillet or a Dutch oven, melt the unsalted butter over medium heat. A light-colored pan is helpful here so you can see the color changing. Don’t walk away! Once the butter melts, it will start to foam. Swirl the pan occasionally. After about 3 to 4 minutes, you’ll see little brown specks forming at the bottom, and it will smell wonderfully nutty. That’s your brown butter. You’ve just unlocked a whole new level of flavor.
Step 3: Sauté the Shallot
As soon as the butter is browned, immediately add your finely minced shallot. The butter is hot, so the shallot will cook quickly. Sauté it for about two minutes, stirring constantly. You want it to become soft and fragrant, but be careful not to let the butter or the shallot burn. This step builds the aromatic foundation of the dish.
Step 4: Cook the Corn
Now, stir in your corn kernels along with the salt, pepper, and that little pinch of nutmeg. Give everything a good stir to coat the corn in that beautiful brown butter. Continue cooking and stirring for about five minutes. The corn will turn a vibrant, glossy yellow and will just start to become tender.
Step 5: Add the Liquids
Pour in the heavy cream, whole milk, and that reserved corn milk you scraped from the cobs. If your corn isn’t super sweet, this is when you can add the optional teaspoon of sugar. Stir everything together and bring the mixture to a lively simmer over medium heat. You’ll see little bubbles popping up across the surface.
Step 6: Simmer to Perfection
Once it’s simmering, reduce the heat to low. You want to maintain a very gentle simmer, not a boil. Let it cook for 15 to 20 minutes, stirring every few minutes to prevent sticking. During this time, the corn will become perfectly tender, and the cream will reduce and thicken into a luscious sauce that clings to every kernel. This slow simmer is crucial for developing the flavor and texture.
Step 7: Finish and Serve
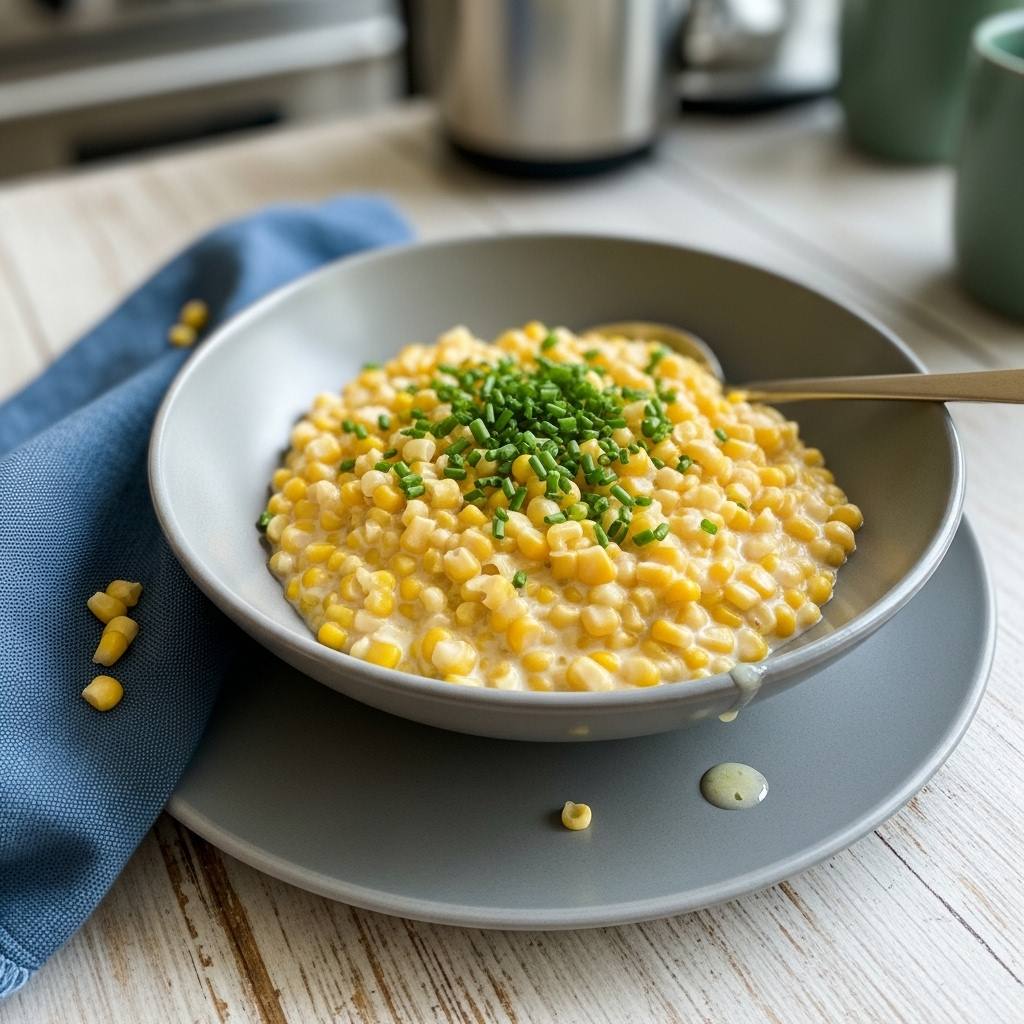
Remove the skillet from the heat. The last step is to stir in the fresh, finely chopped chives. They add a pop of color and a mild, fresh oniony flavor that brightens everything up. Give it one final taste and add a little more salt or pepper if you think it needs it. Your spectacular Creamed Corn is ready to be served hot.
How To Serve Creamed Corn
This Brown Butter Creamed Corn is so delicious, I could honestly just eat it with a spoon right out of the skillet. But, it truly shines as a versatile side dish that complements an incredible number of main courses. It’s a must have on any holiday table, especially for Thanksgiving, Christmas, or Easter dinner. It feels right at home next to a roasted turkey, a honey-glazed ham, or a beautiful prime rib.
Beyond the holidays, it’s the perfect partner for classic Southern comfort food. Imagine a spoonful of this creamy corn next to crispy fried chicken, a juicy pork chop, or a perfectly grilled steak. It adds a touch of sweetness and richness that balances savory meats wonderfully.
If you want to get a little more creative, here are a few of my favorite ways to serve it up:
- As a Topping: Spoon it over fluffy baked potatoes, creamy grits, or even a slice of savory cornbread. It turns a simple starch into a complete meal.
- In Individual Servings: For a more elegant presentation, serve the creamed corn in small, individual ramekins. Top with a sprinkle of smoked paprika or some extra chives for a restaurant-quality look.
- As a Delicious Base: Use it as a starter for a quick corn chowder. Just thin it out with a little chicken broth and add some potatoes or bacon.
- With a Crunchy Garnish: Add some textural contrast by topping it with crispy fried onions, crumbled bacon, or even some toasted breadcrumbs just before serving.
No matter how you choose to serve it, this dish is sure to be a hit. It’s the kind of side dish that people remember and ask for again and again. Be prepared to share the recipe!
How To Store & Reuse Creamed Corn Leftovers
While this creamed corn is absolutely best when served fresh and hot, leftovers are a very happy bonus. Because it’s made with a stable cream sauce, it stores and reheats beautifully, making it a great option for meal prep or for enjoying the day after a big holiday meal.
First, let the creamed corn cool down to room temperature completely before storing. This prevents condensation from forming inside the container. Once cooled, transfer it to an airtight container and store it in the refrigerator. It will keep well for up to four days.
When you’re ready to reheat it, the stovetop is your best friend. Place the leftovers in a small saucepan over low heat. It will likely have thickened up in the fridge, so you may need to add a splash of milk or cream to loosen it back to its original consistency. Stir it gently and frequently until it’s heated through. Reheating it slowly ensures the cream sauce stays smooth and doesn’t separate. While you can use a microwave, do so in short 30-second intervals, stirring in between to ensure even heating.
Don’t just reheat it, though. Leftover creamed corn is a fantastic ingredient for other dishes!
- Creamy Corn Pasta: Toss the leftover creamed corn with your favorite pasta and some Parmesan cheese for a quick and decadent mac and cheese alternative.
- Corn and Bacon Frittata: Whisk it into some eggs with crumbled bacon and cheese, then bake it for a delicious breakfast or brunch frittata.
- Savory Corn Pancakes: Mix a scoop of leftover creamed corn into your favorite pancake or waffle batter for a savory twist. Serve with a dollop of sour cream and chives.
- Quesadilla Filling: Use it as a creamy, cheesy filling for quesadillas along with some shredded chicken or black beans.
With so many delicious ways to use it, you might find yourself making a double batch just to guarantee you’ll have leftovers to play with during the week.
Substitutions & Variations For Creamed Corn
One of the things I love most about a great base recipe is how easily you can adapt it to your own tastes or what you have on hand in the pantry. This Creamed Corn is a perfect canvas for your culinary creativity. While I adore the nutty simplicity of the brown butter and chives version, here are some fun and delicious ways to switch things up.
Feel free to mix and match these ideas to create your own signature version. A recipe is just a roadmap, after all. The real fun begins when you take a little detour.
- Make It Spicy: For those who like a little heat, add one finely minced jalapeño along with the shallot. A pinch of cayenne pepper or a dash of your favorite hot sauce stirred in at the end also works wonders.
- Add Some Cheese: Everything is better with cheese, right? After you remove the skillet from the heat, stir in about a half cup of shredded cheese until it’s melted and gooey. Sharp cheddar, smoked Gruyère, or Monterey Jack would all be fantastic.
- Get Smoky: For a deep, smoky flavor, add a few slices of cooked and crumbled bacon at the end. Alternatively, a quarter teaspoon of smoked paprika added with the other seasonings will give it a nice smoky undertone.
- Change Up the Herbs: While I love the classic flavor of chives, other fresh herbs work beautifully. Try swapping them for finely chopped fresh parsley for brightness, cilantro for a Southwestern flair, or a little fresh thyme for an earthy note.
- A Southwestern Spin: Give it a taste of the Southwest by adding a can of diced green chiles (drained well) and swapping the chives for fresh cilantro. Topping it with some crumbled cotija cheese before serving would be the perfect finishing touch.
No matter how you tweak it, the core technique of browning the butter and simmering the corn in real cream will ensure you have a delicious and impressive side dish every single time.
Julie’s Brown Butter Creamed Corn
Description: A rich and luxurious creamed corn made with fresh sweet corn, nutty brown butter, and a hint of nutmeg. This is not your grandmother’s canned creamed corn; it’s a show-stopping side dish perfect for holidays or any special meal.
Yield: 6-8 servings | Category: Side Dish | Cuisine: Southern, American
Prep Time: 10 minutes | Cook Time: 25 minutes
Ingredients
- 4 tablespoons unsalted butter
- 5 cups sweet corn kernels (from 6-7 fresh ears, or frozen and thawed)
- Reserved “corn milk” from fresh cobs
- 1 large shallot, finely minced
- 1 cup heavy cream
- 1/2 cup whole milk
- 1 teaspoon granulated sugar (optional)
- 3/4 teaspoon kosher salt
- 1/4 teaspoon freshly ground black pepper
- A pinch of freshly grated nutmeg
- 2 tablespoons finely chopped fresh chives
Instructions
- If using fresh corn, cut kernels from cobs. Scrape the cobs with the back of a knife to extract the “corn milk” and set aside.
- In a large skillet over medium heat, melt the butter. Continue cooking, swirling occasionally, for 3-4 minutes until the milk solids turn brown and the butter smells nutty.
- Immediately add the minced shallot and sauté for 2 minutes until softened.
- Stir in corn kernels, salt, pepper, and nutmeg. Cook for 5 minutes, stirring frequently.
- Pour in heavy cream, whole milk, and reserved corn milk. Bring to a simmer.
- Reduce heat to low and simmer gently for 15-20 minutes, until the sauce has thickened and corn is tender.
- Remove from heat, stir in fresh chives, and adjust seasoning to taste. Serve immediately.
Notes
For the best flavor, use fresh, in-season sweet corn. If using frozen, ensure it’s fully thawed. A light-colored skillet helps you monitor the butter so it browns perfectly without burning.
Servings: 8 | Calories: 285 kcal | Fat: 23g | Carbohydrates: 18g | Protein: 4g
5 FAQs About Creamed Corn
Here are some straightforward answers to the most common questions I receive about this Creamed Corn recipe.
Can I use frozen or canned corn for this creamed corn recipe?
Yes, you absolutely can, though the final result will vary slightly. Fresh corn, especially when it’s in season, will always give you the best flavor and texture. The kernels are plumper, sweeter, and you get the benefit of that starchy “corn milk” scraped from the cobs, which adds incredible body and flavor to the sauce. It’s my number one choice for a reason.
That said, good quality frozen sweet corn is a fantastic substitute, especially in the off-season. Just make sure to thaw the corn completely and pat it dry before adding it to the skillet. This prevents it from watering down your cream sauce. If you use canned corn, be sure to choose a brand with no salt added if possible. You must drain it very well and rinse it to remove the canning liquid. Since canned corn is already cooked, you can reduce the initial sauté time slightly. You may also find you don’t need the optional sugar, as canned corn can sometimes be sweeter.
Why is my creamed corn too thin or watery?
A thin or watery creamed corn is usually due to one of two things: not enough simmering time or too much excess moisture. The most common culprit is simply not letting the sauce reduce enough. The 15 to 20 minute simmer on low heat is a crucial step. This is when the heavy cream reduces, the natural starches from the corn milk activate, and the sauce thickens into that luxurious consistency we’re looking for. If it seems thin, just give it another 5 to 10 minutes of gentle simmering, stirring occasionally.
The other possibility is excess water from the corn itself. This is especially common if you’re using frozen corn that wasn’t fully thawed and drained. Any ice crystals will melt in the pan and water down the sauce. If you’ve simmered it for a good while and it’s still too thin for your liking, you can make a tiny slurry by mixing one teaspoon of cornstarch with one tablespoon of cold water, then whisking it into the simmering corn. Let it cook for another minute or two, and it will thicken right up. I consider this a last resort, as the sauce should thicken perfectly on its own if you let it reduce properly.
What makes this creamed corn different from the canned version?
Oh, honey, they are worlds apart! It’s like comparing a fresh, garden-ripened tomato to ketchup. The biggest difference is texture. Canned creamed corn is often pureed or blended, resulting in a homogenous, sometimes mushy texture. My recipe keeps the corn kernels whole and distinct, suspended in a rich, creamy sauce. You get that satisfying pop of a fresh kernel with every bite.
Then there’s the flavor. Canned versions rely heavily on sugar, salt, and preservatives. This homemade Creamed Corn gets its sweetness from the corn itself, its savory depth from the nutty brown butter and fragrant shallots, and its richness from real cream and milk. The pinch of nutmeg and fresh chives add layers of complexity you’ll never find in a can. It tastes fresh, vibrant, and incredibly flavorful. Essentially, you’re trading processed ingredients for fresh ones, and the difference is truly night and day.
How do I keep my creamed corn from curdling?
This is a great question, as a broken cream sauce can be so disappointing. The good news is that it’s very easy to prevent with this recipe. The number one cause of curdling is high heat. Dairy proteins can seize up and separate when boiled too aggressively. That’s why the instructions specify bringing the mixture to a simmer, then immediately reducing the heat to low. A gentle, lazy bubble is all you need for the sauce to reduce and thicken beautifully without any risk of breaking.
Another key is to use full-fat dairy. The higher fat content in heavy cream and whole milk makes them much more stable and resistant to curdling than lower-fat options like half-and-half or 2% milk. I don’t recommend substituting them in this recipe. Also, avoid adding any acidic ingredients, like lemon juice or wine, directly to the hot cream, as this can also cause it to separate. By keeping the heat low and using full-fat dairy, your sauce will stay perfectly smooth and creamy every time.
Can I make this creamed corn ahead of time?
Yes, and it’s one of the reasons I love this recipe for holidays and entertaining! It’s a wonderful side dish to make ahead, which frees up your time and stovetop space on the big day. You can prepare the recipe completely, then let it cool down before transferring it to an airtight container and storing it in the refrigerator for up to two days.
When you’re ready to serve, simply reheat it gently in a saucepan over low heat. As I mentioned before, it will thicken as it chills, so you’ll want to add a splash of milk or cream to bring it back to its original creamy consistency. Stir it frequently until it’s warmed through. The only thing I recommend saving for the last minute is the fresh chives. Stir them in just after you’ve reheated the corn and are about to serve it. This way, they stay bright green and retain their fresh, delicate flavor.
Try These Recipes Next
If you love the sweet, versatile flavor of corn as much as I do, I have a few other recipes I think you’ll really enjoy.
- Spicy Crab and Corn Chowder: A rich, creamy chowder that’s packed with sweet corn, lump crab meat, and a little kick of spice.
- Cheesy Chipotle Shrimp and Corn Dip: The ultimate party appetizer. It’s cheesy, smoky, a little spicy, and completely addictive.
- Street Corn Salad: All the amazing flavors of Mexican street corn, but served off the cob as a bright, fresh salad that’s perfect for cookouts.
I hope you give them a try and love them just as much as we do!