
The Secret to Insanely Fudgy Brownies Is Brown Butter and Tahini
There are few things in this world more comforting than a warm, fudgy brownie. I remember my grandmother’s brownies from every church potluck and family get-together. They were the classic, straight-from-the-box kind, and they were perfect in their simplicity. But as I started getting more adventurous in my own kitchen, I couldn’t help but wonder if I could take that simple perfection and give it a little nudge toward something spectacular.
I started playing around with the basics. A little espresso powder here, some different chocolate chips there. They were all good, but none of them had that “wow” factor I was looking for. Then one afternoon, while making a savory dish, the nutty aroma of browning butter filled my kitchen, and a lightbulb went off. At the same time, a jar of tahini I’d bought for hummus was staring at me from the pantry shelf.
What if, I thought, I combined that deep, toasty flavor of brown butter with the rich, savory notes of tahini? It felt a little wild, but the idea took hold. The result was this recipe, a batch of brownies so decadent and complex, they stopped my husband mid-sentence. These Brown Butter Tahini Brownies are my tribute to a classic, all dressed up and ready to impress.
Why This Brownies Recipe Works
Brownies have been a beloved American dessert for over a century, first appearing in the late 1800s. Their popularity is no mystery. They deliver a deep chocolate flavor in a dense, chewy package that is simpler to make than a layer cake but feels so much more decadent than a simple cookie. They are the ultimate comfort food, perfect for bake sales, after-school snacks, and late-night cravings.
The magic of this particular recipe lies in two key upgrades to the classic formula: brown butter and tahini. These aren’t just random additions, they are purposeful ingredients that transform the texture and flavor profile of the final product. They work in harmony to create a brownie that is familiar yet entirely new.
First, let’s talk about the brown butter. By melting the butter and continuing to cook it until the milk solids toast, you create a beautiful, nutty, and almost caramel-like aroma and taste. This simple step adds an incredible layer of complexity that you just can’t get from regular melted butter. It deepens the flavor of the chocolate and makes the entire brownie taste richer and more sophisticated.
Then comes the tahini. Made from ground sesame seeds, tahini has a wonderfully savory, earthy flavor that beautifully balances the sweetness of the sugar and the bitterness of the cocoa. It also adds an incredible amount of moisture and fat, resulting in a brownie that is unbelievably fudgy and dense. It prevents the brownies from being too sweet and introduces a subtle, savory finish that will have everyone asking for your secret ingredient. Together, these two elements elevate a simple dessert into a gourmet experience.
Ingredients for Brownies
The beauty of these brownies is how a few high-quality ingredients can create such a showstopper. While the list might look familiar, the specific combination and preparation are what make them truly special. Here is exactly what you’ll need to gather from your pantry and fridge.
- ¾ cup unsalted butter: Using unsalted butter is key here because you will be browning it. This allows you to control the salt level perfectly. I recommend using a good quality butter, as its flavor will really shine through once browned.
- ½ cup tahini: This is our star ingredient! Look for a high-quality, runny tahini. Some brands can be very thick and pasty, especially at the bottom of the jar. Give it a good stir before measuring to ensure it’s smooth and pourable. The better the tahini, the silkier your brownies will be.
- 1 ¼ cups granulated sugar: Provides the sweetness and is crucial for creating that classic, shiny, crackly top on the brownies.
- 2 large eggs: They act as a binder and provide lift and richness. Make sure they are at room temperature to help them incorporate into the batter more easily.
- 1 teaspoon vanilla extract: A baking essential. It enhances the flavor of the chocolate and complements the nutty notes of the brown butter and tahini.
- ¾ cup all-purpose flour: Provides the structure for the brownies. Be sure to measure it correctly, either by weight or by spooning it into your measuring cup and leveling it off.
- ½ cup unsweetened cocoa powder: This is where most of the chocolate flavor comes from. I prefer using a Dutch-processed cocoa powder for a darker color and smoother flavor, but any unsweetened cocoa will work.
- ½ teaspoon salt: Salt is a flavor enhancer. It balances the sweetness and brings out the complexity of the chocolate and brown butter.
- 6 ounces bittersweet chocolate, chopped: Using chopped chocolate instead of chips creates wonderful puddles of melted chocolate throughout the brownies. A good quality bar with around 60-70% cacao is perfect.
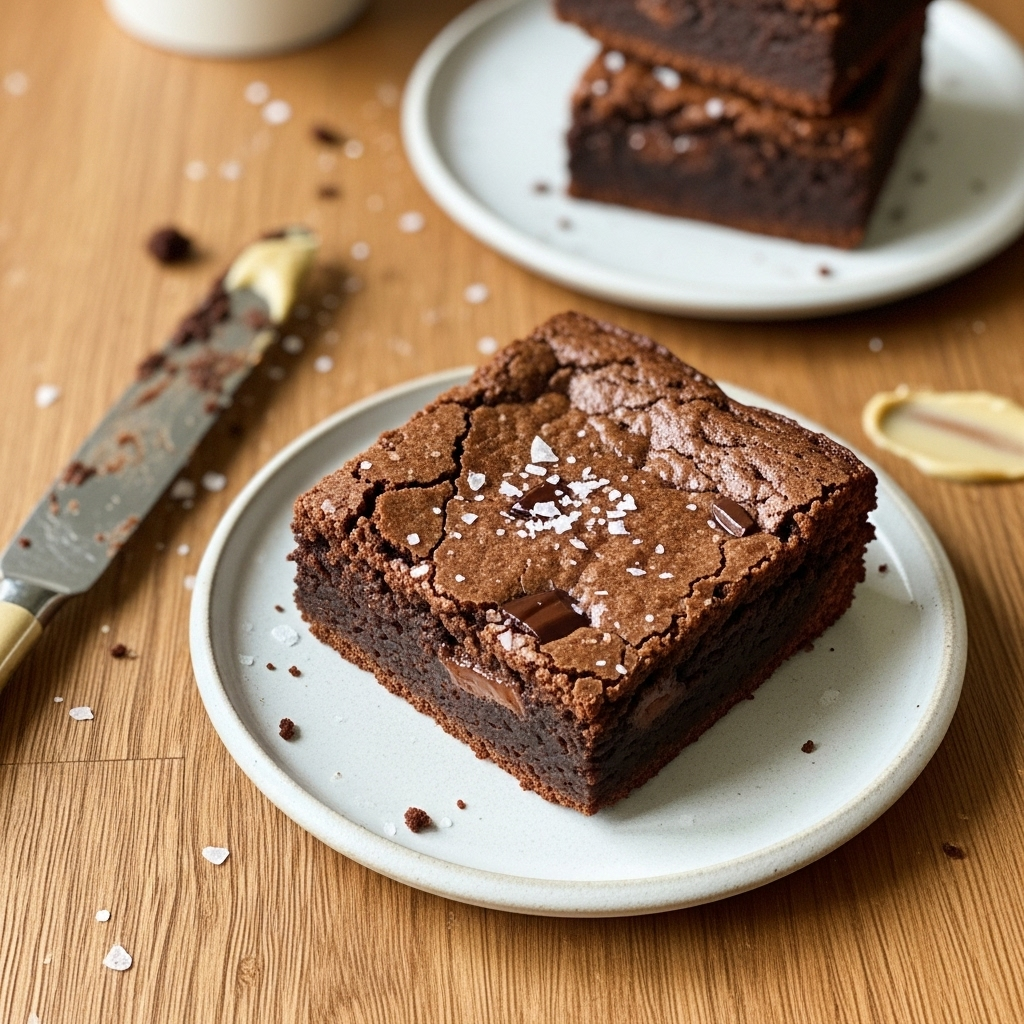
- Flaky sea salt, for sprinkling: This is the finishing touch. A little sprinkle on top after baking adds a delightful crunch and a final pop of flavor that cuts through the richness.
Step-by-Step Instructions For Making Brownies
Making these brownies is a truly sensory experience, from the smell of the browning butter to the sight of the glossy batter. Following these steps carefully will guarantee a perfect pan of fudgy, flavorful brownies every time. Don’t rush the process, and enjoy it!
Step 1: Prep Your Pan and Oven
First things first, let’s get everything ready. Preheat your oven to 350°F (175°C). Proper oven temperature is crucial for even baking. While it heats up, prepare an 8×8 inch baking pan. I like to grease the bottom and sides with a little butter or nonstick spray, then line it with parchment paper. Leave some parchment hanging over on two opposite sides. These little “handles” will make it incredibly easy to lift the entire batch of brownies out of the pan once they’ve cooled.
Step 2: Brown the Butter
This is where the magic begins. In a small, light-colored saucepan (so you can see the color change), melt the unsalted butter over medium heat. Once it’s melted, it will start to foam and sputter. Keep cooking and swirling the pan occasionally. Soon, the foam will subside, and you’ll see little brown specks forming at the bottom. Your kitchen will fill with the most amazing nutty aroma. As soon as you see those specks and smell that nuttiness, remove it from the heat immediately to prevent it from burning. Pour it into a large mixing bowl, making sure to scrape all those precious browned bits in with it.
Step 3: Combine the Wet Ingredients
To the warm brown butter in your mixing bowl, add the tahini. Whisk them together until the mixture is completely smooth and uniform. Next, add the granulated sugar and whisk it in vigorously for about a minute. You want the mixture to be well combined and slightly grainy. Now, add the eggs one at a time, whisking well after each one. This process helps create that desirable shiny, crackly top. Once the eggs are fully incorporated, the batter should look thick and glossy. Finally, stir in the vanilla extract.
Step 4: Add the Dry Ingredients and Chocolate
In a separate medium bowl, whisk together the all-purpose flour, unsweetened cocoa powder, and salt. This little step ensures there are no lumps and that everything is evenly distributed. Add these dry ingredients to your wet ingredients in the large bowl. Using a spatula, gently fold everything together until it’s just combined. The key here is not to overmix. A few streaks of flour are perfectly fine. Overmixing develops the gluten in the flour, which can lead to tough, cakey brownies instead of fudgy ones. Gently fold in your chopped bittersweet chocolate.
Step 5: Bake to Perfection
Pour the finished batter into your prepared baking pan and use your spatula to spread it into an even layer, making sure it reaches all the corners. Pop it into your preheated oven and bake for 25 to 30 minutes. The exact time can vary by oven. You’ll know the brownies are done when a toothpick inserted into the center comes out with moist, fudgy crumbs attached, not wet batter. As soon as you pull the pan from the oven, sprinkle the top evenly with flaky sea salt. The heat will help it adhere to the surface.
Step 6: Cool and Cut
This might be the hardest step of all: you have to wait! Let the brownies cool completely in the pan on a wire rack. This is so important, as it allows them to set up properly. If you try to cut them while they are warm, you’ll have a delicious, chocolatey mess. For extra clean, sharp squares, I like to chill the cooled brownies in the refrigerator for about 30 minutes before slicing. Use the parchment paper handles to lift them out, place them on a cutting board, and use a large, sharp knife to cut them into squares. Enjoy!
How To Serve Brownies
Serving these Brown Butter Tahini Brownies is half the fun. While they are absolutely divine on their own, right out of the pan, there are so many ways to dress them up for any occasion. A little extra flair can turn this humble dessert into the star of the show.
For a classic, comforting treat, nothing beats a slightly warm brownie. You can pop a square in the microwave for just 10 to 15 seconds to get that just-out-of-the-oven softness and melt the chocolate chunks inside. This is the perfect base for a scoop of high-quality vanilla bean ice cream. The contrast between the warm, rich brownie and the cold, creamy ice cream is simply heavenly. A drizzle of chocolate or caramel sauce over the top takes it to the next level of indulgence.
If you’re hosting a dinner party or want to create a more elegant dessert, you can get even more creative. Here are a few of my favorite ways to serve them:
- With a Dollop of Cream: Serve a brownie square with a generous dollop of freshly whipped cream or, for a tangy twist, some crème fraîche. A few fresh berries on the side, like raspberries or strawberries, add a beautiful pop of color and a touch of brightness.
- Brownie Sundae Bar: This is always a hit with kids and adults. Set out the brownies alongside bowls of different ice cream flavors, sauces like hot fudge and salted caramel, whipped cream, chopped nuts, sprinkles, and cherries. Let everyone build their own masterpiece.
- Crumble and Layer: For a completely different presentation, crumble the brownies and use them as a layer in a trifle or parfait. Alternate layers of brownie crumbles, chocolate pudding or mousse, and whipped cream in a clear glass for a stunning and delicious dessert.
You can also simply arrange the cut brownies on a beautiful platter and let them shine on their own. The flaky salt on top already makes them look quite special. No matter how you choose to serve them, these brownies are sure to be a crowd-pleaser.
How To Store & Reuse Brownies Leftovers
While it’s rare to have leftovers of these brownies in my house, it’s good to know how to store them properly to keep them tasting fresh and fudgy. Proper storage ensures that your hard work doesn’t go to waste and you can enjoy these treats for several days.
The best way to store the brownies is in an airtight container at room temperature. I find they stay perfectly moist and delicious for up to three or four days this way. You can either leave them in the baking pan and cover it tightly with foil or plastic wrap, or you can cut them into squares and place them in a container. Placing a piece of parchment paper between layers can prevent them from sticking together.
If you want them to last a bit longer, you can store them in the refrigerator. In an airtight container, they will keep well for up to a week. The cold temperature will make them firmer and denser, which some people actually prefer. Just let them sit out at room temperature for about 15 to 20 minutes before serving to soften up a bit.
Should you find yourself with a few leftover brownies that are starting to lose their initial freshness, don’t throw them away! They are fantastic when repurposed into other desserts. Here are a few ideas for giving them a second life:
- Brownie Milkshakes: Crumble a brownie or two into a blender with a few scoops of your favorite ice cream and a splash of milk. Blend until smooth for an incredibly decadent and thick milkshake.
- Ice Cream Topping: Gently warm a brownie in the microwave and crumble it over a bowl of ice cream. It adds a wonderful texture and a rich, chocolatey flavor that’s far better than any store-bought topping.
- Brownie Truffles: Mash leftover brownies with a little bit of cream cheese or a splash of cream until you can form a thick paste. Roll the mixture into small balls, chill them until firm, and then dip them in melted chocolate.
These brownies also freeze exceptionally well. Wrap individual squares tightly in plastic wrap and then place them in a zip-top freezer bag. They can be frozen for up to three months. When you’re ready for a treat, just thaw one at room temperature for an hour or so, or give it a quick 20-second warm-up in the microwave.
Substitutions & Variations For Brownies
One of the best things about a solid brownie recipe is that it can serve as a canvas for your own creativity. While I adore this recipe exactly as it is, there are plenty of ways to tweak it based on what you have in your pantry or your personal taste preferences. Feel free to experiment and make these brownies your own!
If you’re not a fan of tahini or have a sesame allergy, you can easily swap it out for another nut or seed butter. A smooth, natural peanut butter would create a classic chocolate-peanut butter combination that is always a winner. Almond butter or cashew butter would also work beautifully, lending their own subtle nutty flavors to the brownies. Just be sure to use a smooth, well-stirred variety for the best texture.
There are also countless ways to add extra flavor and texture to the batter itself. Here are a few variations to get you started:
- Add Some Crunch: Fold in about a cup of chopped, toasted nuts along with the chocolate chunks. Walnuts, pecans, or even pistachios would be delicious and add a wonderful textural contrast to the fudgy brownie.
- Coffee Lover’s Twist: Add one or two teaspoons of instant espresso powder to the dry ingredients. Coffee has a magical way of intensifying the flavor of chocolate, making the brownies taste even richer and deeper.
- Spice It Up: A pinch of spice can add a lovely warmth. Try adding half a teaspoon of cinnamon or a pinch of cayenne pepper to the dry ingredients for a subtle, surprising kick of heat.
- Gluten-Free Option: While I have not tested this recipe extensively with gluten-free flours, a high-quality 1-to-1 gluten-free baking flour blend containing xanthan gum should work as a substitute for the all-purpose flour.
You can also play around with the chocolate. Instead of bittersweet, try using semi-sweet chocolate for a slightly sweeter brownie, or even milk chocolate if that’s what you prefer. A handful of white chocolate chips or peanut butter chips folded in at the end would also be a fantastic addition. Don’t be afraid to make this recipe your own special creation.
Brown Butter Tahini Brownies
Description: Unbelievably rich and fudgy brownies with the nutty, complex flavors of brown butter and savory tahini. Topped with flaky sea salt, this is a sophisticated twist on a classic dessert that is sure to impress.
Yield: 16 squares | Category: Dessert | Cuisine: American
Prep Time: 15 minutes | Cook Time: 30 minutes
Ingredients
- ¾ cup unsalted butter
- ½ cup tahini
- 1 ¼ cups granulated sugar
- 2 large eggs
- 1 teaspoon vanilla extract
- ¾ cup all-purpose flour
- ½ cup unsweetened cocoa powder
- ½ teaspoon salt
- 6 ounces bittersweet chocolate, chopped
- Flaky sea salt, for sprinkling
Instructions
- Preheat oven to 350°F (175°C). Grease and line an 8×8 inch pan with parchment paper.
- In a small saucepan, cook butter over medium heat until it foams and brown specks appear. Pour into a large bowl.
- Whisk tahini into the warm brown butter until smooth. Whisk in sugar, then add eggs one at a time, followed by vanilla.
- In a separate bowl, whisk together flour, cocoa powder, and salt.
- Fold the dry ingredients into the wet ingredients until just combined. Fold in chopped chocolate.
- Pour batter into the prepared pan and bake for 25-30 minutes.
- Sprinkle with flaky sea salt immediately after removing from the oven.
- Cool completely before lifting out of the pan and cutting into squares.
Notes
For extra clean cuts, chill the brownies in the refrigerator for 30 minutes before slicing. Use a high-quality, runny tahini for the best results. Do not overmix the batter to ensure the brownies stay fudgy.
Servings: 16 | Calories: 250 kcal | Fat: 16g | Carbohydrates: 25g | Protein: 4g
5 FAQs About Brownies
Here are some straightforward answers to the most common questions I receive about this Brown Butter Tahini Brownies recipe.
What makes these Brown Butter Tahini Brownies different from regular brownies?
The primary difference lies in two key flavor-enhancing ingredients: brown butter and tahini. A standard brownie recipe typically uses melted butter or oil. While delicious, it doesn’t add much flavor on its own. By taking the extra five minutes to brown the butter, we are toasting the milk solids, which creates a deep, nutty, and almost caramel-like flavor. This adds an incredible layer of complexity that elevates the entire dessert, making it taste richer and more gourmet.
The tahini is the other game-changer. Tahini is a paste made from ground sesame seeds, and it has a savory, slightly earthy flavor. When added to the brownie batter, it does two wonderful things. First, its savory quality beautifully balances the sweetness of the sugar and the richness of the chocolate, preventing the brownies from being one-dimensionally sweet. Second, it adds a significant amount of fat and moisture, which results in an exceptionally fudgy and dense texture. The combination of these two ingredients creates a brownie that is familiar in comfort but surprisingly sophisticated in taste.
Can I make these brownies without browning the butter?
You absolutely can, but I highly recommend you don’t skip that step! The brown butter is a cornerstone of this recipe’s unique flavor profile. If you skip browning it, your brownies will still be delicious, but they will be missing that signature nutty depth that makes them so special. They will taste more like a classic, high-quality brownie, which is certainly not a bad thing, but you will miss out on the “wow” factor.
If you are short on time or simply prefer not to brown the butter, you can just melt the ¾ cup of unsalted butter and proceed with the recipe as written. Simply melt the butter in the saucepan or in the microwave, then pour it into your mixing bowl and continue with step three by adding the tahini and sugar. The rest of the instructions remain the same. The texture will still be wonderfully fudgy thanks to the tahini, but the flavor will be less complex.
My brownies came out cakey, what did I do wrong?
The dreaded cakey brownie! The difference between a fudgy brownie and a cakey one often comes down to two things: the ratio of fat to flour and how much you mix the batter. This recipe is formulated to be very fudgy due to the high amount of fat from the butter, tahini, eggs, and chocolate. So, if your brownies turned out cakey, the most likely culprit is overmixing the batter after adding the flour.
When you mix flour with wet ingredients, you begin to develop gluten. A little gluten is necessary for structure, but too much will create a tough, airy, and cake-like texture. To avoid this, you should fold the dry ingredients in with a spatula only until you no longer see big streaks of flour. A few little pockets are fine. Stop mixing as soon as it comes together. Another potential issue could be overbaking. If you bake the brownies for too long, they will dry out and become more cakey. Always check for doneness on the earlier side of the recommended baking time.
What is the best type of tahini to use for these brownies?
This is a great question, as not all tahini is created equal! The quality and consistency of your tahini can have a noticeable impact on the final texture of your brownies. For this recipe, you want to use a high-quality, smooth, and runny tahini. Look for brands that are well-blended and pourable, similar to the consistency of a natural, drippy peanut butter. Some excellent brands are often found in Middle Eastern grocery stores.
Avoid using the thick, dry, and pasty tahini that can sometimes be found at the bottom of a jar that hasn’t been stirred well. This type of tahini is difficult to incorporate smoothly into the batter and can result in a clumpy or dry brownie. Before you measure it out, always give your jar of tahini a very thorough stir, scraping the bottom to make sure any separated oil is fully reincorporated with the sesame paste. A good, silky tahini will blend seamlessly with the brown butter, contributing to that ultra-fudgy texture we’re aiming for.
How do I get that perfect crackly top on my brownies?
That beautiful, shiny, paper-thin crust on top of a brownie is what many bakers strive for, and it’s easier to achieve than you might think. The secret to that crackly top, often called a meringue layer, lies in how you incorporate the sugar and eggs. It’s a result of dissolving the sugar sufficiently and whipping enough air into the eggs.
In this recipe, we achieve this in Step 3. After you’ve mixed the brown butter and tahini, you add the sugar and whisk it vigorously. This starts the process of dissolving the sugar into the fat. Then, you add the eggs one at a time, whisking well after each addition until the batter becomes thick and glossy. This action of vigorously whisking the eggs and sugar together creates a light foam. When the brownies bake, this sugary foam rises to the top and bakes into a delicate, crisp layer that cracks as the brownies cool. So, don’t be shy with your whisk during that step, it’s the key to that perfect finish!
Try These Recipes Next
If you loved the rich, chocolatey goodness of these brownies, I have a few other recipes I think you’ll enjoy just as much.
- Flourless Fudgy Brownies: For the ultimate fudgy experience, these naturally gluten-free brownies are incredibly dense and decadent.
- Easy Fudge Swirl Brownies: This recipe takes a classic brownie and adds a beautiful and delicious swirl of homemade fudge right through the top.
- Halloween Brownie Truffles: A fun and creative way to use leftover brownies, these little bites are perfect for parties and holiday treats.
I hope you have fun exploring these other chocolate creations in your own kitchen!