
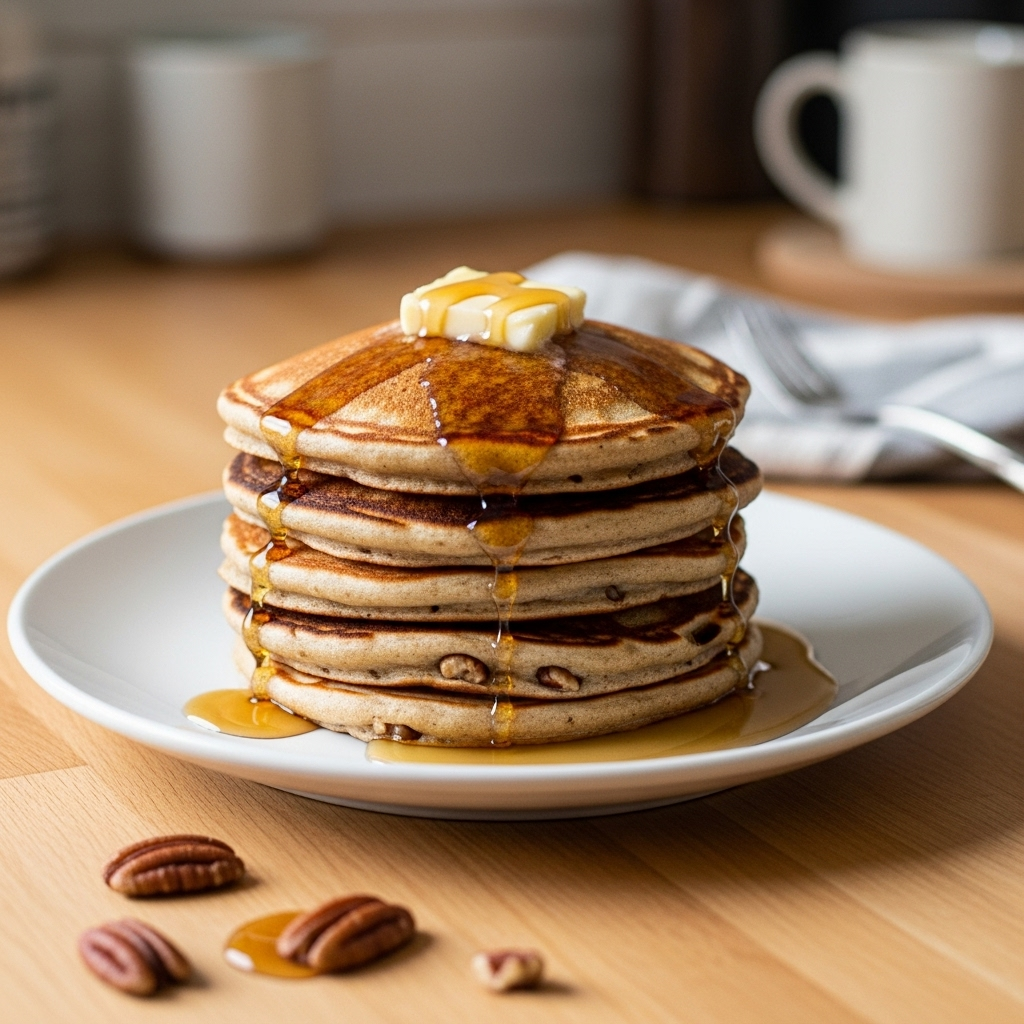
Brown Butter Banana Pancakes with Toasted Pecans
There is just something about a weekend morning that calls for a stack of warm, fluffy banana pancakes.
I feel like every family has their go-to pancake recipe. For years, mine was a simple, no-fuss version I learned from my grandmother. It was reliable and comforting, exactly what you’d expect. But one Saturday, while staring at a bunch of bananas that were well past their prime, I knew I wanted something more. Something with a little more personality.
I remembered a weekend trip to Savannah years ago. We stayed at this charming little bed and breakfast, and the owner served the most incredible pancakes I’d ever tasted. They were banana, yes, but they had this deep, nutty, almost caramel-like flavor that I couldn’t quite place. It was rich and sophisticated, not just sweet.
That memory sparked an idea. I decided to take my classic banana pancakes recipe and give it a little upgrade. The secret, I suspected, was in the butter. So I decided to try browning it, creating that liquid gold the French call beurre noisette. I also toasted some pecans to add a bit of crunch and echo that nutty flavor. The result was nothing short of a revelation. It was the taste of that Savannah morning, right in my own kitchen.
Why This Banana Pancakes Recipe Works
Banana pancakes are a beloved breakfast staple for a reason. They are the perfect solution for those overripe bananas sitting on the counter, transforming potential waste into a sweet, comforting meal. The natural sweetness of the banana means you can often use less sugar, and their moisture helps create a wonderfully tender crumb. It’s a classic that feels both indulgent and a little bit wholesome.
But a classic can always be improved upon, and that’s where my special twist comes in. Many recipes just call for melted butter, which is perfectly fine. This recipe, however, calls for brown butter.
Taking the extra five minutes to brown the butter is a complete game changer. As the butter melts and then cooks a bit longer, the milk solids toast and caramelize. This process creates an incredibly rich, nutty, and complex flavor that plain melted butter simply can’t offer. It adds a layer of sophistication that elevates these from simple breakfast fare to something truly special.
The brown butter’s nutty aroma perfectly complements the sweet banana and the warm cinnamon. To push that flavor profile even further, I fold in toasted pecans. Toasting the nuts brings out their natural oils and deepens their flavor, adding a delightful crunch that contrasts beautifully with the soft, fluffy pancake. It’s these two simple steps, browning the butter and toasting the nuts, that make this the absolute best banana pancakes recipe you will ever try.
Ingredients for Banana Pancakes
The magic of these banana pancakes comes from using quality pantry staples and giving a couple of them some special attention. Before you start, it’s always a good idea to gather all your ingredients and have them measured out and ready to go. It makes the whole process feel smoother and more relaxed.
Here’s what you’ll need to create a stack of the fluffiest, most flavorful pancakes:
- 1 ½ cups all-purpose flour
- 2 tablespoons packed light brown sugar
- 2 teaspoons baking powder
- ½ teaspoon baking soda
- ½ teaspoon ground cinnamon
- ¼ teaspoon salt
- Pinch of freshly grated nutmeg
- 6 tablespoons unsalted butter
- ½ cup finely chopped pecans
- 1 ¼ cups buttermilk
- 2 very ripe, large bananas, mashed well
- 1 large egg, lightly beaten
- 1 teaspoon vanilla extract
- Additional butter or neutral oil, for the griddle
A few notes on some key ingredients here. For the bananas, the riper, the better. I’m talking about the ones that are covered in brown and black spots, the ones you might think are ready for the compost bin. These bananas are sweeter and have a much more intense flavor, which is exactly what we want. Real buttermilk is also a non-negotiable for me. Its acidity reacts with the baking soda to create an incredibly light and tender pancake, and it adds a subtle tang that balances the sweetness beautifully.
And of course, the star of the show, the unsalted butter. Using unsalted allows you to control the saltiness of the final dish and, more importantly, it lets you see the color of the milk solids as they toast. This is crucial for getting that perfect nutty brown butter without burning it.
Step-by-Step Instructions For Making Banana Pancakes
Making these banana pancakes is a straightforward process, but paying attention to a few key techniques will guarantee a perfect, fluffy stack every single time. Grab your apron and let’s get started.
Step 1: Brown the Butter
Start by placing your 6 tablespoons of unsalted butter in a small, light-colored saucepan. A stainless steel pan works wonderfully because it allows you to see the color change clearly. Melt the butter over medium heat. Once melted, it will start to foam and sizzle. Swirl the pan occasionally to ensure it cooks evenly. After a few minutes, the sizzling will subside, and you’ll notice little brown specks forming at the bottom. The air will fill with a rich, nutty aroma. That’s your signal! Immediately pour the brown butter, including all those toasty brown bits, into a medium bowl to stop the cooking process. Set it aside to cool down a bit.
Step 2: Toast the Pecans
While your butter is doing its thing, you can toast the pecans. Place the chopped pecans in a small, dry skillet over medium-low heat. There’s no need for any oil. Stir them frequently so they don’t burn. In just 3 to 4 minutes, they’ll become incredibly fragrant and turn a shade darker. As soon as you smell that wonderful toasty pecan scent, remove them from the skillet and set them aside. This simple step makes a world of difference in their flavor and crunch.
Step 3: Combine the Dry Ingredients
In a large mixing bowl, add your all-purpose flour, brown sugar, baking powder, baking soda, cinnamon, salt, and a pinch of freshly grated nutmeg. Whisk everything together thoroughly. This isn’t just about mixing; it’s about evenly distributing the leavening agents, which ensures that every single pancake will rise beautifully.
Step 4: Combine the Wet Ingredients
Head back to your bowl of slightly cooled brown butter. Add the buttermilk, mashed bananas, lightly beaten egg, and vanilla extract. Whisk these ingredients together until they are just combined. You want a cohesive liquid mixture to pour into your dry ingredients.
Step 5: Make the Batter
Now, pour the wet ingredients into the large bowl with the dry ingredients. Using a rubber spatula or a wooden spoon, gently fold everything together until it’s just combined. The most important rule of pancake making is to not overmix! A few lumps in the batter are not only okay, they are a good sign. Overmixing develops the gluten in the flour and leads to tough, chewy pancakes instead of light, fluffy ones. Gently fold in your toasted pecans at the very end.
Step 6: Let the Batter Rest
Patience is a virtue, especially in the kitchen. Let your finished pancake batter rest on the counter for about 5 to 10 minutes. This allows the flour to fully absorb the liquid and the gluten strands to relax, which contributes to a more tender and flavorful pancake.
Step 7: Heat the Griddle
Place a large non-stick skillet or a griddle over medium-low heat. Getting the temperature right is key. Too hot, and the outside will burn before the inside is cooked. Too low, and they won’t get that lovely golden color. A good test is to flick a drop of water onto the surface. It should sizzle and dance before evaporating. Once hot, lightly grease it with a little extra butter or a neutral oil.
Step 8 & 9: Cook and Flip the Pancakes
Pour about ¼ cup of batter onto the hot griddle for each pancake. Let them cook for 2 to 3 minutes. You’ll know they’re ready to flip when you see bubbles forming and popping on the surface and the edges look dry and set. Slide your spatula underneath, give it a confident flip, and cook for another minute or two on the other side until it’s golden brown. Resist the urge to press down on the pancake with your spatula, as this will just press out all the air you worked to create.
Step 10: Keep Warm and Serve
As you finish each pancake, transfer it to a plate or a baking sheet and place it in a preheated oven at 200°F to keep warm. This way, everyone can sit down and eat a warm stack together. Serve them immediately with your favorite toppings and enjoy!
How To Serve Banana Pancakes
Serving these brown butter banana pancakes is half the fun. A beautiful presentation can make a simple weekend breakfast feel like a special occasion. While they are absolutely divine on their own, the right toppings can take them to a whole new level of deliciousness.
The classic way is always a winner. A generous pat of good-quality salted butter melting into a warm stack, followed by a liberal drizzle of pure maple syrup, is breakfast perfection. The salt from the butter balances the sweetness of the syrup and the banana, creating a truly harmonious bite. But why stop there when you can get creative?
For a truly spectacular breakfast or brunch spread, consider setting up a little toppings bar. Here are some of my favorite ways to dress up these pancakes:
- Fresh Fruit: Thinly sliced fresh bananas are a natural choice, but a handful of fresh blueberries or raspberries adds a lovely tart contrast.
- Something Creamy: A dollop of freshly whipped cream makes them feel extra decadent. For a tangier option, try a spoonful of crème fraîche or even full-fat Greek yogurt.
- Sweet Sauces: Go all out with a drizzle of warm caramel sauce, which pairs beautifully with the brown butter flavor. A simple chocolate sauce is also a guaranteed crowd-pleaser.
- Extra Crunch: Sprinkle on some more of those toasted pecans for added texture and nutty flavor. Toasted coconut flakes or even a sprinkle of granola would be wonderful too.
- The Savory Side: Never underestimate the power of a sweet and savory combination. A side of crispy, salty bacon or some savory sausage links provides the perfect counterpoint to a sweet stack of pancakes.
No matter how you choose to serve them, these banana pancakes are sure to impress. They are perfect for a lazy Sunday morning, a festive holiday brunch, or even a comforting breakfast-for-dinner situation.
How To Store & Reuse Banana Pancakes Leftovers
While these banana pancakes are best enjoyed fresh off the griddle, life happens, and sometimes you end up with leftovers. The good news is that they store and reheat beautifully, making them a fantastic option for a quick and easy breakfast on a busy weekday morning. The key is to store them properly to maintain their texture and flavor.
First things first, make sure the pancakes are completely cool before you store them. Storing them while still warm will create condensation, which can lead to soggy pancakes. Once they’ve reached room temperature, you have a couple of options for storage.
- In the Refrigerator: If you plan on eating the leftovers within a few days, the fridge is your best bet. Stack the cooled pancakes with a small square of parchment or wax paper between each one. This little step is crucial to prevent them from sticking together in one big clump. Place the stack in an airtight container or a resealable plastic bag. They will keep well for up to 3 days.
- In the Freezer: For longer-term storage, the freezer is the way to go. First, flash-freeze the pancakes. Place the cooled pancakes in a single layer on a baking sheet and pop them in the freezer for about an hour, or until they are firm. This prevents them from sticking together. Once frozen solid, you can transfer the pancake discs to a freezer-safe bag or airtight container. They’ll stay fresh for up to 2 months.
When you’re ready to enjoy your leftovers, you have several great reheating options. My personal favorite method is the toaster or toaster oven. It warms the pancake through while crisping up the edges, making it taste almost as good as fresh. You can also reheat them in the microwave for a softer result, or in a lightly buttered skillet over low heat until warmed through.
Substitutions & Variations For Banana Pancakes
While I believe this recipe is pretty close to perfect as is, cooking should always be about making a recipe your own! This banana pancake recipe is wonderfully versatile and can be easily adapted to suit different dietary needs or simply to use what you have on hand in your pantry. A few simple swaps can create a whole new flavor experience.
If you need to make dietary adjustments, it’s quite simple. For a gluten-free version, substitute the all-purpose flour with your favorite one-to-one gluten-free baking blend. For a dairy-free option, you can create a buttermilk substitute by mixing a tablespoon of lemon juice or white vinegar into a plant-based milk and letting it sit for a few minutes. Use a high-quality vegan butter that is known to brown well in place of the dairy butter.
Beyond dietary needs, there are plenty of ways to play with the flavors. Here are a few variations to get your creativity flowing:
- Change the Nuts: While I love the Southern charm of pecans, toasted walnuts or sliced almonds would be equally delicious. For a nut-free version, simply omit them.
- Add Some Spice: Feel free to adjust the spices to your liking. A pinch of ground ginger or allspice can add another layer of warmth, or you could increase the amount of cinnamon.
- Fun Mix-ins: This batter is a great canvas for other additions. Try folding in half a cup of mini chocolate chips, shredded coconut, or even a handful of fresh or frozen blueberries along with the pecans.
- Tropical Twist: For a tropical spin, swap the vanilla extract for a teaspoon of rum extract and fold in some toasted shredded coconut with the pecans. This variation is especially delicious!
- Chocolate Banana Pancakes: Add two or three tablespoons of unsweetened cocoa powder to your dry ingredients for a rich, chocolatey version that kids and adults will love.
Don’t be afraid to experiment. The core of this recipe, the brown butter and ripe banana, provides a fantastic foundation for all sorts of delicious combinations. Have fun and find your family’s new favorite version!
Brown Butter Banana Pecan Pancakes
Description: The ultimate banana pancakes, made wonderfully rich and complex with the addition of nutty brown butter and crunchy toasted pecans. They’re fluffy, moist, and packed with flavor, turning a simple breakfast into a truly special meal.
Yield: 12 pancakes | Category: Breakfast | Cuisine: American
Prep Time: 15 minutes | Cook Time: 15 minutes
Ingredients
- 1 ½ cups all-purpose flour
- 2 tablespoons packed light brown sugar
- 2 teaspoons baking powder
- ½ teaspoon baking soda
- ½ teaspoon ground cinnamon
- ¼ teaspoon salt
- Pinch of freshly grated nutmeg
- 6 tablespoons unsalted butter
- ½ cup finely chopped pecans
- 1 ¼ cups buttermilk
- 2 very ripe, large bananas, mashed well
- 1 large egg, lightly beaten
- 1 teaspoon vanilla extract
- Additional butter or neutral oil, for the griddle
Instructions
- In a small, light-colored saucepan over medium heat, cook the 6 tablespoons of butter until it foams, then turns golden brown with a nutty aroma. Immediately pour into a medium bowl to cool.
- While butter browns, toast the pecans in a dry skillet over medium-low heat for 3-4 minutes until fragrant. Set aside.
- In a large bowl, whisk together the flour, brown sugar, baking powder, baking soda, cinnamon, salt, and nutmeg.
- To the bowl with the cooled brown butter, add buttermilk, mashed bananas, egg, and vanilla. Whisk to combine.
- Pour the wet ingredients into the dry ingredients and mix with a spatula until just combined. Do not overmix. Gently fold in the toasted pecans.
- Let the batter rest for 5-10 minutes.
- Heat a lightly greased griddle or large skillet over medium-low heat.
- Pour ¼ cup of batter per pancake and cook for 2-3 minutes, until bubbles appear on the surface. Flip and cook for another 1-2 minutes until golden brown.
- Serve immediately with butter and maple syrup.
Notes
Ensure your bananas are very ripe with plenty of brown spots for the best flavor and sweetness. Do not skip resting the batter; it makes for a more tender pancake.
Servings: 4 | Calories: 450 kcal | Fat: 22g | Carbohydrates: 55g | Protein: 9g
5 FAQs About Banana Pancakes
Here are some straightforward answers to the most common questions I receive about this banana pancakes recipe.
Why are my banana pancakes dense and tough?
A dense or tough pancake is almost always the result of overmixing the batter. When you mix flour with liquid, you begin to develop gluten. A little gluten provides structure, but too much will make your pancakes chewy and rubbery instead of light and fluffy. To avoid this, mix your wet and dry ingredients together with a spatula only until they are just combined. It is perfectly fine, and even desirable, to have some lumps remaining in the batter. A lumpy batter is a happy batter!
Another culprit could be not letting the batter rest. That 5 to 10 minute rest period allows the gluten that has formed to relax, resulting in a more tender final product. Lastly, check the expiration dates on your baking powder and baking soda. If they are old, they won’t have the power to lift the batter, which can also result in dense, flat pancakes.
Can I make banana pancakes without buttermilk?
You certainly can. If you don’t have buttermilk on hand, you can make a quick substitute. For every 1 cup of milk (dairy or non-dairy), stir in 1 tablespoon of an acid, like white vinegar or lemon juice. Let it sit for about 5 to 10 minutes until it looks slightly curdled, then use it as a one-to-one replacement for the buttermilk in the recipe. This substitute will provide the necessary acidity to activate the baking soda for a good rise.
However, I do want to make a case for using real buttermilk if you can. True buttermilk has a unique thickness and flavor profile that the substitute just can’t fully replicate. It contributes to an extra tender crumb and a subtle, pleasant tang that beautifully balances the sweetness of the bananas and brown sugar. It really does make a noticeable difference in the final texture and taste of these banana pancakes.
How ripe should bananas be for banana pancakes?
The riper, the better! For banana pancakes, you want bananas that are heavily speckled with brown or are almost completely black. These are the bananas that might look a bit sad sitting on your counter, but they are at their peak for baking. As a banana ripens, its starches convert into sugars, making it much sweeter and more intensely flavorful. This deep, natural sweetness means you don’t need to add a lot of extra sugar to the batter.
Besides flavor, very ripe bananas are also much softer and easier to mash into a smooth consistency. This ensures the banana is evenly distributed throughout the batter, providing moisture and flavor in every single bite. Using underripe, yellow, or green-tinged bananas will result in pancakes that are less sweet, less flavorful, and may have a slightly starchy or even chalky texture.
How do I keep my banana pancakes from burning?
This is a common issue because the sugar in the bananas and the brown sugar in the batter can caramelize and burn quickly. The most important factor is temperature control. Cook your banana pancakes over medium-low heat. It might take a little more patience, but it ensures the inside has time to cook through before the outside gets too dark. A griddle that is too hot is the number one reason for burnt pancakes with a raw center.
Before you pour your first pancake, test your griddle temperature. A drop of water should sizzle and dance across the surface. If it evaporates instantly, the pan is too hot. Also, be mindful of the fat you use on your griddle. While butter adds great flavor, it can burn. Using a neutral oil with a higher smoke point, like canola or vegetable oil, or a combination of oil and butter, can help prevent scorching. Cook them for a solid 2 to 3 minutes on the first side until the edges are set and bubbles cover the surface before you even think about flipping.
Can I make the banana pancake batter ahead of time?
While you can, I generally recommend making it fresh for the best results. The reason for this lies with the leavening agents, particularly the baking soda. Baking soda is activated as soon as it comes into contact with the acidic buttermilk. This reaction creates the carbon dioxide bubbles that make the pancakes light and fluffy. The longer the batter sits, the more of that lifting power is lost.
If you absolutely must make it ahead, you could probably get away with an hour or two in the refrigerator, but you may notice slightly flatter pancakes. A better make-ahead strategy is to prep your components separately. You can whisk all the dry ingredients together in one bowl and all the wet ingredients together in another. Cover both and store them in the refrigerator overnight. In the morning, all you have to do is pour the wet into the dry, gently mix, and you’re ready to cook. This gives you the convenience of prepping ahead without sacrificing the fluffiness of your banana pancakes.
Try These Recipes Next
If you loved this recipe, I just know you’ll enjoy some of my other favorites from the blog. Whether you’re looking for more morning inspiration or easy meal ideas, there’s something here for you!