
Creamy Roasted Cauliflower Soup with a Savory Miso Twist
There are certain dishes that just feel like a warm hug in a bowl, and for the longest time, I thought I had my soup game all figured out. Then, on a little anniversary trip my husband and I took to Asheville, I ordered a cauliflower soup that completely changed my mind. It was at a cozy, farm-to-table spot, and the soup was so velvety and complex. It wasn’t just creamy; it had this deep, savory flavor I couldn’t quite place.
I came home absolutely determined to recreate that magic. I knew roasting the cauliflower was key to getting that nutty, caramelized flavor, but that still wasn’t enough. My first few attempts at a roasted cauliflower soup were good, but they were missing that special something. They tasted flat. I experimented with different herbs and spices, but nothing hit the mark.
Then, one afternoon while staring into my fridge, I saw a tub of white miso paste I’d bought for a salmon recipe. A lightbulb went off. Miso is known for its incredible umami flavor, that rich, savory depth that makes food so satisfying. I whisked a little bit into some coconut milk and stirred it into the soup base. Y’all, that was it. That was the secret. It added that exact savory, complex note I’d been chasing, making the soup taste like it had simmered for hours. It was the perfect Southern twist on a modern classic.
Why This Roasted Cauliflower Soup Recipe Works
Creamy vegetable soups have been a staple in kitchens for generations. They are the perfect way to turn humble produce into something elegant and comforting. Cauliflower soup, in particular, is a classic because of the vegetable’s mild flavor and its ability to blend into a beautifully smooth, velvety texture. It’s a blank canvas that can be dressed up in countless ways, which is why it has remained so popular for so long.
The traditional method often involves simply boiling the cauliflower, which can sometimes lead to a watery or bland result. Roasting the cauliflower first is a game-changer. This step coaxes out the natural sugars in the vegetable, caramelizing the edges and creating a deep, nutty flavor that you simply can’t get from boiling. It transforms the cauliflower from a simple ingredient into the star of the show.
But my little secret is what truly sets this roasted cauliflower soup apart. The addition of white miso paste is the twist that elevates this recipe from good to unforgettable. Miso, a fermented soybean paste, brings a profound savory depth, or umami, that perfectly complements the sweetness of the roasted cauliflower and the richness of the coconut milk. It adds a layer of complexity that makes each spoonful more interesting than the last. You get the classic creaminess you expect, but with a surprising and deeply satisfying flavor that will have everyone asking for your secret.
Ingredients for Roasted Cauliflower Soup
The beauty of this recipe is its simplicity. We’re using a handful of wholesome ingredients to create a soup that tastes incredibly luxurious. Each component plays a specific role in building the layers of flavor, so using quality ingredients will make a noticeable difference in the final product.
The star, of course, is the cauliflower. Roasting it brings out its best qualities. But the true magic lies in the combination of full-fat coconut milk for creaminess and the white miso paste for that unforgettable savory depth. Don’t be shy with the smoked paprika, either. It adds a subtle warmth and smokiness that ties everything together beautifully.
Here is what you will need:
- 1 large head of cauliflower, cut into florets: Look for a head that’s firm, compact, and creamy white with no blemishes.
- 1 tablespoon olive oil: A good quality extra-virgin olive oil will add a nice flavor during the roasting process.
- 1 yellow onion, chopped: Yellow onions provide a sweet, mellow base when sautéed.
- 2 cloves garlic, minced: Fresh garlic is always best. We add it later in the cooking process to prevent it from burning and becoming bitter.
- 4 cups vegetable broth: Use a low-sodium broth so you can control the saltiness of the final soup.
- 1/2 cup full-fat coconut milk: This is crucial for creaminess. Please don’t use the ‘lite’ version or coconut beverage from a carton, as they won’t provide the same rich texture. Canned, full-fat is the way to go.
- 2 tablespoons white miso paste: This is our secret weapon! White miso (or shiro miso) is milder and slightly sweeter than red miso, making it perfect for this soup. It adds a wonderful umami flavor without overpowering the other ingredients. You can typically find it in the refrigerated section of most grocery stores, often near the tofu.
- 1/2 teaspoon smoked paprika: This adds a lovely, subtle smoky flavor that complements the roasted cauliflower.
- Salt and freshly ground black pepper to taste: Season as you go and taste at the end.
- For garnish (optional): toasted sesame seeds, fresh chives (chopped): These add a nice textural contrast and a pop of fresh flavor.
Step-by-Step Instructions For Making Roasted Cauliflower Soup
Making this soup is a straightforward process, but paying attention to a few key techniques will ensure a perfect result every time. We’ll start by roasting the cauliflower to build that foundational flavor, then bring everything together on the stovetop before blending it into a silky-smooth dream.
Grab your favorite Dutch oven or heavy-bottomed pot, and let’s get started. An immersion blender is my preferred tool for blending soups directly in the pot, as it saves on cleanup and is much safer than transferring hot liquid. If you don’t have one, just be extra careful when using a regular blender.
Step 1: Preheat Your Oven and Prepare the Cauliflower
First things first, get that oven preheating to 400°F (200°C). While it’s heating up, chop your cauliflower into bite-sized florets. Try to keep them relatively uniform in size so they cook evenly. On a large baking sheet, toss the florets with the olive oil, a generous pinch of salt, and some freshly ground black pepper. Make sure every piece is lightly coated.
Step 2: Roast the Cauliflower
Spread the cauliflower florets in a single layer on the baking sheet. This is important. If you crowd the pan, the cauliflower will steam instead of roast, and you’ll miss out on all that beautiful caramelization. If your head of cauliflower is extra large, use two baking sheets. Roast for 20-25 minutes. You’re looking for the florets to be tender and have lovely browned, crispy edges.
Step 3: Sauté the Aromatics
While the cauliflower is doing its thing in the oven, heat a large pot or Dutch oven over medium heat. Add the chopped yellow onion and cook, stirring occasionally, until it has softened and become translucent. This usually takes about 5 to 7 minutes. This step builds the first layer of savory flavor for our soup base.
Step 4: Bloom the Spices
Once the onion is soft, add the minced garlic and the smoked paprika to the pot. Stir constantly and cook for just about one minute until you can smell that wonderful garlic and paprika aroma. This quick step, called blooming, really wakes up the spices and deepens their flavor.
Step 5: Simmer the Soup
By now, your cauliflower should be perfectly roasted. Carefully add the hot cauliflower to the pot with the onions and garlic. Pour in the 4 cups of vegetable broth. Stir everything together, bring the mixture to a simmer, and then reduce the heat slightly. Let it gently simmer for about 10 minutes. This gives all those wonderful flavors a chance to get to know each other and meld together.
Step 6: Prepare the Miso Mixture
While the soup simmers, prepare our secret ingredient. In a small bowl, add the full-fat coconut milk and the two tablespoons of white miso paste. Use a small whisk or a fork to mix them together until the miso is completely dissolved and the mixture is smooth. This prevents any clumps of miso from ending up in your final soup.
Step 7: Add the Creaminess
Stir the smooth miso and coconut milk mixture into the simmering soup. Let it heat through for a minute or two, but try not to let it come to a rolling boil after adding the miso, as high heat can diminish its delicate flavor and beneficial properties.
Step 8: Blend Until Smooth
Now for the fun part. Turn off the heat. Use an immersion blender to blend the soup directly in the pot until it reaches your desired consistency. I like mine perfectly silky, but if you prefer a little texture, that’s fine too. If using a regular blender, let the soup cool for a few minutes first. Carefully transfer it in batches, never filling the blender more than halfway. Remember to remove the center cap from the blender lid and cover the opening with a folded kitchen towel to allow steam to escape safely.
Step 9: Final Seasoning
Once your soup is blended, give it a taste. Now is the time to adjust the seasoning. Add more salt and freshly ground black pepper until the flavors really sing. The amount of salt you need will depend on the saltiness of your broth and miso paste.
Step 10: Serve and Garnish
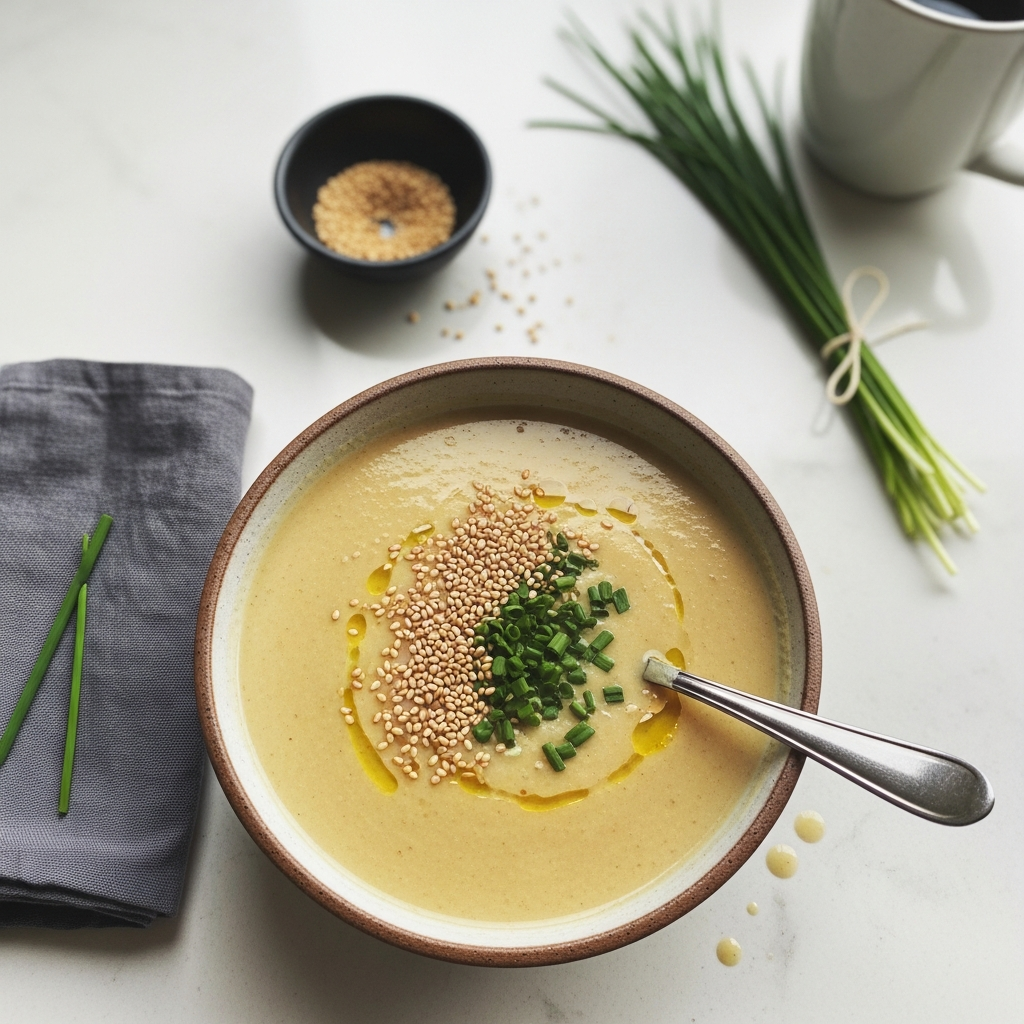
Ladle the hot, creamy roasted cauliflower soup into bowls. To make it extra special, add a garnish. A sprinkle of toasted sesame seeds adds a lovely nutty crunch, and some freshly chopped chives provide a pop of color and mild oniony flavor. Serve it right away and enjoy!
How To Serve Roasted Cauliflower Soup
This soup is absolutely stunning on its own, but the right accompaniments can turn it into a truly memorable meal. Whether you’re serving it for a light lunch or as the first course for a dinner party, a little extra touch goes a long way. I love thinking about different textures and flavors that can complement the soup’s creamy, savory profile.
Think about crunch, freshness, and richness. A simple garnish can elevate the entire bowl, while a hearty side can make it a satisfying main course. It’s all about creating a balanced and delightful experience with every spoonful. Here are a few of my favorite ways to serve this gorgeous soup.
- Crusty Bread or Grilled Cheese: You can never go wrong with soup’s best friend. A thick slice of crusty sourdough or a warm baguette is perfect for dipping. For an even more indulgent meal, serve it alongside a gooey grilled cheese sandwich. The combination is pure comfort.
- Creative Toppings: Go beyond the sesame seeds and chives! Try a sprinkle of crispy roasted chickpeas for protein and crunch, some crunchy croutons, or a handful of savory granola. A drizzle of high-quality olive oil or a swirl of chili crisp adds a beautiful finish and another layer of flavor.
- A Dollop of Dairy (or Not): For extra richness, you can add a swirl of heavy cream, a dollop of sour cream, or some plain Greek yogurt right before serving. For a dairy-free option that still adds creaminess, a spoonful of unsweetened cashew cream works wonderfully.
- Add Some Protein: To make this soup a more substantial meal, top it with some crumbled bacon or pancetta. The salty, smoky flavor is a fantastic counterpoint to the creamy cauliflower.
- As a Starter: Serve this roasted cauliflower soup in smaller portions in cups or demitasses as an elegant starter for a holiday meal or dinner party. The sophisticated flavor is sure to impress your guests right from the beginning.
No matter how you choose to serve it, this soup is sure to be a hit. It’s versatile enough for a quiet weeknight dinner or a fancy gathering with friends.
How To Store & Reuse Roasted Cauliflower Soup Leftovers
One of the best things about making a big pot of soup is having delicious leftovers. This roasted cauliflower soup stores beautifully, and its flavor can even deepen and improve overnight. Proper storage is key to making sure it tastes just as good the next day, or even a month from now. I often make a double batch just so I can have some ready to go in the freezer for a busy day.
Reheating is simple, and there are even a few creative ways to use up any remaining soup if you want to try something a little different. Don’t let a single drop of this liquid gold go to waste! Here’s everything you need to know about storing and enjoying your leftovers.
- In the Refrigerator: Allow the soup to cool down to room temperature before storing. Transfer it to an airtight container and it will keep well in the refrigerator for up to 4 days. The flavors will continue to meld, so it’s often even better on day two.
- In the Freezer: This soup freezes exceptionally well. Once cooled, pour it into freezer-safe containers or heavy-duty freezer bags. Be sure to leave about an inch of space at the top to allow for expansion. It can be frozen for up to 3 months. To thaw, simply place it in the refrigerator overnight.
- Reheating: To reheat, gently warm the soup in a saucepan over medium-low heat on the stovetop, stirring occasionally until it’s heated through. You can also reheat individual portions in the microwave. The soup may thicken slightly upon chilling, so you might want to add a splash of vegetable broth or water to thin it back to your desired consistency.
- Creative Reuse: If you have a smaller amount of leftover soup, think of it as a sauce! It makes a fantastic, creamy base for a pasta dish. Just thin it with a little pasta water and toss with your favorite noodles and some sautéed vegetables. You can also use it as a flavorful base for a chicken or vegetable pot pie.
With these simple tips, you can enjoy the comforting flavor of your homemade soup all week long. It’s the perfect meal to prep ahead for easy and delicious lunches or dinners.
Substitutions & Variations For Roasted Cauliflower Soup
While I believe this recipe is perfect as is, I know that every cook likes to put their own spin on things. Sometimes you just don’t have a certain ingredient on hand! The great news is that this roasted cauliflower soup is very forgiving and lends itself well to a variety of substitutions and creative variations. Feel free to experiment and make it your own.
Whether you need to accommodate a dietary restriction, want to use up vegetables you have in the fridge, or just feel like trying a new flavor combination, these ideas will help you customize the soup to your liking. Here are some of my go-to swaps and additions.
- For the Coconut Milk: If you’re not a fan of coconut or don’t have it, you can substitute it with heavy cream for an equally rich and decadent soup. For a dairy-free alternative that isn’t coconut, try making a simple cashew cream by soaking raw cashews in hot water and blending them until smooth.
- No Miso Paste?: While miso provides a unique flavor, you can still make a delicious soup without it. To add a bit of savory depth, try stirring in a teaspoon of soy sauce or tamari at the end. A tablespoon of nutritional yeast can also add a cheesy, savory flavor.
- Add Other Veggies: Feel free to roast other vegetables along with the cauliflower. A peeled and chopped potato or a parsnip can make the soup even creamier and thicker. Roasting a few carrots will add a lovely sweetness and a beautiful pale orange hue.
- Spice It Up: If you like a little heat, add a pinch of red pepper flakes along with the garlic and paprika. You could also roast a jalapeño along with the cauliflower for a spicier kick. For a different flavor profile, try adding warm spices like a quarter teaspoon of curry powder or turmeric.
- Change Up the Broth: While I use vegetable broth to keep it vegetarian, feel free to use chicken broth if that’s what you have. A mushroom broth would also be delicious and would add another layer of earthy, umami flavor.
Don’t be afraid to play around with the recipe. Cooking should be fun and creative, and these variations are a great starting point for discovering your perfect version of this soup.
Roasted Cauliflower Soup with Miso
Description: A velvety, rich roasted cauliflower soup with a secret ingredient, white miso, that adds an incredible depth of savory flavor. This simple yet elegant soup is pure comfort in a bowl and perfect for any occasion.
Yield: 6 servings | Category: Soup | Cuisine: American
Prep Time: 15 minutes | Cook Time: 40 minutes
Ingredients
- 1 large head of cauliflower, cut into florets
- 1 tablespoon olive oil
- 1 yellow onion, chopped
- 2 cloves garlic, minced
- 4 cups vegetable broth
- 1/2 cup full-fat coconut milk
- 2 tablespoons white miso paste
- 1/2 teaspoon smoked paprika
- Salt and freshly ground black pepper to taste
- For garnish (optional): toasted sesame seeds, fresh chives (chopped)
Instructions
- Preheat oven to 400°F (200°C). Toss cauliflower florets on a baking sheet with olive oil, salt, and pepper. Roast for 20-25 minutes until tender and browned.
- While cauliflower roasts, heat a large pot over medium heat. Sauté onion until soft, about 5-7 minutes. Add garlic and smoked paprika and cook for 1 more minute until fragrant.
- Add the roasted cauliflower and vegetable broth to the pot. Bring to a simmer and cook for 10 minutes.
- In a small bowl, whisk the coconut milk and miso paste until smooth. Stir the mixture into the soup.
- Turn off the heat and use an immersion blender to blend the soup until smooth. Season with salt and pepper to taste.
- Serve hot, garnished with toasted sesame seeds and fresh chives, if desired.
Notes
For the creamiest texture, be sure to use full-fat canned coconut milk. An immersion blender is recommended for ease and safety, but you can use a regular blender in batches if needed. Let the soup cool slightly first!
Servings: 6 | Calories: 155 kcal | Fat: 10g | Carbohydrates: 14g | Protein: 4g
5 FAQs About Roasted Cauliflower Soup
Here are some straightforward answers to the most common questions I receive about this roasted cauliflower soup recipe. I hope these help you feel even more confident about making this delicious dish in your own kitchen!
How can I make my roasted cauliflower soup thicker or thinner?
The consistency of a pureed soup is a matter of personal preference, and thankfully, it’s very easy to adjust. If you find your soup is thinner than you’d like, there are a few simple ways to thicken it up. The easiest method is to simply let it simmer gently on the stovetop with the lid off for an extra 10 to 15 minutes. This allows some of the excess liquid to evaporate, concentrating the flavors and thickening the soup naturally.
Another great option, if you have it on hand, is to add a peeled and diced potato to the pot along with the roasted cauliflower and broth. As the potato cooks and is blended into the soup, its starches will act as a natural thickener. If you need a quick fix after the soup is already blended, you can create a small slurry by whisking a tablespoon of cornstarch with two tablespoons of cold water, then slowly stirring it into the simmering soup until it thickens.
Conversely, if your soup is too thick for your liking, the solution is even simpler. Just whisk in a bit more vegetable broth, a little at a time, until you reach your desired consistency. You could also add a splash more coconut milk for extra creaminess. Just be sure to taste and adjust the seasoning after adding more liquid.
Can I make this roasted cauliflower soup ahead of time?
Absolutely! This is one of my favorite recipes to make ahead, which makes it perfect for meal prep or for entertaining. The flavors actually have a chance to meld and deepen overnight, so I often think it tastes even better the next day. You can prepare the entire soup from start to finish, let it cool completely, and then store it in an airtight container in the refrigerator for up to 4 days.
When you’re ready to serve, you can reheat it gently on the stovetop over medium-low heat, stirring occasionally. You might find it has thickened a bit in the fridge, so feel free to add a splash of broth or water to thin it out as it warms up. Alternatively, you can reheat individual portions in the microwave. I recommend waiting to add any fresh garnishes, like the chives, until just before serving to keep them vibrant and fresh.
This soup also freezes wonderfully for longer storage. Just follow the storage instructions mentioned earlier, and you can have a comforting, homemade meal ready to go for up to three months.
Why is my roasted cauliflower soup bitter?
A bitter taste in cauliflower soup is a common issue, but it’s usually easy to fix and prevent. The primary culprit for bitterness is often overcooking the cauliflower, particularly if it starts to burn during the roasting process. You’re looking for deep golden-brown spots, not blackened or charred edges. Keep a close eye on it while it’s in the oven and pull it out as soon as it’s tender and lightly caramelized.
Another potential source of bitterness can be the garlic. If the minced garlic is added to the pot too early or cooked over too high a heat, it can scorch easily, which will impart a harsh, bitter flavor to the entire dish. That’s why the instructions specify adding it after the onions have softened and cooking it for just a minute until fragrant.
If you’ve already made your soup and it tastes a bit bitter, don’t despair. You can often balance out the bitterness by adding a little something sweet, acidic, or fatty. Try stirring in a teaspoon of maple syrup or a pinch of sugar. A squeeze of fresh lemon juice can also work wonders to brighten the flavors and cut through any bitterness. Finally, adding a bit more full-fat coconut milk or a swirl of heavy cream can mellow out the flavors.
Is this roasted cauliflower soup healthy?
Yes, this roasted cauliflower soup is a wonderfully healthy and nourishing dish. Cauliflower itself is a nutritional powerhouse. It’s a cruciferous vegetable that is low in calories but packed with vitamins and minerals, including Vitamin C, Vitamin K, and folate. It’s also an excellent source of fiber, which is important for digestive health and helps you feel full and satisfied.
This recipe is naturally vegetarian and can easily be considered vegan. By using olive oil, vegetable broth, and full-fat coconut milk instead of dairy, it’s a great option for those following a plant-based diet. The coconut milk provides healthy fats, and the miso paste, being a fermented food, can contribute beneficial probiotics. Using a low-sodium vegetable broth and seasoning to your own taste allows you to control the sodium content, making it a heart-healthy choice.
It’s a fantastic way to get a hearty serving of vegetables in a delicious and comforting form. This soup is proof that healthy food doesn’t have to be boring. It’s rich, flavorful, and satisfying, making it a perfect choice for a light yet filling meal.
Can I use frozen cauliflower for this soup recipe?
Yes, you can certainly use frozen cauliflower florets in a pinch, and it’s a great way to save on prep time. However, you’ll need to adjust the roasting process slightly. Frozen vegetables contain a lot more moisture than fresh ones, so they have a tendency to steam rather than roast. To get the best results, do not thaw the cauliflower first. Spread the frozen florets directly onto your baking sheet.
You may need to increase the roasting time by 10 to 15 minutes to allow the excess water to cook off and to give the cauliflower a chance to brown and caramelize properly. Be sure to spread them in a single, even layer so they have plenty of space. You might not achieve the exact same deep, nutty flavor as you would with fresh cauliflower, but you will still get a delicious result.
Once the frozen cauliflower is roasted, you can proceed with the rest of the recipe exactly as written. It’s a convenient shortcut for those busy weeknights when you’re craving a bowl of warm, homemade soup without the extra chopping.
Try These Recipes Next
If you loved the comforting, velvety texture of this roasted cauliflower soup, I have a few other recipes I think you’ll enjoy just as much.
- Roasted Tomato Soup: Another incredible soup that gets its deep flavor from roasting the vegetables first. It’s rich, classic, and perfect with a grilled cheese.
- Brown Butter Cauliflower Casserole: If you’re looking for another way to enjoy cauliflower, this casserole is a showstopper. The nutty brown butter takes it to a whole new level.
- Panera Broccoli Cheddar Soup (Copycat): A homemade version of the beloved classic. It’s cheesy, creamy, and everything you want in a comforting soup.
I hope you enjoy making these cozy dishes in your own kitchen!