
Easy Honey Butter Dinner Rolls Recipe
There are certain smells that just transport you right back to your childhood kitchen, and for me, the scent of yeast rolls baking is at the very top of that list. I remember my grandmother pulling pans of perfectly golden, pillowy rolls from the oven for every single holiday. They were legendary. For years, I tried to replicate them, getting close but never quite achieving that melt-in-your-mouth texture that made hers so special. My rolls were good, but they were missing that certain something.
Then one Sunday afternoon, while tinkering with her old recipe card, I had an idea. The recipe called for butter, which gives an unbeatable flavor. But I remembered my other grandmother swearing by shortening for the softest biscuits. A little lightbulb went off. What if I used both? It felt a little scandalous, like I was breaking a sacred baking rule, but I decided to give it a try.
The result was pure magic. The butter brought all the rich, classic flavor I loved, while the shortening created a tenderness and a soft, fluffy crumb that was simply heavenly. I brushed them with a simple honey butter glaze right out of the oven, and y’all, that was it. I had finally created the perfect Honey Butter Dinner Rolls. They have the soul of my grandmother’s classic recipe, with a modern little twist that makes them unbelievably soft and delicious. They’ve become my signature dish, and now I’m so excited to share them with you.
Why This Honey Butter Dinner Rolls Recipe Works
Dinner rolls are more than just a side dish here in the South, they are an essential part of any proper meal, especially when family is gathered. Every home cook has their version, passed down through generations. The goal is always the same, to create a roll that is light, fluffy, and full of flavor. Most traditional recipes will have you choose between two fats, butter or shortening. Each one has its own distinct advantage, and that’s where the problem usually lies.
Butter, of course, provides that rich, creamy, and slightly nutty flavor that is simply non-negotiable in a good dinner roll. Nothing else can replicate it. However, rolls made with only butter can sometimes turn a little firm or dry the next day. On the other hand, shortening is a baker’s secret weapon for texture. It creates an incredibly tender, soft crumb and helps baked goods stay moist and fresh for longer. The trade-off is that it doesn’t offer much in the way of flavor.
This is precisely why my Honey Butter Dinner Rolls recipe is so special. It doesn’t force you to choose. By using a combination of both butter and shortening, you get the absolute best of both worlds. You get all the beautiful, rich flavor from the butter, plus the unbelievably soft, pillowy, and tender texture from the shortening. This dynamic duo ensures the rolls bake up perfectly fluffy and golden, and they stay wonderfully soft for days. That little touch of honey in the dough and in the glaze adds a subtle sweetness that complements the savory roll perfectly, making them completely irresistible.
Ingredients for Honey Butter Dinner Rolls
The beauty of a classic recipe like this is its simplicity. We’re using basic pantry staples to create something truly spectacular. But as with any simple recipe, the quality of your ingredients really does make a difference. Here’s exactly what you’ll need to make these amazing rolls.
The real secret, the ingredient that gives these rolls their signature texture, is the combination of fats. We use both butter for that classic, rich flavor and shortening for an unbeatable softness that lasts for days. It’s a small change that makes a huge impact on the final result.
- 4 C all purpose flour, plus more if needed
- 1 packet of dry active yeast
- 1/3 C honey
- 1 tsp salt
- 1 egg, beaten
- 1 C milk
- 1 1/2 tbsp butter
- 1 1/2 tbsp shortening
- 1 C water
When it comes to flour, a good quality all-purpose flour like King Arthur or White Lily will give you a consistent, reliable result. For the milk, I highly recommend using whole milk. The extra fat content contributes to a softer, richer dough. As for the honey, a mild clover or wildflower honey works beautifully here, adding a delicate sweetness without overpowering the buttery flavor of the rolls. And please, make sure your yeast is fresh! Old yeast is often the reason for dough that doesn’t rise properly, which is always such a disappointment.
Step-by-Step Instructions For Making Honey Butter Dinner Rolls
Making yeast dough from scratch might seem intimidating, but I promise this recipe is straightforward and so rewarding. Just follow these steps, and you’ll have warm, fluffy rolls coming out of your oven in no time. I recommend using a stand mixer with a dough hook if you have one, as it makes the kneading process a breeze.
Step 1: Activate the Yeast
First things first, we need to wake up our yeast. In the bowl of your stand mixer, combine the packet of active dry yeast with one cup of warm water. The water should feel like a warm bath, not hot, around 110°F. Give it a gentle stir and let it sit for about 5 to 10 minutes. You’ll know it’s ready when the mixture becomes foamy and smells distinctly like bread. This step is called proofing, and it’s how we make sure our yeast is alive and active before we add the other ingredients.
Step 2: Warm the Liquids
While the yeast is proofing, grab a small saucepan. Combine the milk, honey, butter, shortening, and salt. Place it over low heat, stirring gently. We only want to warm this mixture enough to melt the butter and shortening. The shortening might look a little lumpy, and that is perfectly fine. The most important thing here is to not let the mixture boil or even simmer. If it gets too hot, it can kill the yeast when you combine them.
Step 3: Combine and Mix
Pour the warm milk mixture into the stand mixer bowl with the foamy yeast. Add the beaten egg. Using the flat beater attachment, mix everything on low speed for about 30 seconds until it’s just combined. Now, add 3 and 3/4 cups of the flour to the bowl and mix again until the flour is fully incorporated and a shaggy dough forms.
Step 4: Knead the Dough
Switch from the flat beater to the dough hook attachment. Turn the mixer on a medium low speed and let it knead the dough for about 8 to 10 minutes. During this time, the dough will transform from sticky and rough to smooth and elastic. Gradually add the remaining 1/4 cup of flour, a little at a time, just until the dough pulls away from the sides of the bowl. Be careful not to add too much flour, as this is the secret to light, fluffy rolls instead of dense, heavy ones.
Step 5: First Rise
Once the dough is smooth and elastic, remove it from the mixer. Form it into a ball and place it in a large, lightly oiled bowl. Turn the dough over once to coat it in oil, which prevents a skin from forming. Cover the bowl with plastic wrap or a clean kitchen towel and place it in a warm, draft free spot to rise for one to two hours, or until it has doubled in size.
Step 6: Shape the Rolls
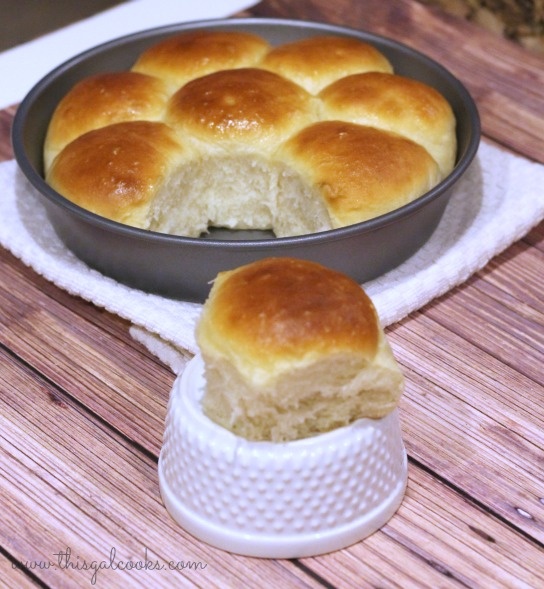
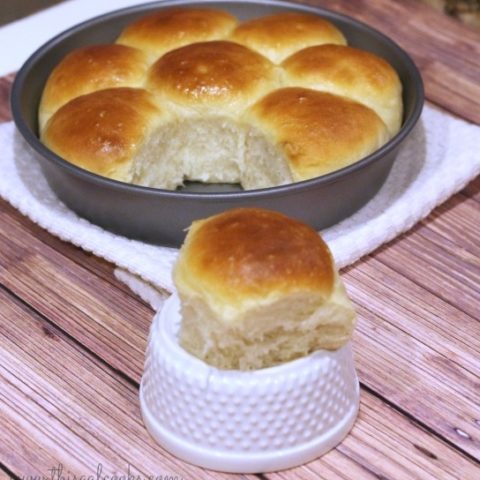
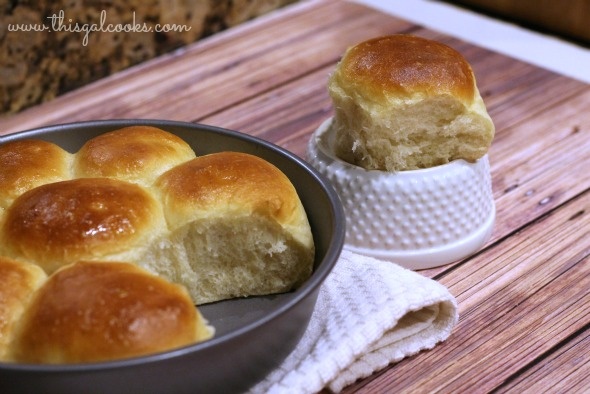
Gently punch the dough down to release the air. Place it on a lightly floured surface and let it rest for about 10 minutes. This allows the gluten to relax, making it easier to shape. Roll the dough into a long log shape and use a bench scraper or knife to divide it into 16 to 18 equal pieces. Shape each piece into a smooth ball and arrange them in two greased 9-inch round cake pans.
Step 7: Second Rise
Cover the pans with your kitchen towel and let the rolls rise again in a warm place for about 30 minutes. They should double in size again and be touching each other in the pan. While they are rising, preheat your oven to 400°F.
Step 8: Bake to Golden Perfection
Bake the rolls for 10 to 15 minutes, until the tops are beautifully golden brown. The smell that will fill your kitchen is absolutely divine! Every oven is different, so keep an eye on them during the last few minutes of baking.
Step 9: Add the Honey Butter Glaze
While the rolls are baking, quickly mix together one tablespoon of melted butter and one teaspoon of honey. As soon as you pull the rolls out of the oven, brush this glorious honey butter mixture all over the hot tops. This gives them a beautiful shine and an extra layer of sweet, buttery flavor. Let them cool in the pan on a wire rack for a few minutes before serving warm.
How To Serve Honey Butter Dinner Rolls
There is truly no wrong way to serve a warm, fluffy dinner roll, but these beauties deserve to be the star of the show. The most classic way, of course, is to place a big basket of them, fresh from the oven, right in the center of the dinner table. Serve them alongside a dish of good quality salted butter and let everyone help themselves. They are the perfect companion to any holiday meal, from a Thanksgiving turkey to an Easter ham.
But don’t just save these Honey Butter Dinner Rolls for special occasions! They elevate a simple weeknight meal in the best way. Imagine sopping up the last bits of a hearty beef stew or a creamy tomato soup with one of these soft rolls. It’s pure comfort. They are also fantastic alongside a Sunday pot roast or a plate of fried chicken.
If you’re looking for more creative ways to enjoy them, I have a few favorite ideas:
- Mini Sliders: These rolls are the perfect size for sliders. Fill them with pulled pork, shredded BBQ chicken, or even little ham and cheese sandwiches for a party or an easy lunch.
- Breakfast Sandwiches: Split a roll in half and fill it with a folded egg, a slice of cheese, and a sausage patty for a truly decadent start to your day.
- Garlic Bread Twists: Before the second rise, you can brush the dough with garlic butter and a sprinkle of parmesan for a savory twist.
- Croutons: If you have any leftover rolls that are a day or two old, cut them into cubes, toss with olive oil and seasonings, and bake until crispy for the best homemade croutons you’ve ever had.
No matter how you choose to serve them, these rolls are guaranteed to be a hit. They bring a little touch of homemade love to any meal, and seeing the smiles on my family’s faces when I bring them to the table is the best part.
How To Store & Reuse Honey Butter Dinner Rolls Leftovers
Thanks to the shortening in the recipe, these rolls stay wonderfully soft for days, but it’s important to store them properly to maintain that freshness. The best part about having leftover rolls, if you’re lucky enough to have any, is finding delicious ways to enjoy them again. Here are my tried-and-true methods for storing and reusing them.
For short-term storage, allow the rolls to cool completely to room temperature. If you store them while they’re still warm, condensation will form and can make them soggy. Once cooled, place them in an airtight container, a zip-top bag, or wrap the pan tightly with plastic wrap. They will stay fresh and soft on your counter for up to three days.
If you want to keep them for longer, freezing is your best option. You can freeze them either baked or unbaked. Here’s how to handle both methods for your Honey Butter Dinner Rolls:
- Storing Baked Rolls: Let the rolls cool completely. You can wrap them individually in plastic wrap and then place them in a freezer-safe bag, or you can place the entire pan of rolls in the freezer until firm, then wrap the whole pan tightly in a layer of plastic wrap followed by a layer of aluminum foil. They’ll keep well in the freezer for up to three months. To reheat, let them thaw at room temperature and then warm them in a 350°F oven for about 5-7 minutes.
- Reheating Leftovers: My favorite way to reheat a leftover roll is to wrap it loosely in a damp paper towel and microwave it for about 15 to 20 seconds. It steams it just enough to make it taste like it just came out of the oven.
- Creative Leftover Ideas: Don’t let a single roll go to waste! Stale rolls are perfect for making mini bread puddings. You can also slice them thinly, brush with butter and cinnamon sugar, and bake them into sweet, crispy chips. They also make a fantastic base for mini French toast bites on a weekend morning.
With these tips, you can enjoy your homemade rolls for days to come. Proper storage means you can bake a big batch and have them ready to go for quick weeknight dinners or lazy weekend breakfasts, making all that loving effort in the kitchen worthwhile.
Substitutions & Variations For Honey Butter Dinner Rolls
One of the things I love most about a solid base recipe like this one is how easily you can adapt it to your own tastes or what you have on hand in the pantry. These Honey Butter Dinner Rolls are absolutely perfect as they are, but they also serve as a wonderful canvas for a little creativity. Whether you need to make a dietary substitution or just feel like trying something new, here are a few ideas to get you started.
Before you start swapping, remember that baking is a science. Changing an ingredient, especially in a yeast dough, can affect the final texture and rise. I always recommend making the recipe as written the first time so you have a baseline. After that, feel free to experiment and make it your own! These variations are a great place to start.
Here are some of my favorite substitutions and flavor variations:
- Herb-Infused Rolls: For a more savory roll, try adding two tablespoons of finely chopped fresh herbs to the dry ingredients. Rosemary, thyme, and chives all work beautifully. A savory herb roll is fantastic served with pasta or a hearty soup.
- Whole Wheat Swap: If you’d like to add some whole grains, you can substitute up to one cup of the all-purpose flour with whole wheat flour. This will result in a slightly denser, heartier roll with a lovely nutty flavor. You may need to add a touch more liquid, as whole wheat flour is a bit thirstier.
- Cinnamon Honey Butter: For a sweeter, almost dessert-like roll, add a quarter teaspoon of cinnamon to the honey butter glaze that you brush on top. This is especially delicious if you’re serving the rolls with a pork dish or for a holiday brunch.
- Make it Dairy-Free: You can substitute the whole milk with an unsweetened plant-based milk like almond or soy milk. For the butter, use a high-quality dairy-free butter substitute. The flavor and texture will be slightly different, but still delicious.
- Savory Toppings: Before baking, you could brush the tops of the rolls with a little melted butter and sprinkle them with flaky sea salt, everything bagel seasoning, or some grated Parmesan cheese for an extra pop of flavor and texture.
Don’t be afraid to play around with this recipe. Baking should be fun, and these little tweaks are a great way to put your own personal stamp on these already wonderful dinner rolls. Let me know in the comments if you discover a new favorite variation!
Recipe: Honey Butter Dinner Rolls
Ingredients
- 4 C all purpose flour, plus more if needed
- 1 packet of dry active yeast
- 1/3 C honey
- 1 tsp salt
- 1 egg, beaten
- 1 C milk
- 1 1/2 tbsp butter
- 1 1/2 tbsp shortening
- 1 C water
Instructions
- In the bowl of a stand up mixer, combine the yeast and water. Allow to sit until the mixture becomes foamy.
- In a sauce pan, combine the milk, honey, butter, shortening and salt over low heat. heat until the butter and shortening are just melted. Please note, the shortening may be lumpy. That's ok. DO NOT BOIL.
- Add the milk mixture and the beaten egg to the yeast mixture.Beat on low speed with the flat attachment for about 30 seconds.
- Ad 3 3/4 C of the flour to the mixture and beat until well combined.
- Remove the flat attachment and add the bread hook attachment. Knead for 8/10 minutes, adding the remaining flour until the dough no longer sticks to the sides of the bowl. Be sure to add small amounts. If you add too much, your rolls will end up dense rather than light and fluffy.
- Remove the dough ball from the mixer and place into a large, oiled bowl and cover. Allow to rise for 1-2 hours or until double in size.
- Punch the dough down and shape into a ball. Cover and allow to rest for 10 minutes.
- On a floured surface, roll the dough into a long tube shape and cut into 16-18 pieces. Shape into balls and place into 2 greased round cake pans.
- Cover and allow to rise for 30 minutes or until doubled in size.
- Bake at 400 for 10-15 minutes, or until the top is golden.
- Meanwhile, combine 1 tbsp melted butter and 1 tsp of honey.
- Once the rolls are done baking, remove from the oven and spread the honey butter mixture on top.
- Allow to cool on a wire rack.
Notes
In order to prevent the dough from sticking to your hands, coat your hands with flour before handling the dough.
5 FAQs About Honey Butter Dinner Rolls
Here are some straightforward answers to the most common questions I receive about this Honey Butter Dinner Rolls recipe.
Why did my Honey Butter Dinner Rolls turn out dense?
Oh, the dreaded dense roll! It’s happened to all of us, and it’s usually caused by one of a few common culprits. The most likely reason is adding too much flour. The recipe calls for four cups, with a little extra if needed, but it’s crucial to add that extra flour very sparingly. The dough should be soft and slightly tacky, not dry and stiff. Too much flour weighs the dough down and inhibits its ability to rise into that light, airy texture we’re after. Always measure your flour by spooning it into the measuring cup and leveling it off, rather than scooping directly from the bag, which can compact it.
Another potential issue is your yeast. Yeast is a living organism, and it can expire. If your yeast didn’t get nice and foamy during the proofing step, it was likely old or inactive, and the rolls simply won’t rise properly. Lastly, be patient with the rising times. If your kitchen is cool, the dough may need longer than the recipe states to double in size. Under-proofed dough doesn’t have enough air bubbles trapped inside, which leads to a dense, heavy roll after baking. Give it the time it needs in a warm, draft-free spot.
Can I make the dough for Honey Butter Dinner Rolls ahead of time?
Absolutely! This is one of my favorite time-saving tricks, especially for holiday baking when oven space is at a premium. You can prepare the dough through the first rise and shaping steps. After you’ve shaped the rolls and placed them in their greased pans, cover them tightly with plastic wrap and place them directly into the refrigerator. They can be refrigerated for up to 24 hours.
When you’re ready to bake, take the pans out of the refrigerator. The rolls will look small and flat, but don’t worry. Leave them, still covered, on the counter at room temperature for about one to two hours. This time allows them to come to room temperature and complete their second rise. Once they have puffed up and doubled in size, you can bake them according to the recipe instructions. This make-ahead method is a lifesaver for planning big meals.
What’s the purpose of using both butter and shortening in these dinner rolls?
This is the secret that really makes this recipe stand out! It’s all about getting the best of both worlds in flavor and texture. Butter provides an unmatched rich, creamy, and slightly sweet flavor. There is simply no substitute for the taste of real butter in a classic dinner roll. However, butter has a lower melting point and can sometimes result in a slightly less tender crumb, especially by the second day.
Shortening, on the other hand, is a baker’s key to softness and a longer shelf life. It has a higher melting point, which helps create a wonderfully light, tender, and pillowy texture in baked goods. By using a combination of both fats, you get all of the delicious, classic flavor from the butter, plus the incredible, lasting softness and moist crumb from the shortening. It’s a simple tweak that elevates these Honey Butter Dinner Rolls from good to absolutely unforgettable.
How do I know when my Honey Butter Dinner Rolls are perfectly baked?
Knowing when your rolls are done is key to getting that perfect texture. The most obvious indicator is the color. You’re looking for a beautiful, even golden brown across the tops of all the rolls. If some are browning faster than others, you can loosely tent the pan with foil for the last few minutes of baking. However, color can sometimes be deceiving, and you don’t want to pull them out only to find they are doughy in the middle.
For a foolproof method, I highly recommend using an instant-read thermometer. Just like with meat, baked goods have an ideal internal temperature. For enriched doughs like this one, you’re looking for a temperature between 190°F and 200°F. Gently insert the thermometer into the center of one of the middle rolls. If it hits that magic number, they are perfectly baked through. This trick takes all the guesswork out of baking and guarantees perfect rolls every single time.
Can I make these Honey Butter Dinner Rolls without a stand mixer?
You certainly can! A stand mixer makes the process easier, but people have been making incredible bread by hand for centuries. You will just need a large bowl, a wooden spoon, and a little bit of elbow grease. Follow the recipe as written for activating the yeast and mixing the ingredients. Once you have a shaggy dough, turn it out onto a lightly floured surface.
Now comes the fun part, kneading. To knead by hand, fold the dough over on itself, then press down and away from you with the heel of your hand. Give the dough a quarter turn and repeat the process. Continue this fold, press, turn motion for about 10 to 15 minutes. It’s a bit of a workout! You’ll know the dough is ready when it’s smooth, elastic, and springs back when you gently poke it. From there, just proceed with the rising and baking steps as directed in the recipe.
Try These Recipes Next
If you’ve fallen in love with making your own dinner rolls from scratch, I have a few more recipes I think you’ll really enjoy.
- Oatmeal Molasses Rolls: These are hearty and wholesome with a lovely, subtle sweetness from the molasses.
- Whole Wheat Dinner Rolls: A classic, healthier option that does not sacrifice any of that wonderful, fluffy texture.
- Easy Sweet Potato Rolls: A true Southern favorite, these rolls are beautifully colored and packed with comforting sweet potato flavor.
I hope your family loves these just as much as mine does.
Yes you are baking up a storm! If it were me I would have already packed another ten pounds on my thighs– I just can’t resist homemade bread. : ) I think your rolls look wonderful and I like the thought of hamburger rolls. Or maybe using these as slider rolls. I’ll let you know when I try it.
Yum, these look delicious!!!
Oh these look heavenly. I would love you to come link up to my party at http://www.memoriesbythemile.com/
It’s going on now!
Wanda Ann @ Memories by the Mile
Sounds delicious…pinned to try later this week :)
Delicious! Can’t wait to make these!
These look so soft and sound amazing.
Making these this weekend to go with roasted chicken! YUM!
Pingback: Recipe: Oatmeal Molasses Rolls - This Gal Cooks
Are you sure the amount of flour is correct? This just made a batter, had to add at least two more cups of flour to form a ball. Rising now so I’ll let you know.
Yes, the amount of flour was correct. If you add too much, you are going to end up with dense rolls. You should initially add about 3 3/4 C and then gradually add more until your dough is elastic and doesn’t stay stuck to the bowl. It will be stick to your hands and the counter, though, so as per my notes, dust the counter and your hands before handling the dough! Let me know how they turn out!
They came out wonderful! Had two pans I used as slider rolls. And had dough to make some cinnamon rolls. Will try this again.
Awesome! I’m glad you enjoyed them. And YUMMY on the cinnamon rolls. I need to make some of those soon! :)
Can you tell me how much honey this recipe takes? I t shows a square instead of a number on the site