
This Pumpkin Pie Cheesecake Recipe Is As Good As It Sounds
Pumpkin pie filling and cheesecake are swirled to make this delicious Pumpkin Pie Cheesecake! It’s the perfect alternative to the traditional pumpkin pie!
Last year I started a mission. A mission to make desserts other than pumpkin pie for Thanksgiving dessert. Don’t get me wrong, I love pumpkin pie but I just get sick of having it every year. I want variety. Change. Pumpkin goodies in forms other than pumpkin pie. So last year I made a Easy Pumpkin Spice Cake. It was a hit. Everyone loved it. I knew I had to make something to top that dessert for this years Thanksgiving feast so I set on a journey to find the perfect dessert recipe.
And boy did I ever.
PUMPKIN PIE CHEESECAKE!
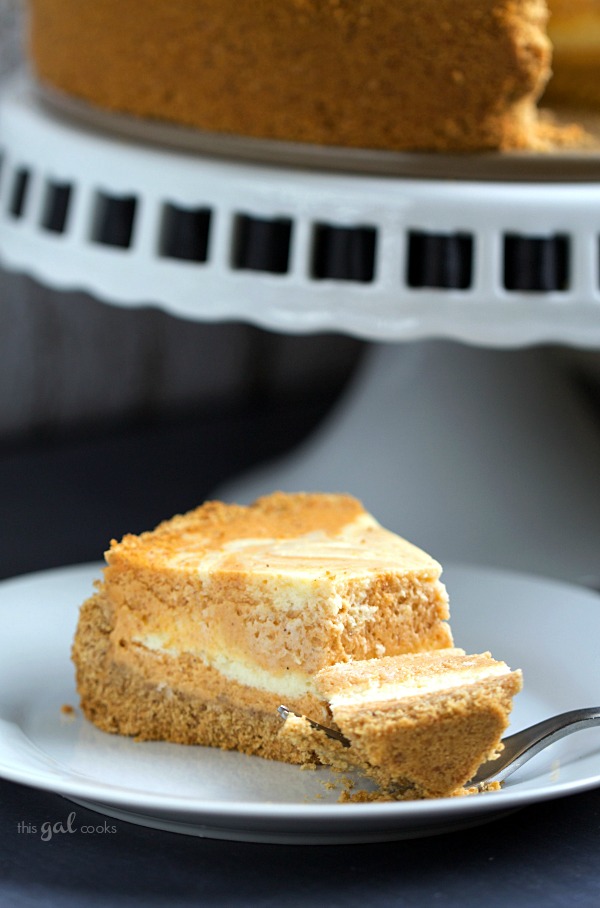
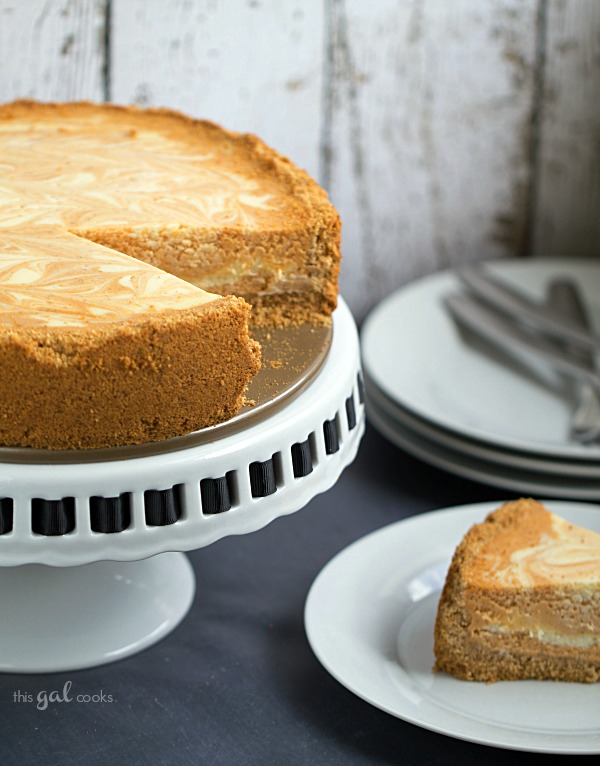
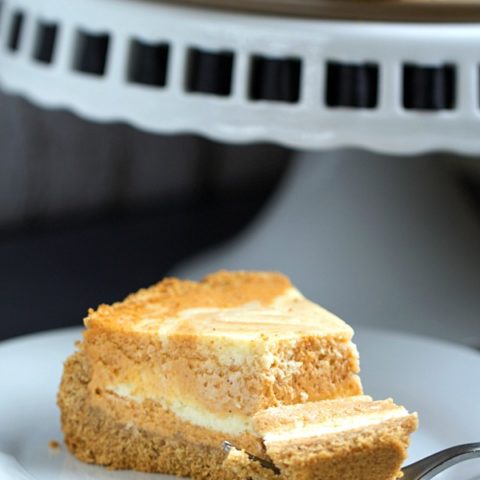
This delicious cheesecake actually tastes like pumpkin pie and cheesecake, hence the name I gave it: Pumpkin Pie Cheesecake. I think you will love this cake as much as my family did. Delicious pumpkin is layered then swirled with cheesecake and it all sits within a graham cracker crust. WIN! I hope you enjoy this recipe!
Ingredients for Pumpkin Pie Cheesecake
The magic of this Pumpkin Pie Cheesecake comes from using simple, high quality ingredients and letting them shine. There’s nothing too complicated here, which is just the way I like it. Make sure your cold ingredients are at room temperature. This is the single most important tip for a smooth, crack free cheesecake.
The real star of this recipe is the method of dividing the batter to create that beautiful swirl. The two separate batters, one a classic cheesecake and the other a pumpkin pie blend, are what give this dessert its signature look and balanced flavor. Using full fat, block style cream cheese is non negotiable for that perfectly dense and creamy texture. The pumpkin puree should be 100% pure pumpkin, not pumpkin pie filling, as we are adding our own spices and sugar for perfect control over the final taste.
Here’s exactly what you’ll need to gather:
- For the filling
- 3 (8 ounce) packages of cream cheese, full fat and at room temperature
- 1 cup pumpkin puree (not pumpkin pie filling)
- 1 cup granulated sugar, divided into 3/4 cup and 1/4 cup
- 1 teaspoon pure vanilla extract
- 3 large eggs, at room temperature
- 1 teaspoon pumpkin pie spice
- For the crust
- 1 3/4 cups graham crackers, finely crushed
- 1/3 cup unsalted butter, melted
A quick note on ingredients. Using room temperature cream cheese and eggs is crucial. Cold ingredients don’t combine smoothly and can lead to a lumpy batter and cracks in your finished cheesecake. I just set my cream cheese blocks and eggs on the counter for about two hours before I start baking. For the pumpkin pie spice, you can use a store bought blend or make your own with cinnamon, nutmeg, ginger, and a pinch of cloves.
Step-by-Step Instructions For Making Pumpkin Pie Cheesecake
Alright, let’s get baking! This Pumpkin Pie Cheesecake might look impressive, but the steps are straightforward. The most important things are to work with room temperature ingredients and to not overmix the batter once the eggs are in. I’ll walk you through everything, so don’t you worry.
Step 1: Prepare the Oven and Pan
First things first, preheat your oven to 325 degrees Fahrenheit. If you have a dark, nonstick springform pan, I recommend lowering the temperature to 300 degrees, as those pans tend to conduct heat more intensely and can cause the edges to overbake. A 9 inch springform pan is essential for this recipe. It allows you to easily remove the cheesecake without having to flip it over.
Step 2: Make the Graham Cracker Crust
In a medium bowl, combine your finely crushed graham crackers with the melted butter. You can crush the crackers by pulsing them in a food processor or by placing them in a zip top bag and rolling them with a rolling pin. Mix the butter and crumbs with a fork until the mixture resembles wet sand. Press this mixture firmly and evenly into the bottom of your 9 inch springform pan. I like to use the bottom of a flat measuring cup to get it nice and compact. You don’t need to pre-bake this crust.
Step 3: Create the Cheesecake Batter
In the bowl of a stand mixer fitted with the paddle attachment, or in a large bowl with a hand mixer, beat the room temperature cream cheese, 3/4 cup of the sugar, and the vanilla extract. Start on low speed and gradually increase to medium. Beat for about 3 to 5 minutes, until the mixture is completely smooth, creamy, and fluffy. Scrape down the sides of the bowl a few times to ensure everything is incorporated. Now, add the eggs one at a time, mixing on medium low speed just until each egg is blended in. Overmixing at this stage can incorporate too much air, which can cause the cheesecake to crack later.
Step 4: Divide and Flavor the Batters
Now for the fun part. Scoop out about 1 1/2 cups of the plain cheesecake batter and set it aside in a separate bowl. To the remaining batter in the main mixing bowl, add the pumpkin puree, the remaining 1/4 cup of sugar, and the pumpkin pie spice. Use a spatula or spoon to gently fold these ingredients together until they are well combined and the batter is a uniform orange color. You now have two beautiful batters.
Step 5: Layer and Swirl the Cheesecake
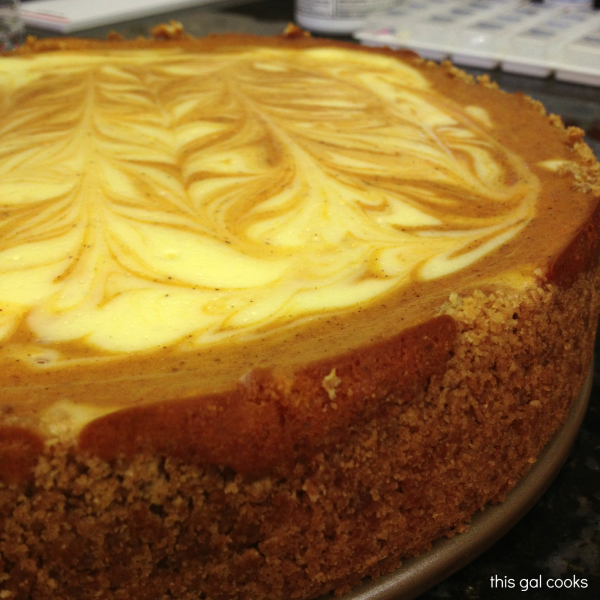
Pour about half of the pumpkin batter over the prepared crust and spread it into an even layer. Next, gently spoon half of the plain cheesecake batter over the pumpkin layer. Don’t worry about making it perfect, just get it mostly covered. Repeat these layers one more time, ending with the plain batter on top. To create the swirl, take a butter knife and plunge it down into the batter. Make a few gentle S-shaped motions through the layers, from one side of the pan to the other, and then a few more in the opposite direction. Don’t overdo it. Just a few swirls are all you need for that beautiful marbled look.
Step 6: Bake and Cool the Pumpkin Pie Cheesecake
Carefully place the pan in the preheated oven and bake for 60 to 90 minutes. The cheesecake is done when the edges are set and the center has just a slight jiggle, like gelatin, when you gently nudge the pan. Turn off the oven, crack the door open, and let the cheesecake cool in the oven for about an hour. This slow cooling process is another secret to preventing cracks. Then, remove it from the oven and let it cool completely on a wire rack for about 30 more minutes. Before refrigerating, run a thin knife around the edge of the cheesecake to loosen it from the pan. This helps prevent cracking as it shrinks while chilling. Finally, cover and refrigerate for at least 4 hours, but overnight is even better for the best flavor and texture.
How To Serve Pumpkin Pie Cheesecake
Once your beautiful Pumpkin Pie Cheesecake has fully chilled and set, it’s ready for its grand debut. Serving this dessert is all about highlighting its creamy texture and rich, spiced flavor. The simplest way is often the best. A clean, sharp slice on a pretty plate is a showstopper all on its own, especially with that gorgeous swirl pattern.
I always recommend using a large, sharp knife to slice it. For the cleanest cuts, dip the knife in hot water and wipe it dry between each slice. This little trick prevents the cheesecake from sticking to the blade and ensures every piece looks picture perfect. While it’s absolutely delicious on its own, adding a little something extra can take it to the next level. A dollop of lightly sweetened whipped cream or a dusting of cinnamon can add a lovely finishing touch that complements the pumpkin spice flavors without overpowering them.
If you really want to impress your guests, here are a few of my favorite ways to dress up a slice:
- Caramel Drizzle: A generous drizzle of salted caramel sauce over the top of each slice is pure heaven. The salty sweet flavor is the perfect counterpoint to the tangy cream cheese and warm spices.
- Candied Pecans: Sprinkle some chopped candied pecans or walnuts on top for a delightful crunch and nutty flavor. It adds a wonderful textural contrast to the smooth cheesecake.
- Whipped Cream and Cinnamon: A classic for a reason. Make your own stabilized whipped cream so it holds its shape, pipe a little rosette on top of each slice, and finish with a light dusting of cinnamon or pumpkin pie spice.
- Ice Cream: For a truly decadent treat, serve a slice with a small scoop of high quality vanilla bean or butter pecan ice cream on the side. It’s an indulgent combination that’s perfect for a special occasion.
No matter how you choose to serve it, make sure the cheesecake is well chilled. The flavors are best and the texture is firmest when it’s served straight from the refrigerator. It’s the perfect dessert for Thanksgiving, Christmas, or any fall gathering.
How To Store & Reuse Pumpkin Pie Cheesecake Leftovers
If you’re lucky enough to have leftovers of this scrumptious Pumpkin Pie Cheesecake, storing it properly is key to keeping it fresh and delicious. Because it’s a dairy based dessert, it must always be stored in the refrigerator. The best way to store it is to keep it in the springform pan, cover it loosely with plastic wrap or foil, and place it back in the fridge.
If you’ve already removed it from the pan, you can place the entire cheesecake on a plate and cover it with a cake dome. For individual slices, place them in an airtight container. Properly stored, your cheesecake will stay fresh for up to 5 days. I actually think the flavor gets even better on day two, as the spices have more time to meld with the creamy filling.
Thinking about reusing leftovers is a fun way to enjoy this dessert in a new form. Here are a couple of ideas:
- Cheesecake Milkshakes: This is a family favorite. Crumble a slice of leftover Pumpkin Pie Cheesecake into a blender with a scoop or two of vanilla ice cream and a splash of milk. Blend until smooth for the most amazing fall milkshake you’ve ever tasted.
- Cheesecake Truffles: Mash up the leftover cheesecake (crust and all) with a fork, roll the mixture into small balls, and place them on a parchment lined baking sheet. Freeze for about an hour until firm, then dip them in melted white or dark chocolate. They are incredible.
You can also freeze this cheesecake for longer storage. You can freeze it whole or in individual slices. To do so, first place the cheesecake uncovered in the freezer for about an hour to firm up. Then, wrap it tightly in a layer of plastic wrap, followed by a layer of heavy duty aluminum foil. This double wrapping helps prevent freezer burn. It can be frozen for up to 2 months. When you’re ready to enjoy it, simply thaw it in the refrigerator overnight. The texture will be nearly identical to when it was fresh.
Substitutions & Variations For Pumpkin Pie Cheesecake
One of the things I love about this Pumpkin Pie Cheesecake recipe is that it’s a fantastic base for your own creative twists. While the original is a crowd pleaser, there are plenty of ways to adapt it to your taste or what you have in your pantry. Feel free to play around and make it your own.
The crust is one of the easiest places to start experimenting. If you’re not a fan of graham crackers or just want to try something different, there are several delicious alternatives. The filling is also adaptable. The key is to maintain the ratio of wet to dry ingredients to ensure it sets up properly. Always make sure your substitutions are measured correctly for the best results.
Here are some of my favorite substitutions and variations that work beautifully with this recipe:
- Crust Variations: Instead of graham crackers, try using crushed gingersnap cookies for an extra layer of spice. Biscoff cookies or even crushed shortbread cookies also make a wonderfully buttery and flavorful crust. For a gluten free option, use your favorite gluten free graham style crackers or a crust made from almond flour, butter, and a touch of sugar.
- Spice It Up: If you love a heavily spiced dessert, feel free to increase the pumpkin pie spice to 1 1/2 teaspoons. You could also add a pinch of cardamom or a dash of black pepper to the pumpkin batter for a more complex and warming flavor profile. A little bit of orange zest added to the plain cheesecake batter can also brighten up the flavors beautifully.
- Cream Cheese Swap: For a lighter, tangier version, you can substitute Neufchâtel cheese for the cream cheese. It has a slightly lower fat content but still produces a creamy result. I would not recommend using fat free cream cheese, as it will negatively affect the texture and may not set up properly.
- Chocolate Swirl: For the chocolate lovers, create a chocolate swirl instead of a plain one. After you’ve removed the 1 1/2 cups of plain batter, melt about 3 ounces of semi sweet chocolate and let it cool slightly. Gently fold the melted chocolate into the plain batter. Layer and swirl as directed for a decadent pumpkin chocolate cheesecake.
These are just a few ideas to get you started. Don’t be afraid to experiment with your favorite fall flavors. This Pumpkin Pie Cheesecake is very forgiving and always delicious.
Pumpkin Pie Cheesecake
Ingredients
For the filling
- 3 8oz packages of cream cheese, room temp
- 1 C pumpkin puree
- 1 C sugar, divided (3/4 C, 1/4 C)
- 1 tsp vanilla extract
- 3 large eggs, room temp
- 1 tsp pumpkin pie spice
For the crust
- 1 3/4 C graham crackers, crushed
- 1/3 C butter, melted
Instructions
- Preheat oven to 325 (300 for dark pans)
- Combine the graham crackers and melted butter. Press into the bottom of a 9 inch springform pan.
- On medium speed, beat together the cream cheese, 3/4 C of the sugar and the vanilla extract until well blended and fluffy, about 3-5 minutes. Add the eggs one at a time, beating on medium between each addition.
- Remove 1 1/2 C of the batter and set aside.
- Add the pumpkin puree, 1/4 C sugar and pumpkin pie spice to the remaining batter in the original mixing bowl. Mix together with a spoon until well incorporated and smooth.
- Pour half of the pumpkin batter over the crust of the pie and smooth with a spoon, if needed. Spoon half of the plain batter over the pumpkin layer and smooth with a spoon. Repeat one more time, until all batter is used. The plain batter will end up being the top layer.
- Using a butter knife, swirl the top layer of the cheesecake. You should have some of the pumpkin layer swirled in.
- Bake for 60-90 minutes or until until firm with only the center being slightly jiggly. Cool for 30 minutes. Loosen the edges with a thin knife and then refrigerate for 4 hours up to overnight before serving.
5 FAQs About Pumpkin Pie Cheesecake
Here are some straightforward answers to the most common questions I receive about this Pumpkin Pie Cheesecake recipe.
Why did my Pumpkin Pie Cheesecake crack on top?
Ah, the dreaded cheesecake crack. It’s the most common concern for bakers, but thankfully, it’s usually preventable. There are a few main culprits. The first, and most common, is overmixing the batter, especially after adding the eggs. When you beat too much air into the batter, it will rise up in the oven like a souffle and then fall and crack as it cools. Mix on low speed just until the eggs are incorporated.
Another major cause is a drastic temperature change. Pulling a hot cheesecake directly from the oven into a cool room can cause it to contract too quickly and crack. That’s why my recipe includes instructions to cool the cheesecake in the turned off oven with the door cracked open for an hour. This gradual cooling process is a game changer. Also, make sure to run a knife around the edge of the pan before chilling. As the cheesecake cools, it shrinks slightly, and if it’s stuck to the sides of the pan, the tension will cause it to crack in the middle. If it still cracks despite your best efforts, don’t worry. Just cover it with whipped cream or caramel sauce, and no one will ever know. It will still taste absolutely delicious.
Can I make this Pumpkin Pie Cheesecake recipe ahead of time?
Absolutely! This Pumpkin Pie Cheesecake is the perfect make ahead dessert, which is a lifesaver during busy holiday seasons. In fact, it needs to be made ahead of time because it requires at least four hours of chilling time, though I strongly recommend chilling it overnight. Chilling is not just about getting it cold. This time allows the cheesecake to fully set and the flavors to deepen and meld together beautifully. The texture will be creamier and the taste will be richer after a full night in the refrigerator.
You can bake this cheesecake up to two days before you plan to serve it. Just keep it covered in the refrigerator until you’re ready. If you need to make it even further in advance, it also freezes exceptionally well. You can freeze it for up to two months by following the storage instructions I mentioned earlier. Just remember to thaw it in the refrigerator overnight before serving. Do not try to rush the thawing process on the counter, as this can affect the texture.
Do I need to use a water bath for this Pumpkin Pie Cheesecake recipe?
Many cheesecake recipes call for a water bath, or bain marie, which involves baking the springform pan inside a larger pan filled with hot water. The steam from the water bath creates a humid environment in the oven, which promotes even baking and helps prevent cracks. While it is a very effective technique, it can also be a bit fussy. You have to carefully wrap your springform pan in multiple layers of foil to prevent water from leaking into your crust.
For this specific Pumpkin Pie Cheesecake recipe, I have found that a water bath is not necessary if you follow the other steps carefully. By using room temperature ingredients, not overmixing, and cooling the cheesecake slowly in the oven, you can achieve a perfectly creamy, crack free cheesecake without the extra step of a water bath. This simplifies the process and makes the recipe more approachable for bakers of all skill levels. If you are a die hard water bath fan, you can certainly still use one with this recipe. It will only add extra insurance against cracks.
Can I use fresh pumpkin puree instead of canned for this cheesecake?
You can definitely use fresh homemade pumpkin puree, and it can add a wonderful, fresh flavor to your Pumpkin Pie Cheesecake. However, there is a very important consideration: moisture content. Homemade pumpkin puree tends to have a much higher water content than canned pumpkin puree. This excess moisture can make your cheesecake filling too thin, which can prevent it from setting up properly and lead to a soggy, dense texture.
If you choose to use fresh pumpkin, you must drain it thoroughly first. After you’ve cooked and pureed your pumpkin, let it cool and then place the puree in a fine mesh sieve lined with a few layers of cheesecloth or a coffee filter. Set the sieve over a bowl and let it drain in the refrigerator for several hours, or even overnight. You will be surprised at how much water comes out. Once it’s significantly thicker, measure out the 1 cup needed for the recipe. This extra step is crucial for achieving the perfect cheesecake texture.
How do I know when my Pumpkin Pie Cheesecake is done baking?
Knowing exactly when to pull a cheesecake out of the oven can be tricky, as it doesn’t get golden brown like a cake. The key is to look for the “jiggle.” The cheesecake is perfectly baked when the outer edges of the cheesecake appear set and slightly puffed, about 2 to 3 inches in from the side of the pan. The very center of the cheesecake, a circle about 2 inches in diameter, should still be slightly wobbly or jiggly when you gently nudge the side of the pan. It should look like Jell-O, not sloshy or liquidy.
Do not wait for the center to be completely firm in the oven. The residual heat will continue to cook the center as it cools, a process called carryover cooking. If the center is fully set when you pull it out, it will be overbaked, dry, and more likely to crack by the time it cools. It’s always better to err on the side of slightly underbaked than overbaked. Trust the jiggle test, and then follow the slow cooling process in the oven for a perfectly creamy and delicious result every time.
Try These Recipes Next
If you loved this Pumpkin Pie Cheesecake, you’ll surely enjoy some of my other favorite dessert recipes.
- 12 Easy Pumpkin Dessert Recipes: A wonderful roundup of my best pumpkin treats, perfect for all your fall baking needs.
- Pumpkin Spice Pudding Pie: A super simple, no-bake pie that’s light, creamy, and packed with all the warm spices you love.
- Easy Classic Cheesecake Recipe: Master the basics with this foolproof recipe for a rich, dense, and utterly perfect classic cheesecake.
Happy baking, y’all!
Looks awesome, Julie. I couldn't wait for the recipe after seeing it on Instagram! Can't wait to try!!
Looks awesome!! I might have to bust this out for Christmas.
Yumm! Loving all these pumpkin recipes you have posted!
Julie yum…out of this world gorgeous..I know it was delish too,I've got one more pumpkin got to put in a recipe,will try this.Thanks for sharing @ Love Bakes Good Cakes #9.
#63
Jo
OMG…I could cry. I love cheesecake and I love pumpkin pie! I want to reach through the screen and grab this whole cheesecake right now! Looks crazy-yummy!
Kristy @ Shona Skye Creations
http://shonaskye.blogspot.com
Oh!! This looks delicious! I found you through a GFC blog hop and I am excited to be a new follower! I hope you will stop by my blog if you get a chance!
Chrissy
http://www.thetaylor-house.com
Julie – this pie looks very impressive and very elegant!
Looking as the recipe I'm sure it's delicious
I just with I could have a slice :)
MMMM this looks amazing. I just printed off this post for the recipe…my guys will LOVE it!
Julie this looks so good am totally gonna try this! May have to replace my annual ooey gooey pumpkin butter cake!Thanks as always for linkin up!
How did I miss this yummy treat on your blog! Love this Julie! I will try to make this! Thanks for linking up every week!
I bet pumpkin pie and cheesecake is a wonderful combo! Thank you for sharing at All my Bloggy Friends. I can't wait to see what you share this week, Julie!
Oh my goodness does that look good! I need one of those. LOL! Okay I don't need one but I really want one. Thanks for sharing on “I Gotta Try That” Have a great week!
Marcie
WOW! Not only yummy, but beautiful!!!
Pingback: Delicious Autumn! | the Green Schoolhouse
Pingback: Peanut Butter Oreo Cheesecake + Giveaway - This Gal Cooks
Pingback: 8 Pumpkin Dessert Recipes | This Gal Cooks