
Indulgent Maple Apple-Crisps Recipe With Candied Ginger
This is, without a doubt, the very best apple crisp you will ever taste.
I grew up on my grandmother’s apple crisp. Every autumn, her kitchen would fill with the scent of cinnamon and baking apples, a smell that I still associate with cozy sweaters and falling leaves. Her recipe was perfection, a classic that needed no improvement. Or so I thought.
A few years ago, while wandering through a tiny market in the Blue Ridge mountains, I came across a jar of glistening crystallized ginger. I’ve always loved the warm spice of ginger, and on a whim, I bought a bag. Back home, with a bushel of freshly picked Honeycrisp apples on my counter, I decided to try something a little different with Grandma’s recipe.
I finely chopped that spicy, sugary ginger and worked it right into the buttery oat topping. The result was nothing short of a revelation. The familiar comfort of the warm, tender apples was still there, but the topping had this incredible, zesty warmth that danced on your tongue. This one little twist took a beloved classic and turned it into something truly special, an unforgettable apple crisps experience that folks always ask me about.
Why This Apple Crisps Recipe Works
Apple crisps have a heartwarming history, born from a need for simple, comforting desserts. They became popular around World War II, when ingredients like flour and butter were rationed. A crisp offered all the satisfaction of a fruit pie but with a much simpler, less fussy topping made from common pantry staples like oats, flour, and sugar.
It’s a dessert that has truly stood the test of time because of its rustic charm and incredible flavor. The magic lies in the contrast of textures. You have the soft, tender, spiced apples that have cooked down into their own glorious syrup, and then you have that crunchy, crumbly, buttery oat topping. It’s a combination that just feels like home.
This particular recipe honors that tradition while adding a modern, sophisticated twist. The secret is the crystallized ginger. It’s not the same as the ground ginger in the filling, which provides a gentle background warmth. Crystallized ginger is chewy, intensely flavorful, and has a sweet heat that cuts right through the richness of the butter and brown sugar.
Each bite gives you a little burst of that zesty spice, which beautifully complements the sweet apples and the subtle vanilla notes from the bourbon. It elevates the whole dessert, making it feel special enough for a holiday gathering but still easy enough for a weeknight treat. This is the apple crisps recipe that will make your guests’ eyes light up as they try to pinpoint that delicious, mysterious flavor.
Ingredients for Apple Crisps
The beauty of a good apple crisp is in its simplicity, so using high quality ingredients really makes a difference. Fresh, crisp apples and real butter are non-negotiable in my kitchen, and once you try it with the crystallized ginger, you’ll never go back.
Here’s what you’ll need to get started:
For the Apple Filling:
- 6 medium baking apples (such as Honeycrisp, Braeburn, or a mix), peeled, cored, and sliced ¼-inch thick
- ¼ cup maple syrup
- 2 tablespoons bourbon or apple cider
- 1 tablespoon cornstarch
- 1 teaspoon ground cinnamon
- ½ teaspoon ground ginger
- ¼ teaspoon ground cardamom
- 1 tablespoon fresh lemon juice
- Pinch of fine sea salt
For the Topping:
- 1 cup old-fashioned rolled oats
- ¾ cup all-purpose flour
- ¾ cup dark brown sugar, packed
- ½ cup toasted pecans, roughly chopped
- ½ teaspoon ground cinnamon
- ½ teaspoon fine sea salt
- ½ cup (1 stick) unsalted butter, cold and cut into cubes
- 2 ounces crystallized ginger, finely chopped (My Twist Ingredient!)
A note on a few key ingredients. For the apples, I highly recommend using a mix of sweet and tart varieties. Honeycrisp brings a wonderful sweetness and holds its shape, while Braeburn or Granny Smith can add a lovely tartness to balance everything out. For the bourbon, a splash of something decent adds a wonderful oaky depth, but good quality apple cider is a perfect non-alcoholic substitute. And for our star ingredient, the crystallized ginger, make sure you chop it finely so you get little jewels of flavor distributed all throughout the topping.
Step-by-Step Instructions For Making Apple Crisps
I’ll walk you through every step to make sure your apple crisp comes out perfectly bubbly, crisp, and delicious. Just follow along, and you’ll have a dessert that will fill your whole house with the most wonderful aroma.
Step 1: Prep Your Oven and Dish
First things first, let’s get that oven preheating to 375°F. Getting your oven fully up to temperature is key for an even bake. While it’s warming up, grab your baking dish, an 8×8-inch pan or a similar 2-quart dish works perfectly. Give it a good coating of butter. This not only prevents the apples from sticking but also adds another little layer of rich flavor to the final dessert.
Step 2: Create the Luscious Apple Filling
In a large bowl, it’s time to build our flavorful filling. Add your peeled and sliced apples. Drizzle them with the maple syrup, bourbon or cider, and lemon juice. The lemon juice adds a nice brightness and keeps the apples from browning. Then, sprinkle over the cornstarch, cinnamon, ground ginger, cardamom, and a pinch of salt. Use a spatula to gently toss everything together until each apple slice is coated in that beautiful, spiced mixture. Pour this into your buttered dish and spread it out evenly.
Step 3: Mix the Crispy Topping Base
Now for my favorite part, the topping. In a separate medium bowl, combine all your dry ingredients. Whisk together the rolled oats, flour, dark brown sugar, chopped pecans, cinnamon, and salt. Mixing these first ensures all the spices and sugar are evenly distributed before we add the butter, which is the secret to a uniformly delicious topping.
Step 4: Cut in the Butter and Ginger
Here’s where the magic happens for that perfect texture. Add your cold, cubed butter and the finely chopped crystallized ginger to the dry oat mixture. Using just your fingertips, a pastry blender, or even two knives, cut the butter into the flour and oats. You want to work quickly so the butter stays cold. The goal is a crumbly mixture that looks like coarse sand with some pea-sized pieces of butter still visible. Those little butter pockets will melt in the oven and create the most incredible crispy topping.
Step 5: Assemble Your Apple Crisp
Take your glorious topping mixture and sprinkle it evenly all over the apple filling in the baking dish. Make sure you get it all the way to the edges. Don’t press it down, just let it sit loosely on top. This allows the heat to circulate through the topping, making it extra crisp.
Step 6: Bake to Golden Perfection
To save yourself a little cleanup later, place your baking dish on a larger baking sheet. This will catch any potential drips from the bubbly fruit filling. Slide it into your preheated oven and bake for 45 to 55 minutes. You’ll know it’s done when the fruit filling is thick and bubbling happily around the edges and the topping is a deep, gorgeous golden brown.
Step 7: Let It Rest
This might be the hardest step, but it’s so important. Once you pull the apple crisp from the oven, let it cool on a wire rack for at least 20 minutes before you serve it. This resting period allows the delicious, syrupy filling to set up a bit. If you dig in right away, it will be quite runny. Patience will be rewarded, I promise.
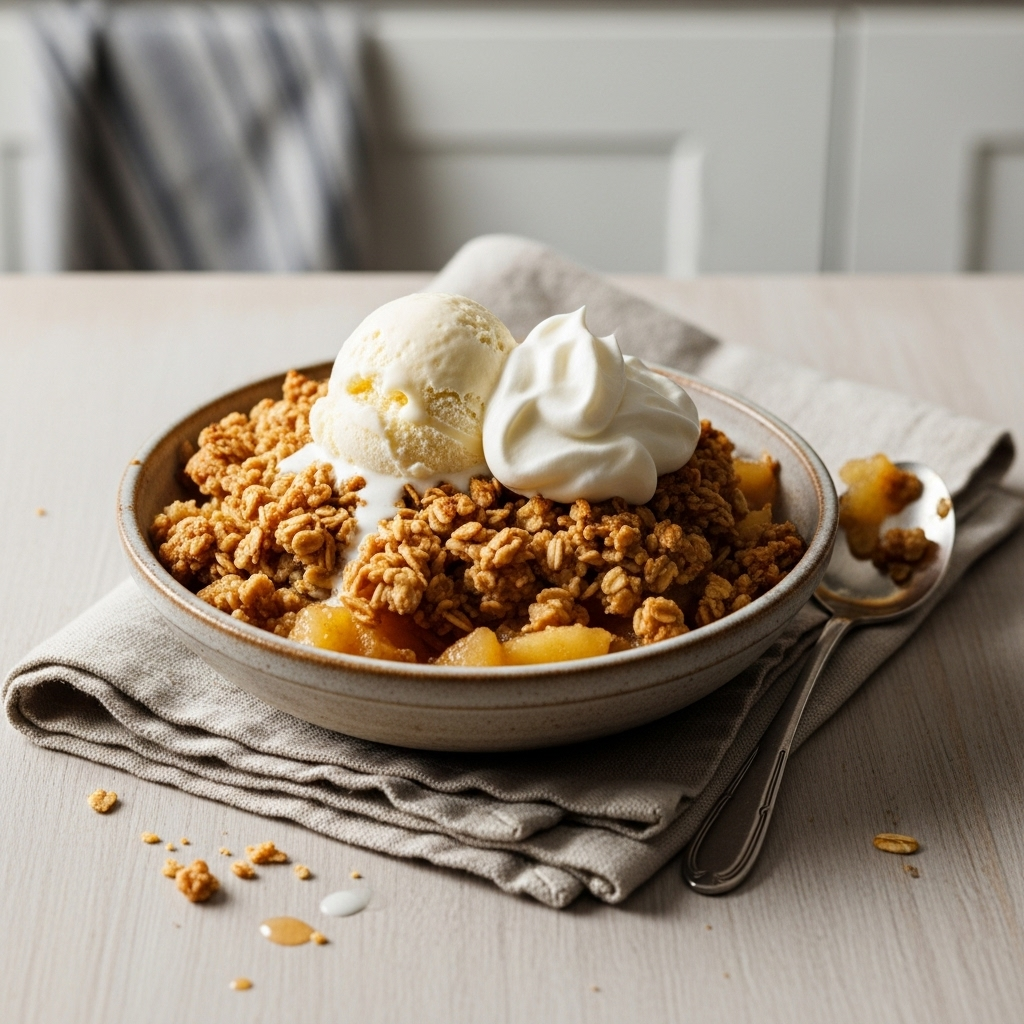
How To Serve Apple Crisps
Serving this apple crisp warm from the oven is truly one of life’s great pleasures. The aroma alone is enough to make everyone’s mouth water. The absolute classic way to serve it is with a generous scoop of good, high quality vanilla bean ice cream. The cool, creamy ice cream slowly melts into the warm, spiced apples and crunchy topping, creating a perfect bite every single time.
But don’t feel like you have to stop there. There are plenty of wonderful ways to dress up this dessert and make it your own. Here are a few of my favorite serving suggestions:
- With Whipped Cream: A dollop of freshly whipped cream is a lighter, but equally delicious, alternative to ice cream. You can even add a splash of bourbon or a little maple syrup to the cream as you whip it for an extra layer of flavor.
- A Drizzle of Caramel: For an extra decadent treat, gently warm up some salted caramel sauce and drizzle it over the top of each serving. The combination of salty, sweet, and spicy is absolutely heavenly.
- For Breakfast or Brunch: Who says you can’t have dessert for breakfast? A scoop of leftover apple crisp is fantastic served with a side of plain Greek yogurt or tangy crème fraîche. The tartness of the yogurt perfectly balances the sweetness of the crisp.
When I’m serving this for a crowd, I like to bring the whole baking dish right to the table. It looks so beautiful and rustic, and it allows everyone to scoop their own portion. Set out a little station with ice cream, caramel sauce, and whipped cream, and let your guests build their own perfect bowl of apple crisp.
How To Store & Reuse Apple Crisps Leftovers
On the rare occasion that we have leftovers, I’m secretly thrilled, because this apple crisp is just as delicious the next day. Storing it properly is key to enjoying it again, especially when it comes to keeping that topping as crisp as possible.
First, allow the apple crisp to cool down completely to room temperature. Covering it while it’s still warm will trap steam and can make the topping soggy. Once it’s cool, cover the baking dish tightly with plastic wrap or aluminum foil, or transfer the leftovers to an airtight container. You can store it in the refrigerator for up to five days.
When you’re ready to enjoy it again, you have a couple of reheating options:
- Oven or Toaster Oven (The Best Method): This is my preferred way because it brings the topping right back to its crispy glory. Place the desired portion in an oven-safe dish and heat it in a 350°F oven for about 15 to 20 minutes, or until it’s warmed all the way through. The topping will become golden and crunchy again.
- Microwave (The Quickest Method): If you’re in a hurry, you can certainly use the microwave. It works great for warming up the apple filling, but be warned, the topping will lose its crispness and become soft. It will still be delicious, just with a different texture.
As I mentioned before, leftover apple crisp makes a fantastic breakfast. I love to spoon it over a bowl of hot oatmeal or mix it into some yogurt with a sprinkle of granola. It’s a wonderful way to start the day with a little something special. No one has to know it was last night’s dessert.
Substitutions & Variations For Apple Crisps
One of the things I love most about a good apple crisp recipe is how wonderfully adaptable it is. This version is my absolute favorite, but you can easily tweak it based on what you have in your pantry or your own personal taste. It’s a forgiving recipe that invites creativity.
Feel free to play around with these ideas to make the recipe your own:
- Try Different Fruits: While apples are classic, this crisp is divine with firm pears or a combination of apples and pears. In the summer, try it with peaches, plums, or a mix of berries. Just be mindful that softer fruits may need less cooking time and a little more cornstarch to thicken up.
- Switch Up the Nuts: The toasted pecans add a lovely buttery crunch, but chopped walnuts or sliced almonds would be just as delicious. For a nut-free version, you can simply omit them or substitute with raw pumpkin seeds or sunflower seeds for a similar texture.
- Adjust the Spices: This spice blend is warm and balanced, but you could add a pinch of nutmeg or allspice to the filling for even more classic autumn flavor. If you don’t have cardamom, you can leave it out, though it does add a special touch.
- For a Gluten-Free Apple Crisp: This recipe is easily made gluten-free. Simply swap the all-purpose flour for your favorite one-to-one gluten-free baking blend and make sure you use certified gluten-free rolled oats.
- For a Dairy-Free or Vegan Apple Crisp: Use a high-quality plant-based butter that comes in stick form. It will work just like regular butter in the topping. Serve it with your favorite dairy-free vanilla ice cream for a completely vegan treat.
No matter how you choose to customize it, the core of this recipe, the balance of sweet fruit and crunchy topping, will always shine through. Have fun with it and enjoy the delicious results of your experiments.
Apple Crisps with a Crystallized Ginger Twist
Description: A classic Southern dessert with a surprising twist of spicy crystallized ginger for a warm, unforgettable flavor. Tender baked apples are topped with a crunchy, buttery oat and pecan crumble that’s perfect for any fall occasion.
Yield: 6-8 servings | Category: Dessert | Cuisine: American
Prep Time: 20 minutes | Cook Time: 50 minutes
Ingredients
- For the Apple Filling:
- 6 medium baking apples (Honeycrisp, Braeburn), peeled, cored, and sliced
- ¼ cup maple syrup
- 2 tablespoons bourbon or apple cider
- 1 tablespoon cornstarch
- 1 teaspoon ground cinnamon
- ½ teaspoon ground ginger
- ¼ teaspoon ground cardamom
- 1 tablespoon fresh lemon juice
- Pinch of fine sea salt
- For the Topping:
- 1 cup old-fashioned rolled oats
- ¾ cup all-purpose flour
- ¾ cup dark brown sugar, packed
- ½ cup toasted pecans, roughly chopped
- ½ teaspoon ground cinnamon
- ½ teaspoon fine sea salt
- ½ cup (1 stick) unsalted butter, cold and cut into cubes
- 2 ounces crystallized ginger, finely chopped
Instructions
- Preheat oven to 375°F (190°C) and butter an 8×8-inch baking dish.
- In a large bowl, toss apple slices with maple syrup, bourbon, cornstarch, spices, lemon juice, and salt. Pour into the prepared dish.
- In a separate bowl, whisk together oats, flour, brown sugar, pecans, cinnamon, and salt for the topping.
- Add the cold butter and crystallized ginger. Use your fingertips to cut the butter into the mixture until it resembles coarse crumbs.
- Sprinkle the topping evenly over the apples.
- Place on a baking sheet and bake for 45-55 minutes, until the filling is bubbly and the topping is golden brown.
- Let cool for at least 20 minutes before serving warm with vanilla ice cream.
Notes
Using a mix of sweet and tart apples provides the best flavor. Make sure your butter is very cold for the crispiest topping. Do not skip the resting time, as it allows the filling to set properly.
Servings: 8 | Calories: 450 kcal | Fat: 20g | Carbohydrates: 65g | Protein: 4g
5 FAQs About Apple Crisps
Here are some straightforward answers to the most common questions I receive about this apple crisps recipe.
What are the best apples to use for apple crisps?
This is probably the most important question, as the type of apple you choose truly defines the final dessert. For the best apple crisps, you want to use apples that are firm and will hold their shape during baking, preventing a mushy, applesauce-like filling. My personal favorites are Honeycrisp, which are wonderfully crisp and have a great sweet-tart balance, and Braeburn, which are firm and have a rich, complex flavor that deepens with cooking.
Other fantastic options include Gala, Jonagold, and Pink Lady. If you prefer a more tart dessert, Granny Smith apples are the classic choice. They are very firm and their tartness provides a wonderful contrast to the sweet, buttery topping. I often find that the very best apple crisps are made with a combination of two different types of apples, one sweet and one tart. This creates a much more interesting and complex flavor profile in the finished dish. Apples to avoid would be softer varieties like Red Delicious or McIntosh, as they tend to break down too much and become watery when baked for a long period.
Can I make this apple crisps recipe ahead of time?
Absolutely, which makes it a fantastic dessert for entertaining. You have two excellent options for making it ahead. The first, and best, method for ensuring the crispiest possible topping is to prepare the components separately. You can mix the apple filling and store it in an airtight container in the refrigerator for up to 24 hours. You can also prepare the oat topping mixture and store it in a separate airtight container or zip-top bag in the refrigerator. When you’re ready to bake, simply pour the filling into your baking dish, sprinkle the topping over it, and bake as directed. This method takes only a few minutes to assemble and gives you a perfectly fresh-baked result.
Your second option is to assemble the entire crisp, cover it tightly with plastic wrap, and refrigerate it for up to 24 hours before baking. While this is incredibly convenient, be aware that the moisture from the apples may seep into the topping slightly, so it might not be quite as crunchy as the first method. If you choose this route, you may need to add about 5 to 10 extra minutes to the baking time since you’re starting with a chilled dish.
Why is my apple crisps topping soggy?
A soggy topping is a common problem, but it’s usually easy to fix. The number one culprit is almost always the butter. It is crucial to use butter that is very cold, straight from the refrigerator, and cut into small cubes. When you work the cold butter into the dry ingredients, you create little pockets of fat. As the crisp bakes, these pockets melt and release steam, which creates a light, crispy, and flaky texture. If your butter is too soft, it will simply blend into the flour and create a heavy, paste-like dough that will bake up dense and soggy.
Another potential issue is over-mixing the topping. You want to stop mixing as soon as you have coarse crumbs with some pea-sized pieces of butter remaining. Overworking it can lead to that same pasty texture. Finally, make sure you bake the crisp uncovered. Covering the dish with foil will trap steam, which is the enemy of crispiness. Let it bake openly so the moisture can evaporate and the top can become golden brown and delicious.
How do I know when my apple crisps are done baking?
There are a few key visual and sensory cues to look for to ensure your apple crisp is perfectly baked. The most reliable indicator is the filling. Look at the edges of the baking dish, you should see the apple filling actively bubbling. This is important because it signals that the mixture has reached a high enough temperature to activate the cornstarch, which will thicken the juices into a lovely, syrupy sauce. If the filling isn’t bubbling, it might be runny once you serve it.
The second sign is the color and texture of the topping. It should be a beautiful, rich, deep golden brown all over. Don’t be afraid to let it get nice and dark, as that color equals flavor and crunch. If the topping is still pale, it’s not done yet. If you are still unsure, you can carefully insert a small, sharp knife or a toothpick into the center of the crisp. The apple slices should feel very tender with little to no resistance. And of course, your kitchen should be filled with an irresistible aroma of sweet, spiced apples.
Can I use quick oats instead of rolled oats in this apple crisps recipe?
While you technically *can* use quick oats in a pinch, I strongly advise against it for this recipe. The texture of the topping is a defining feature of a great apple crisp, and the type of oats you use plays a huge role in that. Old-fashioned rolled oats are whole oats that have been steamed and flattened. They have a substantial, chewy texture that holds up beautifully during the long baking time, contributing to that classic crumbly and crisp topping.
Quick oats, on the other hand, are rolled oats that have been pressed thinner and cut into smaller pieces so they cook faster. When used in a baked topping like this one, they absorb moisture much more quickly and have a tendency to become gummy or pasty rather than crisp. You will lose that wonderful textural contrast between the soft fruit and the crunchy crumble. For the absolute best results and that signature chewy-crisp texture, stick with old-fashioned rolled oats.
Try These Recipes Next
If you loved the warm, cozy flavors of these apple crisps, here are a few other recipes I think you’ll really enjoy.
- Unforgettable Apple Pie with Bourbon and Salted Caramel: This recipe takes the classic apple pie to a whole new level with a rich, boozy filling and a homemade salted caramel drizzle.
- Pumpkin Spice Cake with Maple Bourbon Frosting: Another perfect fall bake that pairs those lovely maple and bourbon notes with classic pumpkin spice. The frosting is just heavenly.
- Easy Apple Fritter Cake: This cake has all the cinnamon sugar goodness of an apple fritter baked into one simple, delicious bundt cake.
Let me know which one you decide to try next!