
I Elevated The “Old Fashioned” Asparagus Casserole Recipe
The first time I ever had asparagus casserole was at my husband’s family Easter gathering, long before we were even married. His Aunt Carol, a woman with a gift for making magic out of simple ingredients, brought a bubbling dish of creamy, cheesy asparagus that vanished almost as soon as it hit the table. It was warm and nostalgic, the kind of recipe that instantly feels like home. I asked her for the recipe card that same afternoon, and it’s been a family staple ever since.
Over the years, I’ve made Aunt Carol’s version exactly as she wrote it, and it never fails to bring back those early memories of laughter, family stories, and second helpings. But as my own cooking evolved, I started to see opportunities to take what I loved about her casserole—the comfort, the creaminess, the tradition—and give it a touch more refinement. I wanted to make something that still felt like Aunt Carol’s dish but looked and tasted just a little more special, the kind of recipe you’d proudly serve at Easter or any spring gathering.
That’s how this elevated version came to be: a dish that honors the past while embracing fresh, flavorful ingredients and a few thoughtful techniques that make all the difference.
How I Elevated Each Part Of The Old Fashioned Asparagus Casserole Recipe
If you grew up on the old-fashioned asparagus casserole (the one layered with canned asparagus, cream of mushroom soup, and crushed saltines), this version might surprise you. It keeps the comforting spirit of the original but rebuilds it from the ground up with real ingredients and refined technique. Every change has a purpose: more flavor, better texture, and a fresher, more vibrant dish that actually celebrates the asparagus instead of hiding it.
1. Fresh Asparagus Instead of Canned
Canned asparagus was convenient in the 1950s, but it lost all its bite and color in the process. Here, blanching fresh asparagus keeps it tender-crisp and bright green, so it tastes like spring rather than saltwater. The quick ice bath locks in that color and stops the cooking right at the perfect texture.
2. Real Cream Sauce Instead of Condensed Soup
Where the old version relied on a can of cream of mushroom soup for convenience, this one builds a proper béchamel from scratch. Butter, flour, milk, and cream form a smooth, rich base that tastes clean and luxurious. You can actually control the thickness and seasoning — no more tinny aftertaste or oversalted filling.
3. Layered Cheeses for Depth and Creaminess
Classic recipes often used one cheese, usually mild cheddar. This one blends sharp cheddar for bite, Gruyère for nuttiness, and a touch of Parmesan in the topping for that salty, golden crust. The result is balanced, complex flavor instead of one-note richness.
4. Horseradish and Dijon for Brightness
A spoonful of prepared horseradish and Dijon mustard add just enough sharpness to cut through the cream and cheese. It’s a small but powerful upgrade that gives the casserole dimension — the kind of flavor you notice after the first bite but can’t quite put your finger on.
5. Shallot Instead of Onion for Subtle Sweetness
Instead of the heavy onion flavor that often dominates older casseroles, a single minced shallot melts into the sauce with delicate sweetness. It adds depth without overwhelming the asparagus or cheese.
6. A Crispy, Buttery Panko Topping
Crushed saltines were the standard topping in the old-school version. Here, Panko breadcrumbs tossed with melted butter and Parmesan deliver a lighter, crunchier, more evenly browned crust. Every forkful gets a bit of that texture contrast. It’s crisp on top, and creamy underneath.
7. Real Cooking Technique, Not Just Mixing and Dumping
Instead of everything being poured from a can and baked together, each step builds flavor intentionally. You sauté, whisk, taste, and layer — which takes a few more minutes but gives you a dish that feels like something special rather than a shortcut.
8. A Cleaner, More Balanced Finish
The traditional version could feel heavy and overly salty. This one’s balance of cream, spice, and acid makes it rich but not cloying. The nutmeg and horseradish keep the sauce lively, while the asparagus still tastes fresh and green.
In short, this casserole honors the nostalgic flavor memory of the original while shedding its shortcuts. It’s what the old-fashioned dish wanted to be all along: a warm, creamy, crowd-pleasing side made from real food that actually tastes like springtime comfort.
Ingredients for Old Fashioned Asparagus Casserole
Here’s the full ingredients list:
- 2 lbs fresh asparagus, tough ends trimmed
- 4 large eggs, hard-boiled and coarsely chopped
- 4 tbsp unsalted butter, divided
- 1 small shallot, finely minced
- 3 tbsp all-purpose flour
- 1 ½ cups whole milk
- ½ cup heavy cream
- 1 ½ cups sharp cheddar cheese, freshly grated
- ½ cup Gruyère cheese, freshly grated
- 1 ½ tbsp prepared horseradish
- 1 tsp Dijon mustard
- ½ tsp salt, or to taste
- ¼ tsp black pepper, freshly ground
- Pinch of freshly grated nutmeg
- ¾ cup Panko breadcrumbs
- ¼ cup grated Parmesan cheese
Step-by-Step Instructions For Making Old Fashioned Asparagus Casserole
Putting this casserole together is a joy, with each step building on the last to create layers of flavor and texture. Follow along, and I promise you’ll have a perfect dish to show for it. Don’t rush the process, especially when making the sauce. A little patience goes a long way!
Step 1: Preheat Oven and Prepare Baking Dish
First things first, get your oven preheating to 375°F. This ensures it’s nice and hot when your casserole is ready to bake, which is key for getting that bubbly sauce and golden top. Go ahead and grease your 2-quart baking dish. You can use butter or a non-stick spray. This simple step prevents sticking and makes serving and cleanup so much easier later on.
Step 2: Blanch the Asparagus
This is a crucial step for a perfect casserole. Blanching the asparagus briefly in boiling salted water cooks it just enough to make it tender-crisp while locking in its vibrant green color. The immediate plunge into an ice water bath stops the cooking process instantly. Nobody likes mushy, olive-green asparagus! Once cooled, drain it well and pat it dry before chopping. Excess water can make your casserole runny.
Step 3: Sauté the Shallot
In a large saucepan over medium heat, melt three tablespoons of the butter. Add your finely minced shallot. We use a shallot instead of an onion for its milder, more delicate flavor, which won’t overpower the other ingredients. Cook, stirring occasionally, until it’s soft and fragrant, which should only take a couple of minutes.
Step 4: Make the Roux
Sprinkle the all-purpose flour over the softened shallots and melted butter. Whisk it all together and let it cook for about a minute. This is called making a roux, and it’s the foundation that will thicken our cheese sauce. Cooking the flour for a minute gets rid of any raw flour taste.
Step 5: Create the Cream Sauce
Slowly, and I mean slowly, pour in the whole milk and heavy cream while whisking constantly. This gradual addition is the secret to a lump-free sauce. Once all the liquid is incorporated, bring the mixture to a simmer and let it cook, stirring often, until it’s thick enough to coat the back of a spoon.
Step 6: Stir in the Cheeses
Remove the saucepan from the heat. This is important because adding cheese to a boiling sauce can make it separate or become grainy. Add the freshly grated cheddar and Gruyère and stir gently until they are completely melted and the sauce is velvety smooth.
Step 7: Season the Sauce
Now for the flavor! Stir in the prepared horseradish, Dijon mustard, salt, pepper, and a tiny pinch of freshly grated nutmeg. Nutmeg is a classic addition to cream sauces that adds a wonderful warmth. Give it a taste and adjust the seasonings if you think it needs it.
Step 8: Assemble the Casserole
In your prepared baking dish, gently combine the chopped blanched asparagus and the coarsely chopped hard-boiled eggs. Pour that glorious cheese sauce all over the top and give it a gentle stir to make sure everything is evenly coated.
Step 9: Prepare the Topping
In a separate small bowl, melt the last tablespoon of butter. Add the Panko breadcrumbs and the grated Parmesan cheese, and toss them together until the breadcrumbs are lightly coated in the butter. This helps them get extra crispy and golden in the oven.
Step 10: Top the Casserole
Sprinkle the Panko mixture evenly over the entire surface of the casserole. Don’t be shy, an even layer ensures every serving gets a bit of that wonderful crunch.
Step 11: Bake to Perfection
Place the casserole in your preheated oven and bake for 20 to 25 minutes. You’re looking for the sauce to be hot and bubbly around the edges and the topping to be a beautiful golden brown. The aroma that will fill your kitchen is your reward!
Step 12: Let It Rest
This might be the hardest step! Let the casserole rest on a wire rack for at least 10 minutes before you serve it. This allows the sauce to set up a bit, making it easier to serve and ensuring it’s not too molten hot. It will still be plenty warm when you dig in.
How To Serve Old Fashioned Asparagus Casserole
This casserole is such a versatile side dish. It feels right at home on a holiday buffet but is also simple enough to elevate a weeknight meal. Its creamy texture and bright flavor make it a wonderful companion to a variety of main courses. When I’m planning a big holiday meal for Easter or Christmas, this is one of the first side dishes on my list because it complements both rich and simple flavors so beautifully.
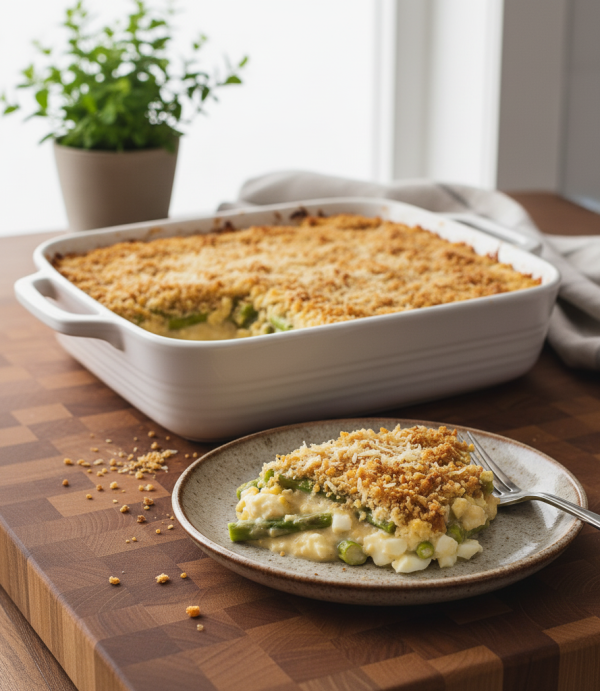
The beauty of this Old Fashioned Asparagus Casserole is that it truly needs no extra fuss once it comes out of the oven. The golden, crunchy Panko topping is all the garnish it needs. Simply bring the baking dish to the table, and let everyone serve themselves. The vibrant green of the asparagus peeking through the creamy sauce makes for a beautiful presentation on its own. It’s a showstopper without even trying.
For a complete and satisfying meal, consider pairing it with these main dishes:
- Holiday Ham: The salty, sweet flavor of a baked ham is the perfect counterpoint to the creamy, cheesy casserole. The zesty horseradish in the sauce cuts through the richness of the ham beautifully.
- Roasted Chicken or Turkey: A classic roasted bird is a natural partner. The casserole adds a touch of indulgence to a simple, wholesome main course.
- Pork Loin Roast: A perfectly roasted pork loin with herbs like rosemary and thyme pairs wonderfully with the nutty Gruyère and sharp cheddar in the sauce.
- Grilled Steak: For a more casual yet elegant meal, serve a smaller portion of the casserole alongside a juicy grilled steak. It’s a fantastic alternative to a standard baked potato.
No matter what you serve it with, this casserole is sure to be a hit. It brings a sense of warmth and tradition to the table, with a little modern twist that will have everyone asking for the recipe. I just love seeing the dish come back to the kitchen empty every single time.
How To Store & Reuse Old Fashioned Asparagus Casserole Leftovers
While this casserole is often devoured completely, on the off chance you have leftovers, they are an absolute treat the next day. Storing and reheating it properly is key to enjoying it just as much the second time around. The flavors have a chance to meld even more, and with the right technique, you can revive that wonderful texture.
First, allow the casserole to cool down to room temperature on the counter for no more than an hour or two. Then, cover the baking dish tightly with plastic wrap or aluminum foil, or transfer the leftovers to an airtight container. It will keep beautifully in the refrigerator for up to three or four days. I don’t recommend freezing this casserole, as the dairy-based sauce can separate and become watery upon thawing, and the asparagus texture can suffer.
When you’re ready to enjoy the leftovers, here are my favorite ways to bring them back to life:
- Oven Reheating (Best Method): To best preserve the creamy sauce and crispy topping, reheating in the oven is the way to go. Preheat your oven to 350°F. Place the leftovers in an oven-safe dish, cover with foil, and bake for 15 to 20 minutes, or until warmed through. For the last 5 minutes, remove the foil to allow the topping to crisp up again.
- Microwave Reheating (Quickest Method): If you’re in a hurry, the microwave will do. Place a serving on a microwave-safe plate and heat in 1-minute increments, stirring gently in between, until it’s hot. The topping won’t be as crispy, but the flavor will still be fantastic.
- Creative Reuse: Think outside the box! I love to spoon leftover casserole over a piece of toasted sourdough for a quick and decadent lunch. You can also thin it out with a little milk or broth and toss it with some cooked pasta for an entirely new, comforting meal.
Having leftovers of this Old Fashioned Asparagus Casserole is like getting a little gift. It’s a delicious reminder of a wonderful meal and a quick solution for lunch or dinner the next day. A little effort in reheating pays off in a big way.
Substitutions & Variations For Old Fashioned Asparagus Casserole
One of the best things about a classic recipe like this is that it provides a wonderful canvas for your own creativity. While I absolutely adore this Old Fashioned Asparagus Casserole exactly as written, it’s also incredibly forgiving and adaptable. Whether you need to accommodate a dietary restriction or just want to use what you have on hand, there are plenty of ways to make this dish your own.
Don’t be afraid to experiment with the cheeses or add some extra savory elements. The core of the recipe, the creamy sauce and tender asparagus, is a fantastic base for all sorts of flavor combinations. Just remember to keep the proportions of sauce to fillings roughly the same to maintain that perfect consistency. It’s a great way to clean out the cheese drawer or use up some leftover cooked meats from another meal.
Here are some of my favorite substitutions and fun variations to try:
- Cheese Swaps: If you don’t have cheddar or Gruyère, feel free to use other good melting cheeses. Colby, Monterey Jack, fontina, or even a smoked Gouda would be delicious. A mix of a few different kinds is always a great idea.
- Vegetable Variations: While asparagus is the star, this casserole base works wonderfully with other vegetables. Try blanched broccoli florets, tender green beans, or even a mix of cauliflower and carrots for a different spin.
- Make it Gluten-Free: This is an easy swap! Simply use your favorite all-purpose gluten-free flour blend in place of the all-purpose flour for the roux. For the topping, use gluten-free Panko or crushed gluten-free crackers.
- Add Some Protein: To make this a heartier, all-in-one meal, stir in some cooked, crumbled bacon, diced ham, or shredded chicken along with the asparagus and eggs.
- Spice It Up: If you like a little more heat, add a quarter teaspoon of cayenne pepper or a dash of your favorite hot sauce to the cheese sauce along with the horseradish.
- Crumb Topping Alternatives: No Panko? No problem. Crushed Ritz crackers, saltines, or even buttery croutons pulsed in a food processor make a fantastic crunchy topping.
Feel free to mix and match these ideas to create your perfect version of this timeless side dish. Cooking should be fun, so let your taste buds be your guide!
My Special Old Fashioned Asparagus Casserole
Description: A classic, creamy asparagus casserole gets a zesty upgrade with a hint of horseradish, sharp cheeses, and a crispy Panko topping. The perfect side dish for holidays or any special meal.
Yield: 8-10 servings | Category: Side Dish | Cuisine: Southern, American
Prep Time: 20 minutes | Cook Time: 25 minutes
Ingredients
- 2 lbs fresh asparagus, tough ends trimmed
- 4 large eggs, hard-boiled and coarsely chopped
- 4 tbsp unsalted butter, divided
- 1 small shallot, finely minced
- 3 tbsp all-purpose flour
- 1 ½ cups whole milk
- ½ cup heavy cream
- 1 ½ cups sharp cheddar cheese, freshly grated
- ½ cup Gruyère cheese, freshly grated
- 1 ½ tbsp prepared horseradish
- 1 tsp Dijon mustard
- ½ tsp salt, or to taste
- ¼ tsp black pepper, freshly ground
- Pinch of freshly grated nutmeg
- ¾ cup Panko breadcrumbs
- ¼ cup grated Parmesan cheese
Instructions
- Preheat oven to 375°F (190°C) and grease a 2-quart baking dish.
- Blanch asparagus in boiling salted water for 2-3 minutes, then transfer to an ice bath. Drain, dry, and cut into 1-inch pieces.
- Melt 3 tbsp butter in a saucepan over medium heat. Sauté minced shallot until soft.
- Whisk in flour and cook for 1 minute. Gradually whisk in milk and cream until smooth. Simmer until thickened, about 5-7 minutes.
- Remove from heat. Stir in cheddar and Gruyère until melted. Stir in horseradish, Dijon, salt, pepper, and nutmeg.
- Combine asparagus and chopped eggs in the baking dish. Pour cheese sauce over and stir gently.
- Melt remaining 1 tbsp butter and toss with Panko and Parmesan. Sprinkle over the casserole.
- Bake for 20-25 minutes, until bubbly and golden brown. Rest for 10 minutes before serving.
Notes
Blanching the asparagus is key to a vibrant green color and perfect texture. Grating your own cheese from a block results in a much smoother, creamier sauce. Don’t skip the 10-minute rest time, it allows the sauce to set properly.
Servings: 8 | Calories: 350 | Fat: 25g | Carbohydrates: 15g | Protein: 18g
5 FAQs About Old Fashioned Asparagus Casserole
Here are some straightforward answers to the most common questions I receive about this Old Fashioned Asparagus Casserole recipe.
Can I make Old Fashioned Asparagus Casserole ahead of time?
Absolutely! This is one of the reasons I love it for holiday entertaining. You can assemble the entire casserole a day in advance, which is a huge time-saver. Simply follow all the steps right up until baking. Prepare the casserole in the baking dish, but keep the Panko topping separate in a small airtight container or zip-top bag. If you add the topping too early, it will get soggy in the fridge overnight.
Cover the baking dish tightly with plastic wrap or foil and store it in the refrigerator for up to 24 hours. When you’re ready to bake, remove the casserole from the fridge for about 30 minutes to let it come closer to room temperature. This helps it bake more evenly. Sprinkle the Panko topping over the casserole just before putting it in the oven. You may need to add about 5 to 10 minutes to the total baking time to ensure it’s heated all the way through.
Why did my Old Fashioned Asparagus Casserole turn out watery?
A watery casserole is usually caused by one of two things: excess moisture from the asparagus or a sauce that wasn’t thick enough. It’s incredibly important to thoroughly drain and pat the asparagus dry after blanching and cooling it in the ice bath. Any lingering water will release into the sauce as it bakes, thinning it out and leading to a soupy result. I like to lay the blanched spears on a clean kitchen towel or a few layers of paper towels to absorb as much moisture as possible before chopping.
The other culprit could be the cheese sauce. Make sure you allow the sauce to simmer and thicken properly before you add the cheeses. It should be thick enough to coat the back of a spoon. If you rush this step, the sauce won’t have the body it needs to hold everything together. Also, using freshly grated cheese helps. Pre-shredded cheeses contain starches that can sometimes interfere with the sauce’s consistency.
Can I use frozen or canned asparagus in this Old Fashioned Asparagus Casserole?
While fresh asparagus will always give you the best flavor and texture, you can use frozen asparagus in a pinch. You’ll want to thaw it completely first and then press out as much excess water as you possibly can with paper towels. You can skip the blanching step since frozen asparagus is already partially cooked. Just be aware that the final texture will be much softer and less crisp than if you used fresh.
I would strongly advise against using canned asparagus. It is very soft and has a distinct flavor that can be overpowering and just doesn’t work as well in this creamy, cheesy dish. It tends to become mushy and can make the entire casserole taste a bit lackluster. For the best possible Old Fashioned Asparagus Casserole, fresh is definitely the way to go.
What’s the best way to prepare the hard-boiled eggs for the Old Fashioned Asparagus Casserole?
Perfectly cooked hard-boiled eggs are key. You want yolks that are fully cooked but not chalky or grey, and whites that are firm but not rubbery. My go-to method is simple. Place your eggs in a single layer in a saucepan and cover them with about an inch of cold water. Bring the water to a rolling boil over high heat. As soon as it’s boiling, turn off the heat, cover the pot with a lid, and let the eggs sit in the hot water for 12 minutes.
Once the time is up, immediately transfer the eggs to a bowl of ice water to stop the cooking process. This also helps the shells pull away from the egg, making them much easier to peel. Let them cool completely in the ice bath before peeling. For the casserole, you want a coarse chop. This ensures you get nice, substantial pieces of egg in every bite, which adds great texture and flavor to the final dish.
How can I make my Old Fashioned Asparagus Casserole gluten-free?
Making this recipe gluten-free is quite simple and doesn’t compromise the flavor or texture at all. There are two components you need to adjust: the roux for the sauce and the breadcrumb topping. For the roux, you can substitute the all-purpose flour with a good quality cup-for-cup gluten-free flour blend. I’ve had great success with blends that contain xanthan gum, as it helps with thickening and binding.
For the crispy topping, simply use gluten-free Panko breadcrumbs, which are widely available in most grocery stores now. If you can’t find them, you can crush gluten-free crackers, cornflakes, or even pork rinds for a savory, crunchy alternative. The rest of the ingredients in the recipe are naturally gluten-free, but it’s always a good practice to double-check the labels on your cheeses and prepared horseradish to ensure there are no hidden gluten-containing additives.
Try These Recipes Next
If you loved this casserole, I have a feeling you’ll enjoy some of my other favorite Southern side dishes.
- Classic Southern Squash Casserole: A summertime staple that’s creamy, cheesy, and topped with a buttery cracker crust.
- Easy Green Bean Casserole from Scratch: Ditch the canned soup! This homemade version is so much better and surprisingly simple.
- Over 25 Thanksgiving Casserole Recipes: Your ultimate guide to finding the perfect comforting casseroles for any holiday table.
Happy cooking, and I hope these recipes bring as much joy to your table as they do to mine!