
The Ultimate Smoked Gouda Stuffed Bell Pepper Recipe
This is my absolute favorite way to make a classic Stuffed Bell Pepper.
I’ll be honest, for the longest time, I thought stuffed peppers were just okay. I grew up eating them, and they were a perfectly fine weeknight dinner, but they never made my heart sing. My mother-in-law, bless her heart, makes them the old-fashioned way, and they are the epitome of comfort food. Wholesome, hearty, and dependable.
But you know me. I can’t leave well enough alone. I’m always looking for that little something extra, that one ingredient that can take a dish from good to “oh my goodness, what is in this?”
My moment of inspiration came one evening after hosting a little get-together. I had leftover smoked Gouda from a cheese board and a plan to make stuffed peppers for dinner the next day. A little lightbulb went off. I shredded that smoky, creamy cheese right into the beef and rice filling and sprinkled a generous amount on top with some panko breadcrumbs for crunch.
Y’all, it was a revelation. The smoky cheese melted into every bite, adding this incredible depth and richness that perfectly complemented the sweet peppers and savory beef. It was the twist I never knew this classic dish needed. Now, it’s one of my most requested recipes for potlucks and family dinners, and it always disappears.
Why This Stuffed Bell Pepper Recipe Works
The Stuffed Bell Pepper is a true American classic, with roots tracing back to comforting, resourceful home cooking. It’s a dish that feels both nostalgic and satisfying, a complete meal tucked neatly inside a vibrant, edible bowl. The concept is simple: a hollowed-out bell pepper serves as a vessel for a delicious filling, usually consisting of ground meat, rice, tomatoes, and seasonings, which is then baked to perfection.
Its popularity comes from its versatility and its all-in-one nature. You get your protein, carbs, and vegetables in a single, beautiful package. It’s the kind of meal that graces dinner tables for a reason. It’s reliable, easy to assemble, and always feels like a special effort, even on a weeknight.
So, what makes my version stand out? It comes down to a few key techniques and one show-stopping ingredient. First, we pre-roast the peppers. This is a non-negotiable step in my kitchen. It softens the peppers just enough so they become tender and sweet in the final bake, and it draws out excess moisture, preventing that dreaded watery bottom. Nobody wants a soggy pepper.
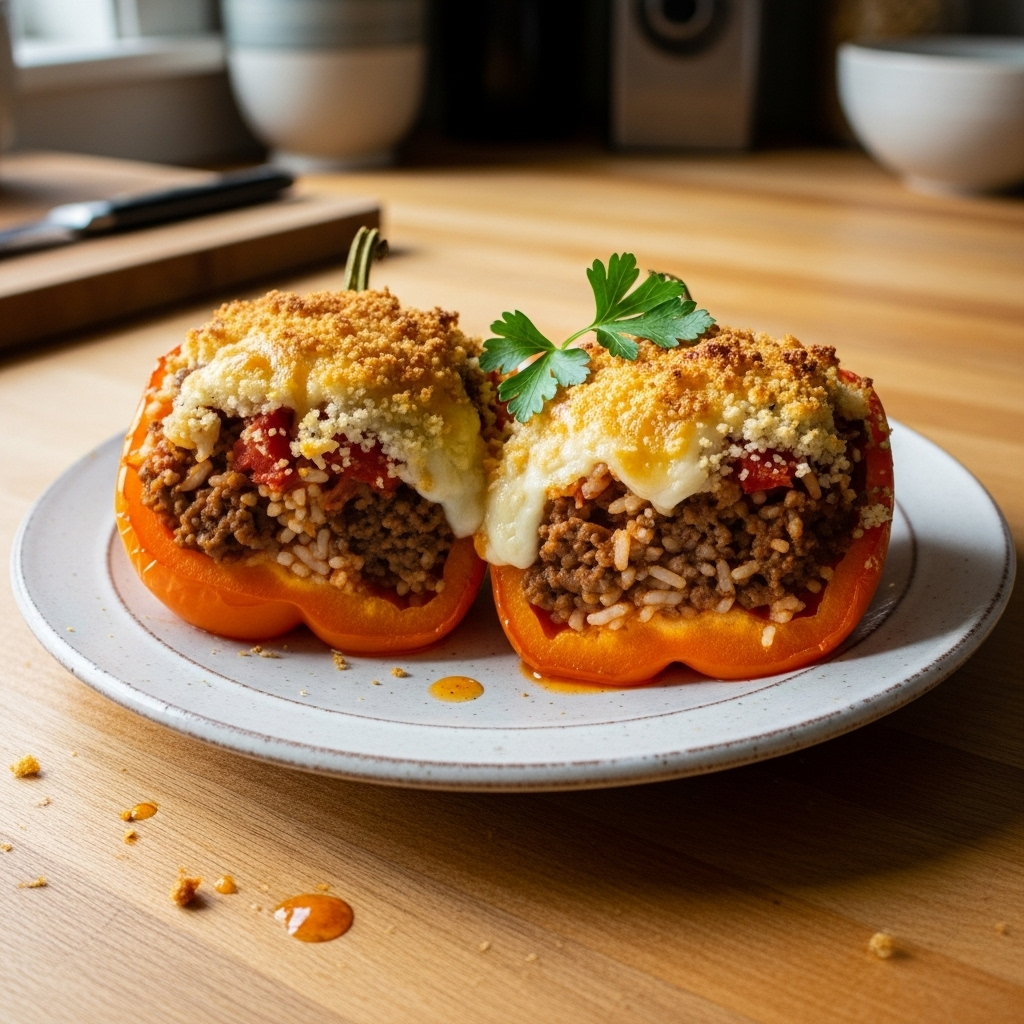
Second, we build layers of flavor in the filling with fire-roasted tomatoes, a touch of Worcestershire, and a splash of balsamic vinegar for a little tang. But the real star, my secret weapon, is the smoked Gouda cheese. Regular cheddar or mozzarella is fine, but smoked Gouda brings a sophisticated, savory smokiness that elevates the entire dish. It melts beautifully into the filling, making it creamy and rich, while the portion on top bubbles and browns into an irresistible crust with the panko. This cheese transforms the humble Stuffed Bell Pepper from a simple comfort food into something truly memorable.
Ingredients for Stuffed Bell Pepper
The beauty of this recipe is that it uses simple, wholesome ingredients you likely have on hand or can easily find at any grocery store. But the combination, especially with our star ingredient, creates something truly special. Let’s walk through what you’ll need to make the perfect Stuffed Bell Pepper dinner.
Quality makes a difference here. Using fire-roasted tomatoes adds a smoky depth right from the start. Choosing a good quality lean ground beef (I prefer 90/10) means you get all the flavor without excess grease. And please, use fresh parsley if you can. It adds a bright, clean flavor that dried parsley just can’t replicate. The most important choice, however, is the cheese.
Here is the full list of ingredients for this recipe:
- 4 large bell peppers, any color
- 1 tbsp olive oil, plus more for drizzling
- 1 lb lean ground beef or turkey
- 1 medium yellow onion, finely chopped
- 3 cloves garlic, minced
- 1 (14.5 oz) can fire-roasted diced tomatoes, undrained
- 2 tbsp tomato paste
- 1 tbsp Worcestershire sauce
- 1 tsp balsamic vinegar
- 1 tsp dried oregano
- 1/2 tsp salt
- 1/4 tsp black pepper
- 1 ½ cups cooked long-grain white or brown rice
- 4 oz smoked Gouda cheese, shredded (about 1 cup), divided
- 1/4 cup chopped fresh parsley
- 1/4 cup panko breadcrumbs
- 1/4 cup water or beef broth
The absolute game-changer in this recipe is the smoked Gouda cheese. Don’t be tempted to swap this for a pre-shredded cheddar. Buy a block of smoked Gouda and shred it yourself. It melts so much better without the anti-caking agents found in packaged shredded cheese. Its creamy texture and distinct smoky flavor are what make these stuffed peppers unforgettable. It’s that little twist that will have everyone asking for your secret.
Step-by-Step Instructions For Making Stuffed Bell Pepper
Making this incredible Stuffed Bell Pepper recipe is straightforward, I promise. We’ll break it down into simple steps, from preparing the peppers to creating that glorious, cheesy topping. Just follow along, and you’ll have a restaurant-worthy meal on your table in no time. Grab a good, sturdy 9×13 inch baking dish, it’s the perfect vessel for this dish.
Step 1: Prepare and Pre-Roast the Peppers
First things first, preheat your oven to 400°F. While it’s heating up, slice your bell peppers in half from stem to bottom. Use a spoon to scoop out the seeds and the white membranes. Place them cut-side up in your baking dish. Drizzle them with just a little olive oil and sprinkle with a pinch of salt and pepper. Pop them into the hot oven for 15 to 20 minutes. This step is crucial. It gives the peppers a head start on cooking so they’re perfectly tender, not crunchy, in the finished dish. It also helps prevent a watery result.
Step 2: Start the Filling
While the peppers are getting their beauty rest in the oven, let’s make the filling. Heat one tablespoon of olive oil in a large skillet over medium-high heat. Add your finely chopped yellow onion and cook it until it’s soft and translucent, which usually takes about 5 minutes. Then, toss in the minced garlic and cook for just another minute until you can smell that wonderful aroma. Be careful not to let the garlic burn.
Step 3: Cook the Beef and Add Aromatics
Now, add the ground beef to the skillet. Use a wooden spoon or a spatula to break it apart as it cooks. Continue cooking until it’s completely browned with no pink remaining. This is an important time to drain off any excess grease from the pan. A leaner ground beef will have less, but it’s always a good idea. Next, stir in the tomato paste. Let it cook for about a minute, stirring constantly. This little step toasts the tomato paste and really deepens its flavor.
Step 4: Simmer and Season
Pour in the can of fire-roasted tomatoes with their juices, the Worcestershire sauce, balsamic vinegar, dried oregano, salt, and pepper. Give everything a good stir to combine and bring the mixture to a gentle simmer. Let it cook for about 5 minutes. This allows all those wonderful flavors to get to know each other and meld into a delicious, savory sauce for our filling.
Step 5: Combine the Filling Ingredients
Take the skillet off the heat. It’s time to bring it all together. Stir in your cooked rice, the fresh chopped parsley, and half of your beautiful shredded smoked Gouda. Mix it gently until everything is evenly distributed. That melted Gouda in the filling is going to make it so creamy and delicious.
Step 6: Stuff the Peppers
By now, your peppers should be slightly softened and ready. Carefully take them out of the oven. Spoon the beef and rice mixture generously into each pepper half. Don’t be shy, you can mound it up a bit on top. Once they’re all filled, pour the 1/4 cup of water or beef broth into the bottom of the baking dish, around the peppers. This creates steam as they bake, keeping the peppers moist and helping everything cook evenly.
Step 7: Create the Topping and Bake
In a small bowl, toss the remaining half of the smoked Gouda with the panko breadcrumbs. This combination is going to give you the most amazing topping, both cheesy and crispy. Sprinkle this mixture evenly over each stuffed pepper. Place the baking dish back into the 400°F oven and bake for 20 to 25 minutes. You’ll know they’re done when the filling is hot all the way through and the cheesy topping is golden brown and bubbly. Let them rest for about 5 minutes before serving, as they will be piping hot!
How To Serve Stuffed Bell Pepper
Once those gorgeous stuffed peppers come out of the oven, smelling absolutely divine, you’re just moments away from a fantastic meal. The best part about this dish is that it’s practically a complete meal on its own, but pairing it with the right side dish can make it feel even more special. The key is to choose something that complements the rich, savory flavors without overpowering them.
I love to let the peppers be the star of the show. Letting them rest for a few minutes is important, as it allows the filling to set up a bit and makes them easier to eat. When you’re ready to serve, you can place one or two pepper halves on each plate, perhaps with a final sprinkle of fresh parsley for a pop of color and freshness.
Here are a few of my favorite ways to serve them:
- With a Simple Green Salad: A crisp salad with a light vinaigrette is the perfect counterpoint to the rich, cheesy peppers. Think mixed greens, cherry tomatoes, cucumber, and a simple lemon or balsamic dressing. It’s light, fresh, and cleanses the palate.
- Alongside Mashed Potatoes: For an ultimate comfort food experience, you can’t go wrong with a scoop of creamy mashed potatoes. The potatoes are perfect for soaking up any delicious juices from the pepper filling that might escape onto the plate.
- With Roasted Vegetables: A side of simple roasted vegetables like asparagus, broccoli, or green beans tossed in olive oil, salt, and pepper works beautifully. They add another layer of nutrition and texture to the meal.
- Over Creamy Polenta: For a slightly more elegant presentation, serve a stuffed pepper half over a bed of creamy, cheesy polenta. The soft polenta is a wonderful contrast to the textures in the pepper.
No matter what you choose to serve with your Stuffed Bell Pepper, the presentation is already beautiful. The vibrant colors of the peppers make any plate look inviting. This is a meal that works equally well for a busy weeknight family dinner or for entertaining guests. It always feels like you put in a ton of effort, even though it’s quite simple to pull together.
How To Store & Reuse Stuffed Bell Pepper Leftovers
One of the best things about making a big batch of stuffed peppers is having leftovers. They store and reheat beautifully, making them perfect for a quick lunch or an easy dinner later in the week. Proper storage is key to making sure they taste just as good the second time around. I always feel so smart when I have a delicious, home-cooked meal ready to go in the fridge.
First, let the peppers cool down completely to room temperature before you store them. Placing hot food directly into the refrigerator can create condensation, which might make the peppers a little soggy. Once cooled, you can store them right in the baking dish covered tightly with plastic wrap or foil, or transfer them to an airtight container. They will keep well in the refrigerator for up to 4 days.
When you’re ready to enjoy them again, you have a few options for reheating and reusing:
- Reheating in the Oven: This is my preferred method as it helps re-crisp the topping. Place the peppers in a baking dish, cover with foil, and bake at 350°F for about 15 to 20 minutes, or until heated through. You can remove the foil for the last 5 minutes to help the topping get crunchy again.
- Reheating in the Microwave: For a quick lunch, the microwave works just fine. Place a pepper half on a microwave-safe plate and heat for 2 to 3 minutes, or until hot. The topping won’t be as crispy, but it will still be delicious.
- Deconstructed Pepper Skillet: This is a fun way to reinvent the leftovers. Roughly chop a leftover stuffed pepper and sauté it in a skillet with a little olive oil. You can add a scrambled egg to turn it into a fantastic breakfast hash or serve it over fresh greens for a quick and hearty salad.
- Freezing for Later: Stuffed peppers freeze exceptionally well. You can freeze them baked or unbaked. Place the stuffed peppers on a baking sheet and freeze until solid, then transfer them to a freezer-safe bag or container. They can be stored in the freezer for up to 3 months. To reheat from frozen, bake at 375°F, covered, for 45 to 60 minutes, or until warmed through.
Having these leftovers on hand feels like a gift to my future self. It’s a wonderful way to ensure a delicious, home-cooked meal is always within reach, even on the busiest of days. Don’t let any of that goodness go to waste!
Substitutions & Variations For Stuffed Bell Pepper
While I believe this recipe is pretty perfect as is, I know that every cook likes to put their own spin on things. This Stuffed Bell Pepper recipe is incredibly forgiving and serves as a fantastic base for all sorts of creative variations. Whether you need to accommodate a dietary preference or just want to use up what you have in the pantry, there are plenty of delicious ways to adapt it.
Don’t be afraid to experiment with the filling, the cheese, or even the grains. Think of this recipe as a template for your own culinary masterpiece. The core components are the pepper vessel and a flavorful filling, and there are so many directions you can take that.
Here are some of my favorite substitutions and variations to get you started:
- Protein Swaps: If you’re not a fan of ground beef, lean ground turkey, ground chicken, or even ground pork would be delicious. For a spicier kick, try using Italian sausage, either sweet or hot, removed from its casing.
- Go Vegetarian or Vegan: To make this recipe vegetarian, simply omit the meat and replace it with a can of black beans, lentils, or finely chopped mushrooms for an “earthy” flavor. Sauté the mushrooms with the onions until they release their liquid. For a vegan version, use a plant-based ground meat substitute, vegetable broth, and your favorite vegan shredded cheese.
- Grain Variations: Don’t have rice? No problem. Cooked quinoa, couscous, farro, or even cauliflower rice for a low-carb option would work wonderfully in the filling. Each will bring a slightly different texture and nutritional profile to the dish.
- Cheese Choices: While I’m partial to the smoked Gouda, you could certainly swap it for another cheese. A sharp white cheddar would add a nice tang, pepper jack would bring some heat, or a classic mozzarella and parmesan blend would give you that traditional cheesy pull.
- Add More Veggies: Feel free to bulk up the filling with more vegetables. Finely diced zucchini, corn, carrots, or spinach would be excellent additions. Just sauté them along with the onions until tender before adding the meat.
Remember, cooking should be fun and creative. Use this guide as a starting point and feel free to mix and match based on your family’s tastes. You might just discover your own “secret ingredient” that makes your stuffed peppers the talk of the town.
Stuffed Bell Pepper with Smoked Gouda
Description: A classic stuffed bell pepper recipe with a delicious twist! A savory beef and rice filling is elevated with the rich, smoky flavor of Gouda cheese, then baked inside tender bell peppers with a crispy panko topping.
Yield: 8 pepper halves | Category: Main Course | Cuisine: American
Prep Time: 20 minutes | Cook Time: 45 minutes
Ingredients
- 4 large bell peppers, any color
- 1 tbsp olive oil, plus more for drizzling
- 1 lb lean ground beef or turkey
- 1 medium yellow onion, finely chopped
- 3 cloves garlic, minced
- 1 (14.5 oz) can fire-roasted diced tomatoes, undrained
- 2 tbsp tomato paste
- 1 tbsp Worcestershire sauce
- 1 tsp balsamic vinegar
- 1 tsp dried oregano
- 1/2 tsp salt
- 1/4 tsp black pepper
- 1 ½ cups cooked long-grain white or brown rice
- 4 oz smoked Gouda cheese, shredded (about 1 cup), divided
- 1/4 cup chopped fresh parsley
- 1/4 cup panko breadcrumbs
- 1/4 cup water or beef broth
Instructions
- Preheat oven to 400°F (200°C). Halve bell peppers lengthwise, remove seeds, and place in a 9×13 inch baking dish. Drizzle with olive oil, season, and pre-roast for 15-20 minutes until slightly tender.
- While peppers roast, heat 1 tbsp olive oil in a skillet. Sauté onion until soft, then add garlic and cook for 1 minute.
- Add ground beef and cook until browned. Drain excess grease. Stir in tomato paste and cook for 1 minute.
- Add fire-roasted tomatoes, Worcestershire, balsamic vinegar, oregano, salt, and pepper. Simmer for 5 minutes.
- Remove from heat. Stir in cooked rice, parsley, and half of the shredded smoked Gouda.
- Fill pepper halves with the beef mixture. Pour water or broth into the bottom of the baking dish.
- In a small bowl, toss the remaining Gouda with panko breadcrumbs. Sprinkle over the peppers.
- Bake for 20-25 minutes, until the topping is golden brown and bubbly. Rest for 5 minutes before serving.
Notes
For the best flavor and texture, buy a block of smoked Gouda and shred it yourself. Pre-shredded cheeses contain anti-caking agents that can prevent smooth melting.
Servings: 4 | Calories: 550 kcal | Fat: 25g | Carbohydrates: 45g | Protein: 35g
5 FAQs About Stuffed Bell Pepper
Here are some straightforward answers to the most common questions I receive about this Stuffed Bell Pepper recipe.
Why are my stuffed bell peppers watery?
This is probably the most common issue people face, and it’s a real bummer to find a pool of water at the bottom of your baking dish. There are usually two main culprits behind watery stuffed bell peppers. The first, and most significant, is not pre-roasting the peppers. Raw bell peppers contain a lot of water, which they release during the baking process. By giving them that 15 to 20 minute head start in the oven, you allow a good portion of that moisture to cook off before you even add the filling.
The second reason could be the filling itself. If you use ground beef with a higher fat content and don’t drain it thoroughly after browning, that excess fat and liquid will render out into the dish. Additionally, some canned tomatoes can be quite watery. My recipe uses undrained fire-roasted tomatoes for flavor, but if you find your mixture looks overly wet, you can drain them slightly. Following the pre-roasting step and ensuring your meat is well-drained are the two most effective ways to guarantee a perfectly tender, not watery, result.
Can I make stuffed bell peppers ahead of time?
Absolutely! This is one of the reasons this dish is fantastic for meal prep or for entertaining. You have a couple of options for making them ahead. The most common method is to prepare the entire dish right up until the final bake. You can prepare the peppers, make the filling, and stuff them completely. Then, cover the baking dish tightly with plastic wrap or foil and refrigerate for up to 24 hours. When you’re ready to eat, just remove the cover and bake as directed, adding about 10 to 15 extra minutes to the baking time since you’re starting with a cold dish.
You can also freeze them for longer-term storage. After stuffing the peppers (but before baking), place the baking dish in the freezer until the peppers are firm. Then, you can transfer them to a freezer-safe bag. They’ll keep for up to 3 months. You can bake them straight from frozen, though you will need to increase the baking time significantly, usually around 45 to 60 minutes at 375°F. It’s a lifesaver on a busy night.
What kind of bell peppers are best for stuffed bell peppers?
Honestly, you can use any color of bell pepper you like, and the choice often comes down to personal preference for flavor and appearance. Red, orange, and yellow bell peppers are all sweeter because they have been allowed to ripen longer on the vine. They have a lovely, mild flavor that becomes even sweeter when roasted and complements the savory filling beautifully. They also create a stunning, vibrant presentation.
Green bell peppers, on the other hand, are harvested before they are fully ripe, which gives them a slightly more bitter, grassy flavor. Some people absolutely love this contrast with the rich filling, as it cuts through the richness. I personally love using a mix of colors, like red and yellow, because it makes the final dish look so cheerful and appetizing. When selecting your peppers at the store, look for ones that are large, firm, and have a relatively flat bottom so they sit steadily in the baking dish.
Do I have to pre-cook the rice for stuffed bell peppers?
Yes, for this specific recipe, it is essential that you use pre-cooked rice. The recipe is balanced based on the moisture content and volume of cooked rice. If you were to use uncooked rice, it would act like a sponge and absorb all the liquid from the tomato sauce and the filling. This would likely result in a dry, dense filling and crunchy, undercooked rice grains, as there isn’t enough excess liquid or a long enough cooking time for the rice to cook through completely inside the pepper.
Cooking the rice separately ensures that it is perfectly fluffy and tender, and it serves to bind the filling together beautifully. This is a great way to use up leftover rice from a previous meal. I often make a big batch of rice early in the week specifically for using in recipes like this. It’s a simple step that guarantees the final texture of your stuffed pepper filling will be absolutely perfect.
How can I make this stuffed bell pepper recipe vegetarian?
This recipe is wonderfully easy to adapt for a vegetarian diet. The savory, umami-rich flavors in the filling can be achieved without meat. My favorite way to make this vegetarian is by replacing the one pound of ground beef with about two cups of cooked lentils or a 15-ounce can of rinsed and drained black beans. You could also use a combination of finely chopped mushrooms and walnuts, which gives a fantastic “meaty” texture and flavor. Sauté about 8 ounces of chopped cremini mushrooms with the onions until they are deeply browned.
You will also want to make one other simple swap. Instead of using beef broth or water in the bottom of the pan, use vegetable broth to keep the entire dish vegetarian. All the other ingredients, including the Worcestershire sauce (just check that it’s a vegetarian-friendly brand, as some contain anchovies), tomato paste, and that delicious smoked Gouda, will work perfectly to create a rich and satisfying vegetarian Stuffed Bell Pepper that even meat-eaters will devour.
Try These Recipes Next
If you loved the comforting, satisfying nature of these Stuffed Bell Peppers, you’re probably always on the lookout for more meals that make your family happy and your life easier. Cooking delicious food at home is one of life’s great pleasures, and finding new inspiration is part of the fun. These peppers are a perfect example of how a simple twist can make a classic dish feel brand new, and that’s a philosophy I bring to all my cooking.
Whether you need something quick for a weeknight, a meal that won’t break the bank, or just some fresh ideas to break out of a dinner rut, I’ve got you covered. Exploring new recipes is the best way to keep your kitchen exciting. Here are a few collections from my site that I think you’ll really enjoy diving into next.
Check out these posts for more culinary inspiration:
- 110 Easy Dinner Ideas: When you’re stumped on what to make for dinner, this list is a lifesaver. It’s packed with recipes for every craving and occasion.
- Cheap Meal Ideas: Eating well doesn’t have to be expensive. This collection is full of delicious, budget-friendly recipes that are big on flavor but easy on your wallet.
- Easy Breakfast Ideas: Why stop at dinner? Start your day off right with these simple and tasty breakfast recipes that will get everyone out of bed with a smile.
I hope these collections help you find your next favorite meal. Happy cooking, y’all!