
Warmly Spiced Sweet Potato Biscuits Recipe
There are certain foods that just feel like a warm hug, and for me, a classic Southern biscuit is right at the top of that list. I remember my first real taste of Sweet Potato Biscuits like it was yesterday. It was at a fall church potluck, and a sweet lady named Mrs. Gable had brought a basket of them, still warm and wrapped in a tea towel. The color was this beautiful, soft orange, and they were so tender they practically melted in my mouth.
I got her recipe that day, a simple, handwritten card that I still have tucked away. For years, I made them just like she did, and they were always a hit. But you know me, I can’t leave well enough alone for too long. I love taking a classic and finding that one little tweak that makes it sing a whole new song.
One afternoon, I was making a batch and the aroma of the melting butter got me thinking. What if it wasn’t just melted butter? What if it was nutty, fragrant, deeply flavorful brown butter? An idea sparked. Then, my eyes landed on the jar of cardamom in my spice cabinet, a spice I usually save for fancier desserts. Its warm, slightly floral, and complex notes seemed like the perfect dance partner for the earthy sweet potato and rich brown butter. That was it. My little twist was born, and these Brown Butter and Cardamom Sweet Potato Biscuits are the delicious result.
They have all the tender comfort of the original but with a layer of flavor that is so special and unexpected. They feel familiar and brand new all at once, and I just can’t wait for you to try them.
Why This Sweet Potato Biscuits Recipe Works
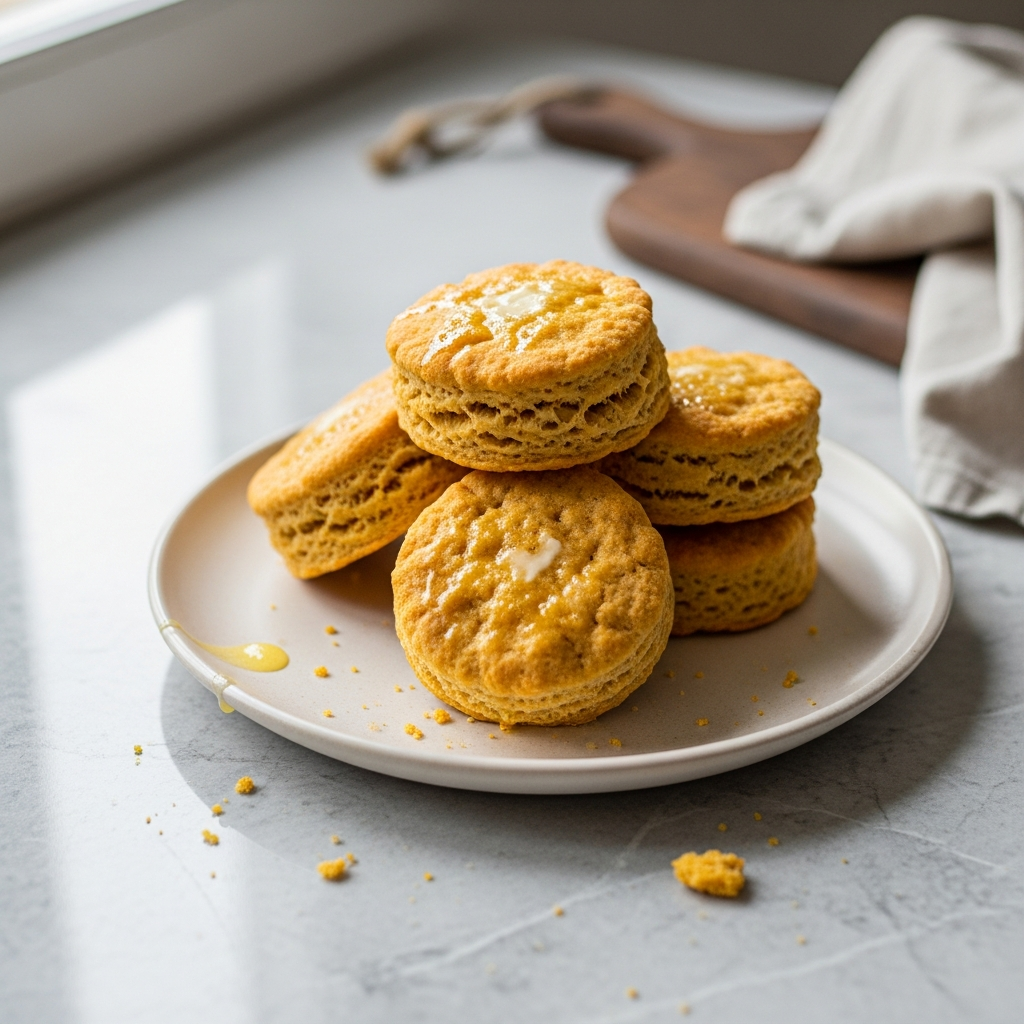
Sweet Potato Biscuits are a beloved staple in Southern baking for a reason. They’ve graced holiday tables and Sunday supper spreads for generations. The mashed sweet potato in the dough does something truly magical, creating a biscuit that is incredibly moist and tender with a hint of natural sweetness. They are heartier than a standard buttermilk biscuit, with a beautiful color and a soft, pillowy texture that’s just irresistible.
This recipe honors that wonderful tradition but elevates it with two key ingredients that create a truly unforgettable flavor profile. First up is the brown butter. This isn’t just a simple swap for melted butter. Browning the butter cooks the milk solids until they become toasted and nutty, releasing an incredible aroma and a depth of flavor that is rich and complex. It adds a sophisticated, caramelized note that complements the sweet potato perfectly.
The second twist is the ground cardamom. While cinnamon and nutmeg are common partners for sweet potato, cardamom brings something unique to the party. It has a warm, aromatic quality with hints of citrus and mint. This complex spice brightens the earthy sweet potato and harmonizes with the nutty brown butter, adding a subtle elegance that makes these biscuits feel truly special. It’s a flavor that might have your guests asking, “What is that amazing taste?”
We also use classic biscuit making techniques, like folding the dough to create flaky layers and using cold buttermilk to ensure a tender crumb and a beautiful rise. It’s the combination of time-tested methods with these unique flavor additions that makes this recipe work so well. It delivers everything you love about traditional sweet potato biscuits, but with a surprising and delicious new dimension.
Ingredients for Sweet Potato Biscuits
The magic of these biscuits comes from a handful of simple, high-quality ingredients working together in perfect harmony. While the list might look familiar, a couple of key players are what make this recipe stand out from the rest. Let’s walk through what you’ll need.
Here is the full list of ingredients for my Brown Butter and Cardamom Sweet Potato Biscuits:
- 2 ½ cups all-purpose flour, plus more for dusting
- 1 tablespoon baking powder
- 1 teaspoon kosher salt
- 2 tablespoons granulated sugar
- ½ teaspoon ground cardamom
- ½ cup (1 stick) unsalted butter
- 1 cup mashed sweet potato, cooled
- ⅔ cup buttermilk, cold
- 2 tablespoons melted butter, for brushing
The real stars of the show here are the brown butter and the cardamom. For the butter, I recommend using a good quality unsalted butter. Since you’ll be browning it, the flavor of the butter itself really shines through. The process concentrates its flavor, so starting with something delicious makes a big difference. The key is to cool it completely until it’s solid again before using it in the recipe. This is crucial for creating those flaky layers we all love.
For the ground cardamom, make sure your spice is fresh. Spices lose their potency over time, and the beautiful, complex aroma of cardamom is what really elevates these biscuits. If you have an old jar sitting in the back of your pantry, it might be time to treat yourself to a new one. The flavor is so worth it.
When it comes to the mashed sweet potato, you can use canned, but I find that baking a fresh sweet potato yields a much better flavor and texture. Canned puree can sometimes be watery. If you bake your own, you can control the moisture and get a deeper, more caramelized flavor. Just be absolutely certain that the mashed sweet potato is completely cooled before you mix it with the buttermilk. Adding warm ingredients will prematurely melt the butter, resulting in dense biscuits instead of light, flaky ones. Similarly, your buttermilk should be very cold, straight from the fridge. Cold ingredients are the secret to a perfect biscuit every time.
Step-by-Step Instructions For Making Sweet Potato Biscuits
Making these biscuits is a truly rewarding process, and it’s easier than you might think. Just follow these steps, and you’ll have a basket of warm, fragrant, and perfectly flaky biscuits in no time. We’ll start with the most important flavor-building step: browning the butter.
Step 1: Make and Cool the Brown Butter
First, we’ll make our magical ingredient. Melt the ½ cup of unsalted butter in a saucepan with a light-colored bottom. This helps you see the color change. Cook it over medium heat, swirling the pan every so often. It will foam up, then the foam will subside. Keep a close eye on it, as soon as you see little brown specks at the bottom and smell a nutty aroma, it’s done. Immediately pour it into a heatproof bowl to stop it from burning. Now, for the most important part: let it cool completely until it’s solid. You can pop it in the fridge to speed this up.
Step 2: Preheat Oven and Prep Pan
Get your oven preheating to 425°F (220°C). This high heat is what helps the biscuits rise quickly and become fluffy. Line a baking sheet with parchment paper for easy cleanup and to prevent sticking.
Step 3: Whisk Dry Ingredients
In a large bowl, whisk together the 2 ½ cups of all-purpose flour, 1 tablespoon of baking powder, 1 teaspoon of kosher salt, 2 tablespoons of granulated sugar, and ½ teaspoon of ground cardamom. Whisking is better than stirring because it aerates the flour and ensures all the leavening and seasoning is evenly distributed.
Step 4: Cut in the Brown Butter
Once your brown butter has solidified, cut it into small cubes. Add these cubes to your flour mixture. Using a pastry blender or just your fingertips, cut the butter into the flour. You’re looking for a texture that resembles coarse crumbs, with some pieces of butter still the size of small peas. Those little butter pockets are what create steam and make the biscuits flaky.
Step 5: Combine Wet Ingredients
In a separate medium bowl, grab your cooled mashed sweet potato and cold buttermilk. Whisk them together until they are smooth and well combined.
Step 6: Form the Dough
Pour the sweet potato and buttermilk mixture into the flour and butter mixture. Use a fork to gently stir everything together until a shaggy, slightly sticky dough forms. Be careful not to overmix here, just bring it together.
Step 7: Gentle Kneading
Turn the dough out onto a surface that you’ve lightly dusted with flour. Gently, and I do mean gently, knead the dough just 4 or 5 times. This is just to make the dough cohesive. Overworking it will develop gluten and make your biscuits tough.
Step 8: Fold for Flaky Layers
Now for the secret to amazing layers. Pat the dough out to about a ½-inch thickness. Fold the dough in half over itself, like you’re closing a book. Pat it back down to a ½-inch thickness. Repeat this folding and patting process two more times. This creates beautiful, pull-apart layers in the final biscuit.
Step 9: Cut the Biscuits
Using a 2 ½-inch biscuit cutter, dip the edge in flour before each cut to prevent sticking. Press the cutter straight down into the dough. It’s very important that you do not twist the cutter. Pull it straight back up. Twisting the cutter seals the edges of the biscuit and prevents it from rising tall. Place the cut biscuits on your prepared baking sheet. You can gently re-pat the scraps to get a few more biscuits.
Step 10: Brush with Butter
Melt the remaining 2 tablespoons of butter and gently brush the tops of each biscuit. This will give them a gorgeous, golden-brown finish.
Step 11: Bake to Perfection
Pop the baking sheet into your hot oven and bake for 12 to 15 minutes. They are done when they’ve risen high and are a beautiful golden brown on top.
Step 12: Serve Warm
The best way to enjoy these is fresh and warm from the oven. The aroma alone is worth all the effort!
How To Serve Sweet Potato Biscuits
One of the best things about these Brown Butter and Cardamom Sweet Potato Biscuits is their incredible versatility. They have just enough sweetness to lean towards a breakfast treat but are savory enough to sit proudly next to a plate of fried chicken. Deciding how to serve them is half the fun, and there really is no wrong answer.
For a classic and simple approach, you can’t beat serving them warm, split open with a generous pat of good quality salted butter melting into the tender crumb. The saltiness of the butter is a perfect contrast to the biscuit’s subtle sweetness. For another simple yet decadent option, a drizzle of honey, maple syrup, or sorghum lets the spices in the biscuit shine.
If you’re looking for more specific pairing ideas, here are a few of my favorite ways to enjoy these delicious biscuits:
- For a Southern-Style Breakfast: Tuck a slice of salty country ham or a savory sausage patty inside a warm biscuit. It’s a classic combination for a reason. They’re also fantastic topped with a fried egg and a dash of hot sauce.
- As a Dinner Side: These biscuits are the perfect companion for so many main courses. Serve them alongside a hearty beef stew, a bowl of chili, or with your Thanksgiving or Christmas dinner spread. They are especially wonderful for sopping up gravy or potlikker from a batch of collard greens.
- For a Fancy Brunch: Use them as a base for a unique take on eggs Benedict, swapping the English muffin for a split sweet potato biscuit. Or, create a biscuit bar with various toppings like pimento cheese, apple butter, and different jams.
- As a Sweet Treat: Don’t forget dessert! Split a biscuit and top it with a scoop of vanilla ice cream and a drizzle of caramel sauce for a simple bread-pudding-like dessert. You could also top them with a simple powdered sugar glaze flavored with a little orange zest.
Honestly, these biscuits are so flavorful on their own that they can elevate any meal. Whether you dress them up or enjoy them plain, they are sure to be a new favorite at your table.
How To Store & Reuse Sweet Potato Biscuits Leftovers
While these Sweet Potato Biscuits are absolutely heavenly when they are fresh and warm from the oven, life happens, and sometimes you have leftovers. The good news is that they are still wonderfully delicious for a couple of days, and with the right storage and reheating methods, you can bring them right back to life. No one should ever have to waste a good biscuit.
The key to storing biscuits is to protect them from air, which will dry them out quickly. Once they have cooled completely to room temperature, you can store them in an airtight container or a zip-top bag. They will keep well on the counter for up to three days. I would avoid storing them in the refrigerator, as the cold air can actually make them stale faster than leaving them at room temperature.
If you want to keep them for longer, the freezer is your best friend. Here are my detailed tips for storing, reheating, and even repurposing any extras:
- Freezing Biscuits: For the best results, freeze them on the day they are baked. Let them cool completely, then wrap each biscuit individually in plastic wrap or foil. Place the wrapped biscuits in a freezer-safe bag or container. They will keep beautifully in the freezer for up to three months. This is a great way to have “fresh” homemade biscuits on hand whenever a craving strikes.
- Reheating Biscuits: To bring back that fresh-baked warmth and texture, the oven or a toaster oven is the way to go. Place your biscuits on a baking sheet, you can wrap them in foil to keep them soft or leave them unwrapped for a crispier exterior. Heat them in a 350°F (175°C) oven for about 5 to 10 minutes, or until warmed through. If you’re reheating from frozen, you’ll need to add a few extra minutes, about 15 to 20 minutes total. A quick zap in the microwave will work in a pinch, but it can make them a bit soft.
- Repurposing Leftovers: If your biscuits are a day or two old and a little dry, don’t throw them out! They can be repurposed in some wonderful ways. Cube them, toss with a little melted butter and herbs, and bake until golden to create amazing croutons for a salad or soup. You can also crumble them to use as a topping for a casserole or a fruit crisp, or use them as the base for an incredible sweet potato biscuit bread pudding.
With these tips, you can enjoy every last crumb of your homemade biscuits, whether they are fresh out of the oven or a few days old.
Substitutions & Variations For Sweet Potato Biscuits
I absolutely adore this recipe just as it is, with the warm, nutty flavor of brown butter and the unique spice of cardamom. However, one of the greatest joys of home baking is making a recipe your own. This Sweet Potato Biscuits recipe is a fantastic base for experimentation, so feel free to play around with the flavors to suit your taste or use what you have on hand in your pantry.
The easiest way to change things up is by swapping out the spices. If you’re not a fan of cardamom or don’t have any, you can create a more traditional fall-spiced biscuit. Try replacing the cardamom with a combination of ½ teaspoon of cinnamon and ¼ teaspoon of nutmeg. A pinch of ground ginger or allspice would also be a lovely addition, giving the biscuits a cozy, classic flavor profile that is perfect for the holidays.
You can also take these biscuits in a more savory direction, which is fantastic if you plan to serve them with dinner. Here are a few of my favorite variations:
- Savory Herb Biscuits: Reduce the granulated sugar to just one tablespoon. Then, add one tablespoon of finely chopped fresh herbs like rosemary, sage, or thyme to the dry ingredients. A combination of sage and black pepper is especially delicious with the sweet potato.
- Cheesy Sweet Potato Biscuits: For an extra rich and savory twist, fold in about ¾ cup of shredded sharp cheddar, Gruyère, or smoked Gouda cheese into the dough right after you add the wet ingredients. The cheese melts into beautiful pockets and creates an irresistible flavor.
- Pumpkin Spice Biscuits: If you don’t have sweet potatoes, you can easily substitute an equal amount of canned pumpkin puree. Just be sure to use 100% pure pumpkin, not pumpkin pie filling. Pair it with a pumpkin pie spice blend instead of cardamom for a perfect autumn treat.
- Buttermilk Substitute: If you find yourself without buttermilk, you can make a quick substitute. For the ⅔ cup needed in this recipe, simply measure out ⅔ cup of regular milk and stir in 2 teaspoons of lemon juice or white vinegar. Let it sit for about five minutes to curdle slightly before using.
No matter how you choose to customize them, the core techniques of using cold brown butter, folding the dough, and not overworking it will ensure you end up with a batch of tender, flaky, and delicious biscuits every single time.
Brown Butter and Cardamom Sweet Potato Biscuits
Description: Tender, flaky sweet potato biscuits made with the nutty warmth of brown butter and a hint of exotic cardamom. This easy recipe elevates a Southern classic into something truly special, perfect for breakfast, dinner, or any holiday meal.
Yield: 12 biscuits | Category: Side Dish | Cuisine: Southern
Prep Time: 30 minutes | Cook Time: 15 minutes
Ingredients
- 2 ½ cups all-purpose flour, plus more for dusting
- 1 tablespoon baking powder
- 1 teaspoon kosher salt
- 2 tablespoons granulated sugar
- ½ teaspoon ground cardamom
- ½ cup (1 stick) unsalted butter
- 1 cup mashed sweet potato, cooled
- ⅔ cup buttermilk, cold
- 2 tablespoons melted butter, for brushing
Instructions
- Melt ½ cup butter in a light-colored saucepan over medium heat until it foams and brown solids form. Pour into a bowl and cool completely until solid.
- Preheat oven to 425°F (220°C). Line a baking sheet with parchment paper.
- In a large bowl, whisk together flour, baking powder, salt, sugar, and cardamom.
- Cut the solidified brown butter into the flour mixture until it resembles coarse crumbs.
- In a separate bowl, whisk together the cooled mashed sweet potato and cold buttermilk.
- Add the wet ingredients to the dry ingredients and stir with a fork until a shaggy dough forms.
- Turn dough onto a floured surface and gently knead 4-5 times.
- Pat the dough to a ½-inch thickness, fold it in half, and repeat the process two more times.
- Cut biscuits with a 2 ½-inch cutter, pressing straight down without twisting. Place on the prepared baking sheet.
- Brush the tops with the 2 tablespoons of melted butter.
- Bake for 12-15 minutes, until golden brown and risen. Serve warm.
Notes
For the best rise, press the biscuit cutter straight down and pull straight up without twisting. Twisting the cutter can seal the edges of the biscuit, preventing it from rising to its full potential.
Servings: 12 | Calories: 195kcal | Fat: 9g | Carbohydrates: 25g | Protein: 4g
5 FAQs About Sweet Potato Biscuits
Here are some straightforward answers to the most common questions I receive about this Sweet Potato Biscuits recipe.
Can I use canned sweet potato puree for these sweet potato biscuits?
Yes, you absolutely can use canned sweet potato puree as a convenient substitute for freshly mashed sweet potato. It’s a great time-saver, especially around the busy holidays. However, there are a couple of things to keep in mind for the best results. Canned purees can vary in moisture content from brand to brand, and some tend to be a bit wetter than what you’d get from a home-baked sweet potato.
If your puree seems particularly thin or watery, you might want to hold back a tablespoon or two of the buttermilk initially. You can always add it back in if the dough seems too dry. Alternatively, you may need to add an extra tablespoon of flour to get the dough to the right “shaggy” consistency. The goal is a soft, slightly sticky dough that is not overly wet. Using a good quality, thick canned puree will give you a result that is closest to using fresh. While the flavor might be slightly less deep and caramelized than with a roasted sweet potato, your biscuits will still be wonderfully tender and delicious.
Why are my sweet potato biscuits tough or dense instead of flaky?
This is the most common biscuit-baking woe, and the answer almost always comes down to two things: temperature and handling. First, your fat and liquids must be cold. In this recipe, that means using the brown butter after it has been completely chilled and re-solidified, along with buttermilk straight from the refrigerator. The little pieces of cold butter in the dough create steam when they hit the hot oven, which pushes the layers of dough apart and creates that coveted flaky texture. If your butter is soft, it will just blend into the flour, and you’ll get a tougher, denser biscuit.
Second, and just as important, is to handle the dough as little as possible. When you mix and knead flour with liquid, you develop gluten. A little gluten provides structure, but too much makes baked goods tough. This is why the instructions emphasize mixing just until a shaggy dough forms and kneading only four or five times. You want the dough to just barely come together. Overworking it will result in tough, dense biscuits instead of light and tender ones. Be gentle with your dough, and it will reward you.
How do I get my sweet potato biscuits to rise tall?
Achieving a beautiful, high rise on your biscuits comes down to a few key techniques. First, make sure your baking powder is fresh. Baking powder can lose its leavening power over time, so if your container has been open for more than six months, it might be time for a new one. A hot oven is also critical. Preheating your oven to 425°F ensures that the biscuits get an immediate blast of heat, which activates the baking powder and causes the cold butter to release steam quickly, forcing the biscuits to rise upwards.
The way you handle and cut the dough also plays a huge role. The folding technique described in the recipe creates multiple thin layers of butter and dough. These layers separate during baking, contributing to the rise and flakiness. When cutting, always press your biscuit cutter straight down and pull it straight up. Do not twist the cutter! Twisting the cutter seals the edges of the dough, which inhibits the rise. Finally, for the tallest biscuits, place them on the baking sheet so their sides are just touching. This encourages them to support each other and rise up instead of spreading out.
Can I make the sweet potato biscuit dough ahead of time?
Yes, you can definitely prepare parts of this recipe in advance, which is a fantastic strategy for holiday baking or a weekend brunch. You have a couple of options. My preferred method is to prepare the biscuits for baking and then freeze them. Follow the recipe through cutting out the biscuits. Place the unbaked, cut biscuits on a parchment-lined baking sheet and pop them into the freezer until they are frozen solid, about an hour or two. Once frozen, you can transfer them to a freezer-safe bag or container, where they’ll keep for up to three months.
When you’re ready to bake, there’s no need to thaw them. Just place the frozen biscuits on a prepared baking sheet, brush them with melted butter, and bake as directed. You will need to add about 3 to 5 minutes to the baking time. Another option is to mix the dry ingredients and cut in the solidified brown butter ahead of time. You can store this flour and butter mixture in an airtight container in the refrigerator for up to two days. When you’re ready to bake, just whisk together your wet ingredients, mix them in, and proceed with the recipe.
What makes brown butter special in sweet potato biscuits?
Brown butter is a simple ingredient with the power to completely transform a recipe. It’s what takes these Sweet Potato Biscuits from great to absolutely spectacular. When you gently heat butter past its melting point, the milk solids suspended in the butterfat begin to toast and caramelize. This process creates an incredibly complex and aromatic flavor profile that you just don’t get from regular melted or softened butter.
The flavor of brown butter is often described as nutty, toasty, and rich, with notes of caramel or toffee. This deep, savory nuttiness is the perfect counterpoint to the natural, earthy sweetness of the sweet potato. It adds a layer of sophistication and warmth that is both comforting and surprising. Paired with the floral notes of the cardamom, the brown butter creates a flavor that is layered and memorable. It’s a simple, extra step that requires a little patience, but the incredible depth of flavor it adds to the final product is more than worth the effort.
Try These Recipes Next
If you enjoyed these special sweet potato biscuits, here are a few other recipes from my kitchen that I think you’ll love.
- Easy Sweet Potato Rolls Recipe: If you love the flavor of sweet potato in your bread, these soft and fluffy rolls are a must-try for your next dinner.
- Brown Butter Cranberry Pecan Sweet Potato Muffins: For a breakfast treat, these muffins combine all the best fall flavors in one perfect bite.
- Recipe Drop Biscuits From Scratch: When you’re short on time but still want homemade biscuits, my easy drop biscuit recipe is a total lifesaver.
I hope you enjoy baking these up as much as I do!