
Easy Stuffed Peppers Recipe Bursting with Quinoa, Ground Beef, and Veggies
The smell of simmered tomatoes and something… else… vaguely burning, hung heavy in the air. My first attempt at stuffing peppers ended less like a culinary masterpiece and more like a kitchen catastrophe. Bless my heart, I thought I had it all figured out. Ground beef, rice, some canned diced tomatoes, a little onion… what could go wrong? Turns out, plenty. The rice was gummy, the beef was bland, and the peppers themselves were, well, still a little crunchy. My sweet husband, bless him, choked down a whole pepper with a smile, but I knew. I knew it wasn’t right.
Determined to redeem myself (and avoid another evening of sympathetic chewing from my beloved), I started researching. I devoured cookbooks, scrolled through endless recipe blogs, and even called my dear Aunt Carol, the queen of Southern comfort food. What I discovered was that stuffing peppers wasn’t just about throwing ingredients together; it was about layering flavors and textures. And that’s when I had my “aha!” moment. I was making a salad with quinoa one day, and I thought, “Why not in a pepper?”
Now, I know what you’re thinking. Quinoa? In a Southern kitchen? But trust me on this one. It adds a nutty, slightly chewy texture that perfectly complements the sweetness of the peppers and the savory meat. Plus, it’s a fantastic source of protein and fiber, so you can feel good about feeding it to your family. It really elevates the whole dish from something ordinary to something truly special. Since then, my stuffed peppers have become a family favorite, and I’ve even won a blue ribbon at the county fair! (Okay, maybe the competition wasn’t *that* stiff, but still!).
It wasn’t just swapping out the rice, either. I browned the ground beef with some chopped garlic and onions, then drained off the excess grease. A pinch of smoked paprika gave it a wonderful depth of flavor. I mixed in some fire-roasted tomatoes instead of the plain diced ones for a little kick. And, instead of just stuffing the peppers and hoping for the best, I parboiled them for a few minutes to soften them up just a tad.
All those little changes added up to a pepper that was tender, flavorful, and absolutely delicious. I’ve experimented with different cheeses, too. Sometimes I sprinkle a little Monterey Jack on top, other times I mix in some crumbled feta with the quinoa. It’s fun to play around and see what you like best. And, you know what? It made those stuffed peppers a star on my table. You’ll love it!
Why This Stuffed Peppers Recipe Works
Stuffed peppers. Where did this comfort food staple come from? While variations exist across cultures, the modern stuffed pepper as we know it really took hold in America in the early 20th century. It coincided with both the increased availability of bell peppers and the popularization of canned tomatoes, a key ingredient in the sauce. Hungarian immigrants likely played a significant role, bringing their own versions of stuffed cabbage (töltött káposzta) and peppers (töltött paprika) that evolved and adapted over time. These recipes melded with readily available American ingredients and tastes, becoming a beloved dish in home kitchens across the country.
There’s just something so satisfying about them, isn’t there? The tender-crisp bite of the roasted pepper, the savory, slightly sweet filling… It’s a complete meal in one neat little package! They’re colorful, they smell amazing while they’re baking, and let’s be honest, they’re just plain fun to eat. I think part of the appeal also lies in their versatility. You can easily adapt the filling to suit your own tastes or use up leftover ingredients. I mean, who doesn’t love a recipe that helps you clean out the fridge?
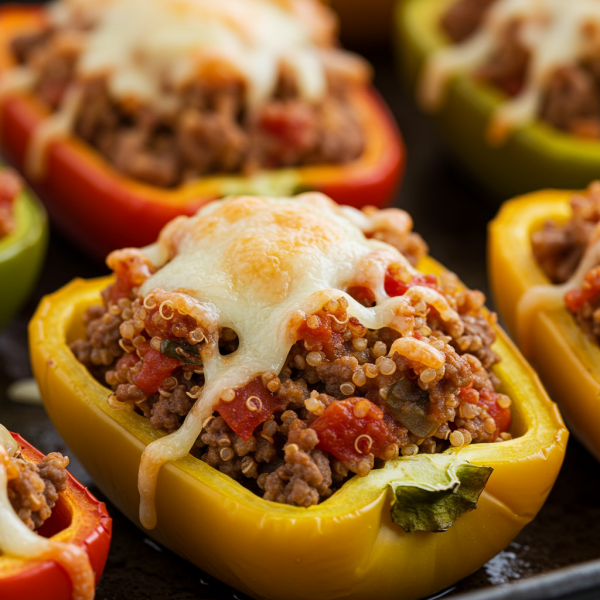
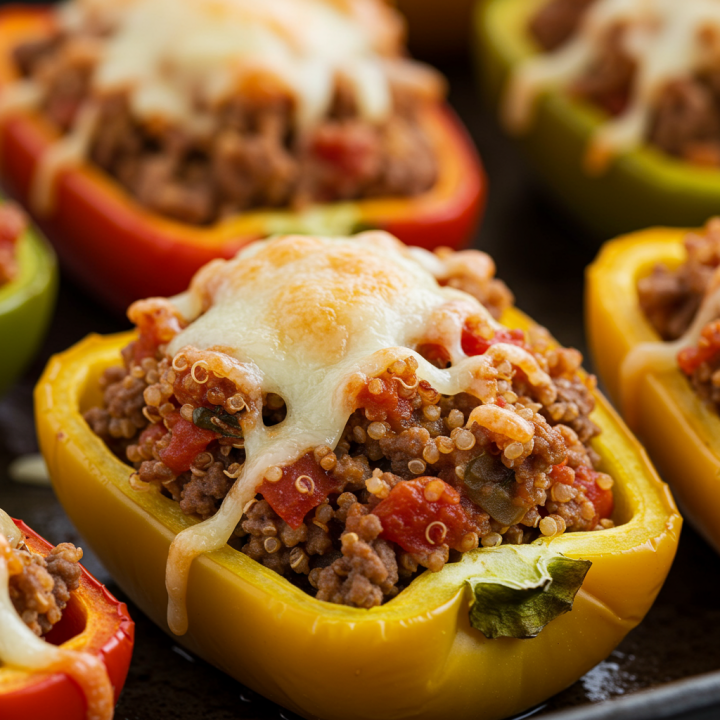
Now, I’ve always been a big fan of the classic rice-based filling, but recently I started experimenting with quinoa. And honey, let me tell you, it’s a game-changer! Quinoa adds a nutty, slightly earthy flavor that complements the other ingredients beautifully. It also gives the filling a wonderful, almost creamy texture. Plus, it’s packed with protein and fiber, so you can feel good about serving it to your family. I also find it soaks up the flavors of the meat, spices, and tomato sauce even better than rice, resulting in a more cohesive and flavorful filling. It also holds up its structure very well, which means it won’t get mushy, which is always a plus! I’d venture to say it’s just a little bit healthier than a traditionally prepared dish. I still make the classic version, of course, but for me, quinoa elevates stuffed peppers to a whole new level of deliciousness. You really ought to try it!
Ingredients for Stuffed Peppers
Alright, y’all, let’s talk about what makes these Quinoa Stuffed Peppers sing! I’ve taken the classic stuffed pepper recipe and given it a little somethin’ somethin’ extra. A boost of nutrition and flavor, and let me tell you, it’s a winner. Here’s what you’ll need:
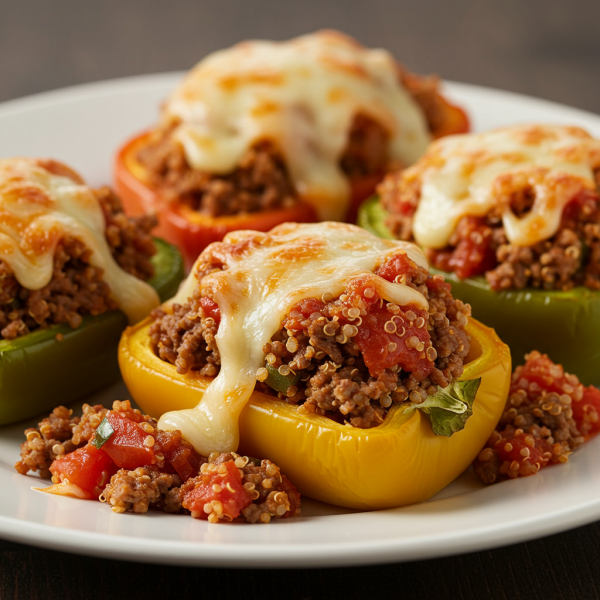
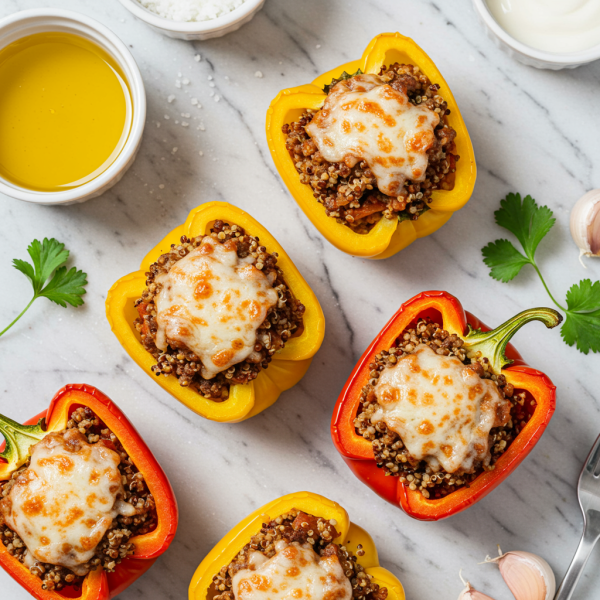
- 6 large bell peppers, any color. I usually go for a mix of red, green, yellow, even orange if I can find ’em! It just makes the plate prettier, doesn’t it? And let’s be honest, we eat with our eyes first.
- 1 pound ground beef. You can use lean, but a little bit of fat adds flavor. Don’t be scared! You can also substitute ground turkey or chicken if you prefer.
- 1 cup cooked quinoa. Now, this is our secret weapon. Quinoa adds a nutty flavor and a whole lotta good-for-you stuff. Cook it according to package directions, and don’t overcook it, or it’ll get mushy. Nobody wants mushy quinoa.
- 1 medium onion, chopped. Yellow or white is fine. We’re gonna sauté this baby up to soften it and bring out its sweetness.
- 2 cloves garlic, minced. Because everything’s better with garlic, right? I swear, the smell of garlic frying is one of my favorite things in the world.
- 1 (14.5 ounce) can diced tomatoes, undrained. Don’t drain ’em! We want all that juicy goodness. You can use the kind with herbs, too, if you like.
- 1 (8 ounce) can tomato sauce. This helps bind everything together and gives the peppers that classic tomatoey flavor.
- 1 teaspoon dried oregano. Oregano just screams “Italian,” doesn’t it? And stuffed peppers always feel a little bit Italian to me.
- 1/2 teaspoon dried basil. Similar reason as the oregano. It has a classic Italian flavor. Plus, basil just smells divine.
- 1/4 teaspoon red pepper flakes (optional). If you like a little heat, a pinch of red pepper flakes will do the trick. My grandpa always said, “A little bit of spice makes life nice!”
- Salt and pepper to taste. Don’t be shy! Seasoning is key.
- 1 cup shredded cheddar cheese. For topping, of course! You can use any cheese you like: Monterey Jack, mozzarella, even a blend. Just make sure it’s melty.
Now, let’s talk about these ingredients for a minute. That quinoa? It’s not just filler. It really adds something special. A little texture, a little nuttiness, and a whole lotta goodness. You can even use different types of quinoa: red, black, or white. It won’t change the flavor much, just the look. And that’s half the fun, ain’t it? Don’t skip the garlic and onions; they’re the foundation of flavor in just about everything I cook. And finally, feel free to adjust the seasonings to your liking.
Step-by-Step Instructions For Making This Stuffed Peppers Recipe
Alright, darlin’, let’s get cookin’! Stuffed peppers are a classic comfort food, but this version with quinoa takes them to a whole new level. The quinoa adds a delightful nutty flavor and a boost of protein, making these peppers both delicious and good for you. Trust me, even the pickiest eaters will be asking for seconds. So, roll up your sleeves, put on some good music, and let’s get started!
Step 1: Prepare the Peppers
First things first, we need to get those beautiful bell peppers ready for their filling. Preheat your oven to 375°F (190°C). While the oven heats up, slice off the tops of the bell peppers and carefully remove the seeds and membranes. You want a nice, clean cavity for all that goodness we’re about to stuff inside. I like to give them a good rinse under cold water afterwards too, just to be sure.
Step 2: Sauté the Aromatics and Brown the Beef
Now, let’s build some flavor! In a large skillet, brown your ground beef over medium heat. As it cooks, break it up with a spoon. Once the beef is browned, drain off any excess grease, we don’t need that weighing things down. Then, add the chopped onion and minced garlic to the skillet and sauté until they’re softened and fragrant, about 5-7 minutes. The smell alone will make your mouth water, I promise.
Step 3: Mix the Filling
This is where the magic happens. To the skillet with the beef, onion, and garlic, add the cooked quinoa, diced tomatoes (undrained, we want all that juice!), tomato sauce, dried oregano, dried basil, red pepper flakes (if you’re feeling a little spicy!), salt, and pepper. Stir everything together until well combined. Give it a taste and adjust the seasonings to your liking. Remember, don’t be shy with the salt and pepper! It makes all the difference.
Step 4: Stuff the Peppers
Carefully spoon the filling into each of the bell peppers, packing it in nicely but not too tightly. You want to leave a little room for the filling to expand as it cooks. Place the stuffed peppers in a baking dish. I like to use a 9×13 inch dish. Then add about 1/2 inch of water to the bottom of the dish. This will help steam the peppers and keep them from drying out.
Step 5: Bake the Peppers
Cover the baking dish with foil and bake for 30 minutes. After 30 minutes, remove the foil and sprinkle the shredded cheddar cheese over the top of each pepper. Bake for another 10-15 minutes, or until the cheese is melted and bubbly and the peppers are tender. The smell drifting from the oven at this point is just heavenly, makes you feel like you’re back in Grandma’s kitchen.
Step 6: Let Cool Slightly and Serve
Once the peppers are done, remove them from the oven and let them cool for a few minutes before serving. This will give the filling a chance to set up a bit and prevent you from burning your tongue. Serve these beauties hot and enjoy every single bite. They’re delicious on their own, but you can also serve them with a side salad or some crusty bread for dipping in the sauce. Enjoy, y’all!
How To Serve Stuffed Peppers
Alright now, Stuffed Peppers are one of those dishes that can be dressed up or dressed down, depending on the company and, let’s be honest, how much energy I’ve got that day! We all have those days, right? I mean, sometimes I’m picturing white tablecloths and other times, well, paper plates are lookin’ mighty fine.
First off, let’s talk about sides. Y’all know I’m a Southern girl, so I’m gonna start with the obvious: coleslaw. A good, creamy coleslaw cuts through the richness of the peppers perfectly. I like to make mine with a little bit of apple cider vinegar for a bit of tang. Now, if coleslaw isn’t your thing, or you’re just wanting something different, cornbread is always a winner. A slightly sweet cornbread muffin is just perfection. I sometimes crumble a little on top of my pepper. Don’t knock it ’til you try it!
But, let’s say you want something a little fancier. For a dinner party, I’ve been known to pair my stuffed peppers with a simple green salad with a balsamic vinaigrette. It’s light, it’s refreshing, and it adds a touch of elegance without being too fussy. I like to toss in some toasted pecans for a bit of crunch.
For a real casual weeknight meal, I’ll just serve the peppers with a side of steamed rice or quinoa. It’s easy, it’s healthy (ish!), and it soaks up all that lovely sauce from the peppers. Plus, the kids don’t complain. And that’s a win in my book!
Now, here’s a little secret. Sometimes I’ll serve my stuffed peppers as appetizers. Just slice them into rings after they’re cooked and arrange them on a platter. They’re colorful, they’re delicious, and they’re a real conversation starter. I even did it once with mini peppers. It was adorable!
Here’s a quick rundown:
- Casual: Coleslaw, cornbread, rice or quinoa.
- Fancy: Green salad with balsamic vinaigrette and toasted pecans.
- Appetizers: Sliced pepper rings arranged on a platter.
No matter how you choose to serve them, I guarantee your Stuffed Peppers will be a hit. They’re just good, honest comfort food that everyone loves. And that’s what it’s all about, isn’t it? Sharing good food with good people.
How To Store & Reheat Stuffed Peppers
Trust me, you *want* to save some leftover peppers. They’re even better the next day, once those flavors have had a chance to really meld together, like two gossiping neighbors sharing secrets over the fence.
First things first: storage. Once your peppers have cooled down a bit (not still steaming hot, mind you, but not stone cold either), get them tucked away in an airtight container. I prefer glass, mostly because Mama always said it keeps things fresher, but a good sturdy plastic container will work just fine. If you’ve got a lot of leftover peppers, don’t overcrowd them. Give ’em a little breathing room. Nobody likes being squished, not even peppers.
Now, how long will they last? In the fridge, those beauties will keep for 3 to 4 days. After that, you’re playing refrigerator roulette, and nobody wants that. If you need longer storage, freezing is your friend. Wrap each pepper individually in plastic wrap, then pop them into a freezer bag. They’ll be happy in the freezer for up to 2 months. Just remember to label and date them, because freezer burn is a sad, sad thing.
Reheating is where the magic happens… or doesn’t, if you’re not careful. The microwave is the quickest option, naturally. Place a pepper or two on a microwave-safe plate, add a tablespoon or two of water to the plate (this helps keep them moist), and cover loosely with plastic wrap or a microwave-safe lid. Heat on medium for 2-3 minutes, or until heated through. But beware: microwaving can sometimes make the peppers a little…soggy.
For a more “refined” experience, the oven is the way to go. Preheat your oven to 350°F. Place the peppers in a baking dish, add a splash of water or tomato sauce to the bottom of the dish to prevent drying, and cover with foil. Bake for 15-20 minutes, or until heated through. This method takes longer, but it helps retain the pepper’s texture and keeps everything nice and juicy. Think of it as the Sunday dinner approach. It’s a little extra effort, but well worth it.
Here’s a quick rundown:
- Fridge: 3-4 days
- Freezer: Up to 2 months
- Microwave Reheating: Quick, but can make peppers soggy. Add water!
- Oven Reheating: Best for texture and flavor. Add liquid and cover with foil!
No matter how you reheat them, remember to check the internal temperature with a food thermometer to make sure they’re good and hot (165°F is the magic number). Safety first, darlings! And there you have it. Now go forth and conquer those leftovers. Your taste buds will thank you.
Substitutions & Variations for This Stuffed Peppers Recipe
Now, y’all know I wouldn’t leave you hangin’ without talkin’ ’bout how to make this recipe your own. Truth be told, half the fun of cookin’ is puttin’ your personal spin on things! Don’t be afraid to play around a little. After all, a recipe is just a guideline, not the gospel.
First off, let’s talk about that meat. I love me some good pork tenderloin, but if you’re not a pork fan, no worries! Chicken breasts or even thick-cut turkey cutlets work beautifully here. Just be sure to adjust your cooking time accordingly. Chicken will cook a bit faster, and you definitely don’t want it dry! A meat thermometer is your best friend for ensuring everything is cooked through. Remember, 165 degrees for chicken, and 145 for pork, then let it rest before slicing.
Now, the sauce is where things can get really interesting! That touch of honey really balances the tanginess of the mustard and vinegar. But if you’re watchin’ your sugar intake, or just don’t care for honey, maple syrup or even a tablespoon of apple sauce are both wonderful substitutes. For a little extra kick, I sometimes throw in a pinch of red pepper flakes, but don’t tell my sister Agnes, she can’t handle the heat!
Got dietary restrictions? I got you covered. If you’re gluten-free, make sure your Dijon mustard is gluten-free (most are, but always double-check!), and consider using tamari instead of soy sauce. It’ll give you that same umami flavor without the gluten. And for my dairy-free friends, you can easily swap the butter for olive oil. It’ll give the sauce a slightly different flavor profile, but still be mighty tasty.
Now, the vegetables are really just a suggestion! Feel free to use whatever’s fresh and in season. Asparagus, bell peppers, even zucchini would be lovely. Roasting ’em alongside the pork is what gives them all that good flavor. Just remember that different vegetables cook at different rates. You might want to add heartier veggies like potatoes or carrots a little earlier than delicate ones like asparagus.
And lastly, don’t be afraid to experiment with the herbs and spices! I’m partial to thyme and rosemary, but oregano, sage, or even a little smoked paprika would be delicious too. That’s the joy of cookin’, y’all. It’s all about making it your own! So go on, get creative, and make something amazing.
FAQs About Stuffed Peppers
Here are some straightforward answers to the most common questions I receive about this Stuffed Peppers recipe.
Can I freeze these Stuffed Peppers for later?
Why, yes, honey, you absolutely can! I often make a double batch of these Quinoa Stuffed Peppers just so I can have some tucked away in the freezer for those evenings when I just don’t have the energy to cook. The key is to let them cool completely after baking, then wrap each pepper individually in plastic wrap before placing them in a freezer bag. They’ll keep beautifully for up to 3 months. When you’re ready to eat, just thaw them overnight in the fridge and reheat in the oven or microwave. Honestly, they taste just as good as the day you made them. Makes me feel like I’ve got a little helper in the kitchen, even if it’s just future me!
What’s the best way to prevent my Stuffed Peppers from getting soggy?
Nobody likes a soggy pepper! To avoid this, make sure you hollow out the peppers really well, removing all the seeds and membranes. Sometimes I even give them a quick bake (about 10 minutes) before stuffing, just to pre-cook them a bit and let some of the moisture escape. Another tip is to not overcook the filling. If it’s too wet to begin with, it will definitely make your Stuffed Peppers soggy. I prefer a filling that is slightly firm and not swimming in sauce. Think of it like packing a suitcase; you don’t want to overstuff it, or things will get messy!
Can I use a different grain other than quinoa in these Stuffed Peppers?
Of course you can! While I love the nutty flavor and nutritional boost that quinoa gives these Stuffed Peppers, you can certainly substitute it with other grains. Brown rice, couscous, or even bulgur wheat would work well. Just remember that different grains cook at different rates, so you may need to adjust the cooking time of the filling accordingly. Personally, I find quinoa to be the easiest and quickest, but don’t let that stop you from experimenting. Sometimes a little kitchen adventure is just what you need!
How can I make these Stuffed Peppers vegetarian or vegan?
Making these Quinoa Stuffed Peppers vegetarian is super easy, since the recipe already calls for quinoa and veggies! To make them vegan, simply swap out any cheese you might use with a plant-based alternative. You can also add some crumbled tofu or tempeh to the filling for extra protein and heartiness. And if you’re really feeling adventurous, a sprinkle of nutritional yeast adds a cheesy, umami flavor that’s just divine. Now, doesn’t that sound tasty?
What kind of sauce goes best with these Stuffed Peppers?
Oh, the sauce makes all the difference, doesn’t it? I typically use a simple tomato sauce that I season with Italian herbs, garlic, and a pinch of red pepper flakes. You could also try a roasted red pepper sauce or even a creamy pesto if you’re feeling fancy. Some folks around here even like to drizzle a little balsamic glaze over their Stuffed Peppers just before serving. Honestly, you can’t go wrong with whatever flavor profile you prefer, but a good tomato-based sauce is a classic for a reason.
Easy Stuffed Peppers Recipe Bursting with Quinoa, Ground Beef, and Veggies
These Quinoa Stuffed Peppers are packed with hearty ground beef, nutty quinoa, savory aromatics, and a tomato-herb sauce.
Ingredients
- 6 large bell peppers (any color), tops sliced off and seeds removed
- 1 pound ground beef (or ground turkey/chicken)
- 1 cup cooked quinoa (white, red, or tri-color all work)
- 1 medium yellow or white onion, chopped
- 2 cloves garlic, minced
- 1 (14.5 ounce) can diced tomatoes, undrained
- 1 (8 ounce) can tomato sauce
- 1 teaspoon dried oregano
- 1/2 teaspoon dried basil
- 1/4 teaspoon red pepper flakes (optional)
- Salt and black pepper to taste
- 1 cup shredded cheddar cheese (or your favorite melty cheese)
- 1/2 cup water (for baking dish)
Instructions
- Preheat oven to 375°F (190°C). Slice the tops off the bell peppers and remove seeds and membranes. Rinse and set aside.
- Brown the ground beef in a large skillet over medium heat. Once cooked through, drain excess fat.
- Add the chopped onion and garlic to the skillet with the beef. Sauté for 5–7 minutes, until the onions are soft and fragrant.
- Stir in the cooked quinoa, diced tomatoes (with juice), tomato sauce, oregano, basil, red pepper flakes (if using), salt, and pepper. Mix well and taste to adjust seasoning.
- Stuff the peppers with the quinoa-beef mixture, packing them gently but firmly. Arrange them upright in a 9x13 inch baking dish. Pour 1/2 inch of water into the bottom of the dish to help steam the peppers as they bake.
- Cover the dish with foil and bake for 30 minutes. Remove the foil, top each pepper with shredded cheddar, and bake uncovered for 10–15 minutes more, until cheese is melted and bubbly and peppers are tender.
- Let cool for 5 minutes before serving. Optional: Serve with a side salad or crusty bread to soak up the sauce.
Try These Recipes Next
If you enjoyed this recipe, these three make a great next stop on your tortellini journey:
- Creamy Chicken Tortellini Soup with Smoked Gouda and Crispy Sage: Comforting, creamy, and full of flavor.
- Tortellini Meatball Soup: Perfect for chilly nights and big appetites.
- Easy Italian Shrimp Tortellini Bake: A cheesy pasta bake with a seafood twist.
These dishes are simple enough for any night of the week and flavorful enough to serve guests.