
PUMPKIN FOCACCIA WITH BROWN BUTTER AND CRISPY SAGE
This is the bread you bring to the party when you want to leave with an empty platter and a whole bunch of recipe requests.
I first tasted something similar at a little fall festival up in the mountains. A local baker was selling slices of a simple pumpkin bread, and while it was good, I knew it could be great. My mind immediately started whirring. What could I do to make this really sing?
The answer came to me when I was planning our Thanksgiving menu a few weeks later. The secret to my sausage stuffing has always been browning the butter and crisping up some fresh sage leaves. The aroma is pure holiday magic, nutty and deeply savory. I had a lightbulb moment. That exact flavor combination would be the perfect complement to the subtle sweetness of this Pumpkin Focaccia.
So, I went to work. I tweaked the dough to get it pillowy soft on the inside with that signature focaccia chew. Then, I created a generous topping of rich brown butter, fragrant olive oil, and crispy, crumbled sage. The result is a showstopper. The top gets unbelievably golden and crisp, the inside stays tender and moist from the pumpkin, and the flavor is just out of this world. It’s the perfect savory twist on a fall classic, and I just know y’all are going to love it.
Why This Pumpkin Focaccia Recipe Works
Focaccia has been a beloved Italian staple for centuries, celebrated for its simple ingredients and satisfying texture. It’s essentially a blank canvas, traditionally topped with little more than olive oil and coarse salt. Its popularity comes from its versatility. You can dip it, top it, or slice it for sandwiches. It’s rustic, comforting, and surprisingly easy for home bakers to master.
My version takes that classic appeal and gives it a distinctly autumnal, Southern-inspired personality. Adding pumpkin purée to the dough does a few wonderful things. First, it introduces a beautiful, warm color and a hint of earthy sweetness that is just perfect for the cooler months. Second, it adds an incredible amount of moisture, ensuring the bread stays tender and fresh for days longer than a traditional loaf might.
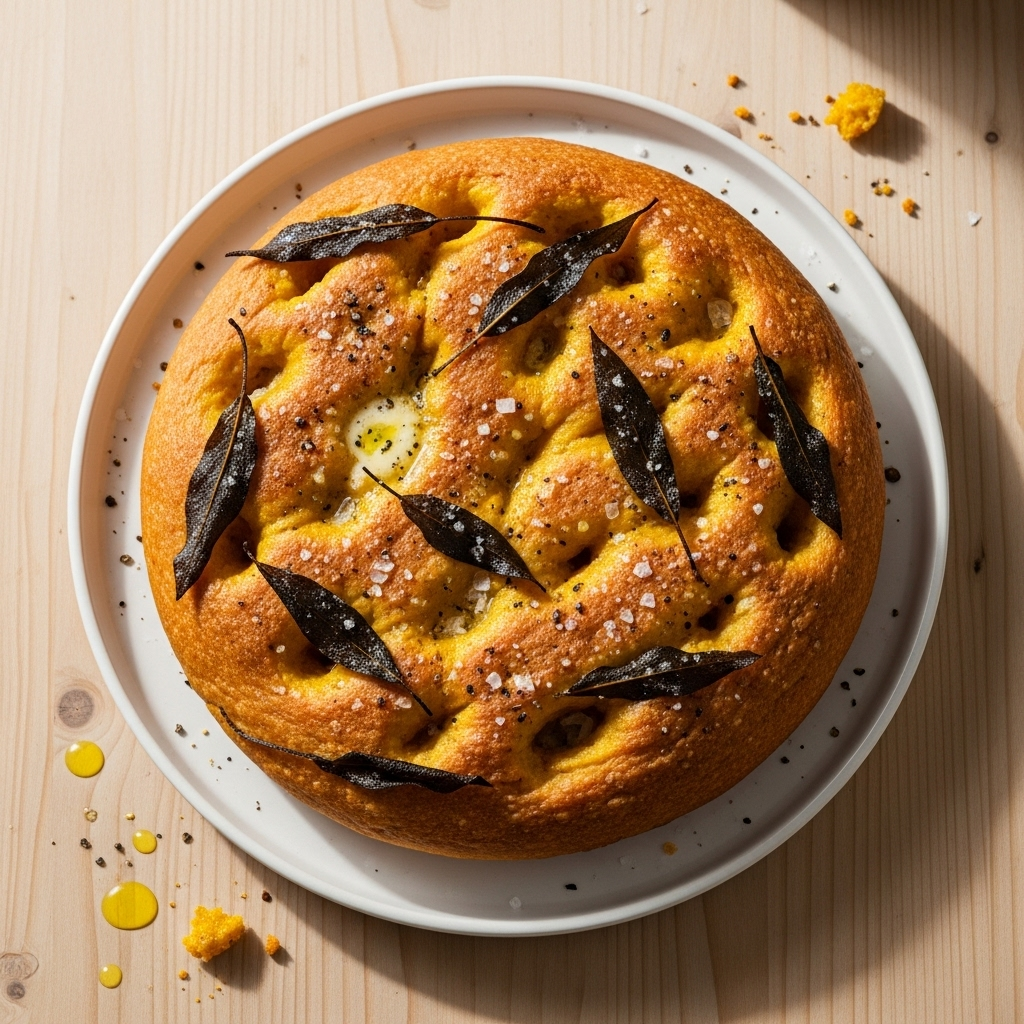
But the real star, the twist that makes this Pumpkin Focaccia recipe truly unforgettable, is the brown butter and sage topping. Browning butter, a simple technique of melting butter until the milk solids toast, creates a complex, nutty, and almost caramel-like aroma. When you infuse that with fresh sage until it’s crispy, you get a topping that is deeply savory and aromatic. It soaks into the dimples of the focaccia, creating little pools of flavor that perfectly balance the sweetness of the pumpkin. It transforms a simple bread into a gourmet experience that tastes like it came from a high-end bakery.
The combination of a pillowy, pumpkin-infused crumb, a super crisp, golden-brown crust, and that rich, herby topping is what makes this recipe a guaranteed winner every single time.
Ingredients for Pumpkin Focaccia
The magic of this bread comes from a handful of simple, high-quality ingredients working together in perfect harmony. While the list might look straightforward, choosing the right components will make all the difference in the final product. Let’s walk through what you’ll need to create this gorgeous loaf.
The foundation is a simple yeast dough, but with a few key players that create that signature fall flavor and texture.
- For the Dough:
- 1 cup (240ml) warm water (about 110°F / 43°C)
- 2 ¼ teaspoons (1 packet) instant yeast
- 1 tablespoon maple syrup
- 4 ⅓ cups (520g) bread flour
- 1 cup (245g) pumpkin purée, not pumpkin pie filling
- 2 teaspoons fine sea salt
- ¼ cup (60ml) extra-virgin olive oil, plus more for the bowl and pan
- For the Brown Butter & Sage Topping:
- 6 tablespoons unsalted butter
- 12-15 fresh sage leaves
- 2 tablespoons extra-virgin olive oil
- 1 ½ teaspoons flaky sea salt, for finishing
- ½ teaspoon freshly cracked black pepper
A few notes on these ingredients. Using bread flour is important here as its higher protein content gives the focaccia a wonderful chewiness that you just can’t get with all-purpose flour. Also, be absolutely certain you grab pure pumpkin purée. Pumpkin pie filling is pre-sweetened and spiced, which will throw off the entire flavor profile of our savory bread.
The true game-changer, of course, is the brown butter and sage topping. This is where the recipe gets its unique, sophisticated flavor. Taking the few extra minutes to let that butter toast until it’s nutty and fragrant is the secret step that will make everyone ask for your recipe. And for finishing, please don’t skip the flaky sea salt! Those crunchy little crystals on top provide the perfect texture and final burst of flavor.
Step-by-Step Instructions For Making Pumpkin Focaccia
Making bread from scratch can feel intimidating, but I promise this focaccia is one of the most forgiving and rewarding recipes you can try. Just follow along with me, and we’ll have a gorgeous, golden loaf ready in no time.
Step 1: Activate the Yeast
First things first, we need to wake up our yeast. In the large bowl of your stand mixer, or just a regular large mixing bowl, combine the warm water, instant yeast, and maple syrup. The water should feel like a warm bath, not hot. Give it a gentle whisk and let it sit for about 5 to 10 minutes. You’re looking for the mixture to become foamy and bubbly. This tells you the yeast is alive and ready to work its magic.
Step 2: Mix and Knead the Dough
Once the yeast is bubbly, add in the bread flour, pumpkin purée, fine sea salt, and the first ¼ cup of olive oil. If you’re using a stand mixer, use the dough hook attachment and mix on low until everything comes together into a shaggy dough. Then, increase the speed to medium and let it knead for 5 to 7 minutes. The dough is ready when it’s smooth, elastic, and pulls away from the sides of the bowl. If kneading by hand, just mix it all up with a wooden spoon, then turn it out onto a lightly floured counter and knead for 8 to 10 minutes.
Step 3: First Rise
Lightly oil a clean large bowl with a little olive oil. Form your dough into a ball and place it in the bowl, turning it over once to coat the top with oil. This prevents a skin from forming. Cover the bowl with a clean kitchen towel and place it in a warm, draft-free spot in your kitchen. I like to use my oven with the light on. Let it rise for 60 to 90 minutes, or until it has about doubled in size.
Step 4: Prepare the Pan and Second Rise
Get your 9×13-inch baking pan ready by pouring a generous 2 to 3 tablespoons of olive oil into it. Use your fingers to spread it all over the bottom and up the sides. Gently deflate the risen dough and transfer it to the pan. Gently press and stretch the dough towards the corners. It might spring back a bit, and that’s okay. If it does, just cover it and let it rest for 15 minutes, then it will be much more cooperative. Once it’s stretched out, cover the pan and let it rise again for another 30 to 45 minutes until it looks puffy.
Step 5: Prepare the Topping and Dimple the Dough
While the dough is on its final rise, preheat your oven to 425°F and make that glorious topping. Melt the butter in a small saucepan over medium heat. Add the whole sage leaves and cook, swirling the pan, until the butter gets nutty-smelling and has little brown specks. The sage leaves will get dark and crispy. Immediately remove the crispy sage to a paper towel and whisk the extra olive oil into your browned butter. Now for the fun part. Dip your fingers in some olive oil and press them all over the puffy dough, creating deep dimples all the way to the bottom of the pan.
Step 6: Top and Bake
Pour that brown butter and olive oil mixture all over the dimpled dough, letting it get into all those little pockets. Bake for 20 to 25 minutes. You’re looking for a deep, golden-brown color on top. As soon as it comes out of the oven, sprinkle it generously with the flaky sea salt and cracked black pepper. Crumble those crispy sage leaves you saved and scatter them over the top. The smell in your kitchen will be absolutely heavenly. Let it cool for just a few minutes before slicing and serving warm.
How To Serve Pumpkin Focaccia
This bread is so flavorful and delicious, you could honestly just eat it plain, straight from the pan. But if you want to make it part of a larger meal or serve it to guests, there are so many wonderful ways to present this Pumpkin Focaccia. Its savory, slightly sweet profile makes it incredibly versatile.
One of my favorite ways to serve it is as the star of a fall appetizer board. Slice the warm focaccia into thick strips or squares and arrange it on a large platter. Surround it with bowls of creamy whipped ricotta, a sweet and savory fig jam, and maybe some good quality olive oil for dipping. Add some cured meats like prosciutto, a few types of cheese like sharp cheddar or creamy brie, and some toasted nuts. It becomes an interactive and impressive starter for any gathering.
This bread is also the absolute perfect companion to a hearty autumn soup or stew. Here are a few more ideas to get you started:
- As a Soup Side: Serve a thick slice alongside a bowl of creamy tomato soup, butternut squash soup, or a hearty beef stew. It’s perfect for sopping up every last drop.
- For Fancy Sandwiches: Split a square of focaccia horizontally and use it as the base for an incredible sandwich. Think turkey, brie, and cranberry sauce, or roasted vegetables with goat cheese.
- With a Salad: A warm piece of pumpkin focaccia is a wonderful contrast to a crisp, cool salad. It turns a simple green salad into a much more substantial and satisfying lunch.
- As a Thanksgiving Starter: Cut it into small squares and serve it in a bread basket before the big meal. It sets the perfect festive tone without being too filling.
No matter how you choose to serve it, I recommend presenting it warm. A few minutes in the oven is all it takes to refresh the crust and reawaken that incredible brown butter and sage aroma. It’s a small step that makes a huge difference and ensures every bite is as delicious as the first.
How To Store & Reuse Pumpkin Focaccia Leftovers
If you find yourself with any leftovers, which I admit is a rare occasion in my house, this Pumpkin Focaccia stores and reheats beautifully. Because of the pumpkin and olive oil in the dough, it stays remarkably moist and tender, so you don’t have to worry about it drying out right away. Proper storage is key to enjoying it for days to come.
For short-term storage, simply let the focaccia cool completely to room temperature. This is important to prevent condensation from making the crust soggy. Once cool, you can wrap it tightly in plastic wrap or place it in an airtight container. It will keep well on the counter for up to three days. I avoid storing it in the refrigerator, as the cold air can actually make bread go stale faster.
If you want to save it for longer, this bread freezes like a dream. You can freeze the whole loaf or, my preferred method, slice it into individual portions first. Wrap each piece tightly in plastic wrap, then place them all in a freezer-safe zip-top bag. It will keep in the freezer for up to two months. This way, you can pull out a single slice whenever a craving strikes. To reheat, you can pop a frozen slice directly into a 350°F oven for 10-15 minutes until it’s warmed through and the crust is crisp again.
Beyond simply reheating, leftovers can be transformed into something new and exciting:
- Gourmet Croutons: Cut leftover focaccia into one-inch cubes. Toss with a little olive oil and bake at 375°F until golden and crisp. They are incredible on salads or soups.
- Savory Bread Pudding: Use the leftover cubes as a base for a savory bread pudding. Combine them with eggs, cream, cheese, and maybe some sausage or mushrooms for a fantastic brunch dish.
- Panzanella Salad: Toasted cubes of this pumpkin focaccia would be a phenomenal addition to a fall-themed Panzanella salad with roasted squash, kale, and a maple vinaigrette.
With these tips, not a single delicious crumb will go to waste. You can enjoy the fresh-baked taste of your hard work long after it comes out of the oven.
Substitutions & Variations For Pumpkin Focaccia
One of the things I love most about a recipe like this is how easily you can adapt it to your own tastes or to what you have on hand in the pantry. This Pumpkin Focaccia is a wonderful canvas for creativity. While I think the brown butter and sage combination is absolute perfection, there are plenty of ways to put your own spin on it.
If you don’t have a specific ingredient, or if you’re dealing with a dietary restriction, don’t fret. For instance, if you’re out of bread flour, you can use all-purpose flour. The crumb will be a little less chewy and more cake-like, but it will still be absolutely delicious. Just be mindful that you may need to adjust the amount of flour slightly as you knead to get the right consistency. Similarly, honey can be used in place of maple syrup to activate the yeast.
Ready to get creative? Here are some of my favorite variations to try. Don’t be afraid to mix and match to create your own signature version:
- Different Herbs: If sage isn’t your favorite, fresh rosemary or thyme would also be fantastic. Add the chopped fresh herbs to the topping or even knead some directly into the dough for more flavor.
- Add Some Cheese: For an even richer, more savory bread, try sprinkling about a half cup of grated Parmesan or crumbled goat cheese over the top of the dough before baking.
- Toasted Nuts or Seeds: Press some toasted pecans, walnuts, or pepitas (pumpkin seeds) into the dimples of the dough along with the brown butter. It adds a wonderful crunch and nutty flavor.
- Sweet & Spicy Kick: Add a pinch of red pepper flakes to the brown butter for a little heat, or drizzle the finished focaccia with a touch of hot honey for a sweet and spicy finish.
- Squash Swap: If you have roasted butternut or sweet potato purée, either one can be substituted for the pumpkin purée in equal amounts for a slightly different, but equally delicious, flavor profile.
The core of this recipe is the moist, tender pumpkin dough and the rich, oily topping. As long as you keep those elements, feel free to play around with the specific flavors. Cooking should be fun, so use this recipe as a starting point and make it your own!
Pumpkin Focaccia with Brown Butter and Crispy Sage
Description: A pillowy, chewy focaccia with the subtle sweetness of pumpkin, topped with nutty brown butter, crispy sage, and flaky sea salt. It’s the perfect savory bread for any fall gathering.
Yield: 12 servings | Category: Bread | Cuisine: Italian-American
Prep Time: 2 hours | Cook Time: 25 minutes
Ingredients
- For the Dough:
- 1 cup (240ml) warm water
- 2 ¼ teaspoons instant yeast
- 1 tablespoon maple syrup
- 4 ⅓ cups (520g) bread flour
- 1 cup (245g) pumpkin purée
- 2 teaspoons fine sea salt
- ¼ cup (60ml) extra-virgin olive oil
- For the Topping:
- 6 tablespoons unsalted butter
- 12-15 fresh sage leaves
- 2 tablespoons extra-virgin olive oil
- 1 ½ teaspoons flaky sea salt
- ½ teaspoon freshly cracked black pepper
Instructions
- Activate yeast in warm water and maple syrup until foamy (5-10 min).
- Mix in flour, pumpkin purée, salt, and ¼ cup olive oil. Knead for 5-7 minutes (mixer) or 8-10 minutes (hand) until smooth.
- Let dough rise in an oiled, covered bowl for 60-90 minutes, until doubled.
- Press dough into an oiled 9×13-inch pan. Let rise again, covered, for 30-45 minutes.
- Preheat oven to 425°F. Make the topping by melting butter with sage leaves until butter browns and sage is crispy. Remove sage leaves and whisk olive oil into the butter.
- Dimple the risen dough with oiled fingers. Pour brown butter mixture over the top.
- Bake for 20-25 minutes until golden brown.
- Top immediately with flaky salt, pepper, and crumbled crispy sage. Cool slightly before serving.
Notes
Ensure you are using 100% pure pumpkin purée, not pumpkin pie filling. The quality of your olive oil will make a big difference in the final flavor.
Servings: 12 | Calories: 295 kcal | Fat: 12g | Carbohydrates: 40g | Protein: 7g
5 FAQs About Pumpkin Focaccia
Here are some straightforward answers to the most common questions I receive about this Pumpkin Focaccia recipe.
Can I make this pumpkin focaccia dough ahead of time?
Absolutely! This is one of the great things about this dough. You have a couple of options for making it ahead. The best method is to do a cold ferment in the refrigerator. After you’ve mixed and kneaded the dough (Step 2), place it in the lightly oiled bowl, cover it tightly with plastic wrap, and place it directly into the refrigerator. It can rest in there for up to three days.
The cold environment slows down the yeast activity, allowing the dough to rise very slowly while developing a more complex, nuanced flavor. When you’re ready to bake, just take the bowl out of the fridge, let it sit on the counter for about an hour or two to come to room temperature, and then proceed with shaping it in the pan (Step 4) and doing the second rise. This is a perfect trick for holiday baking or entertaining when you want to get some of the prep work done in advance.
Why didn’t my pumpkin focaccia dough rise?
A dough that doesn’t rise can be so discouraging, but it’s almost always due to one of a few common issues. The number one culprit is usually the yeast. Your yeast might be old or expired. Always check the date on the packet. Another possibility is that the water you used to activate it was either too hot, which kills the yeast, or too cold, which won’t wake it up. The water should feel comfortably warm to the touch, like a baby’s bath, around 110°F.
The other major factor is the environment. Yeast is a living thing, and it loves a warm, cozy spot to do its work. If your kitchen is cold or drafty, the rise will take much, much longer. Try finding the warmest spot in your house. My favorite trick is to place the covered bowl in my oven (make sure the oven is off!) with just the oven light turned on. This creates a perfect, slightly warm environment for the dough to thrive and double in size.
Can I use all-purpose flour instead of bread flour for pumpkin focaccia?
Yes, you can definitely use all-purpose flour in a pinch. The bread will still turn out beautifully and be very delicious. The main difference you’ll notice is in the texture. Bread flour has a higher protein content than all-purpose flour. This extra protein develops more gluten when the dough is kneaded, which results in a bread with a chewier, more elastic crumb, which is characteristic of a good focaccia.
When you use all-purpose flour, the resulting crumb will be a bit softer, lighter, and more tender, almost like a very rich dinner roll. It’s not a bad thing at all, just different. You might also find that you need to add a little less or a little more flour to get the dough to the right consistency, as different flours absorb moisture differently. Just add it a tablespoon at a time until the dough is smooth and tacky, but not overly sticky.
What’s the difference between pumpkin purée and pumpkin pie filling for this recipe?
This is such an important question, and using the wrong one can completely change the outcome of your Pumpkin Focaccia. You must use 100% pure pumpkin purée. The only ingredient on the can should be “pumpkin.” This product is simply cooked and mashed pumpkin, with no added sweeteners or spices. It provides the moisture, color, and subtle earthy flavor we want for this savory bread.
Pumpkin pie filling, on the other hand, is a convenience product designed for making pies. It comes pre-mixed with sugar, spices like cinnamon, nutmeg, and cloves, and sometimes other thickeners. If you use it in this recipe, your focaccia will be far too sweet and will have the flavor profile of a dessert, which will clash with the savory brown butter and sage topping. Always double-check the can before you buy!
How do I get those signature dimples in my pumpkin focaccia?
Getting those beautiful, deep dimples is not only fun, but it’s also crucial for the texture and flavor of the finished bread. Those little wells are what hold the delicious pools of brown butter and olive oil, ensuring every bite is moist and flavorful. The key is to be gentle with the dough during its second rise, but firm when you make the dimples. Let the dough get nice and puffy in the pan.
Before you start dimpling, coat your fingertips in olive oil. This is a non-negotiable step, as it prevents your fingers from sticking to the delicate dough and tearing it. Then, press your fingers straight down into the dough, firmly enough that you can feel the bottom of the pan. Don’t be shy! You want to create deep indentations all over the surface. These dimples will trap the topping and also help prevent huge, uneven air bubbles from forming as the bread bakes, giving you that classic focaccia look.
Try These Recipes Next
If you had as much fun making this Pumpkin Focaccia as my family has eating it, I know you’ll be looking for your next kitchen project. There’s nothing quite like the satisfaction of creating something delicious from scratch to share with the people you love.
Whether you’re planning a big holiday meal or just looking for some new everyday favorites, I have plenty of recipes that I think you’ll enjoy. These are some of the most popular collections on the blog, full of tested and perfected dishes that are sure to become staples in your home, just as they are in mine.
Take a look around, and I hope you find some new inspiration!
- Thanksgiving Dinner Ideas: This focaccia is a perfect addition to any Thanksgiving table. If you’re looking for more showstoppers for the big day, from the turkey to the sides to the desserts, this is the perfect place to start planning your menu.
- 110 Easy Dinner Ideas: We all have those busy weeknights where getting a delicious meal on the table feels like a challenge. This collection is my go-to for simple, satisfying dinners that don’t require hours in the kitchen.
- Easy Breakfast Ideas: Start your day off right! This list is packed with everything from quick weekday options to more leisurely weekend brunch recipes that are perfect for a slow Saturday morning.
Happy cooking, y’all! I can’t wait to see what you make next.
Just tried this to prep for Thanksgiving, it’s incredible. Did half with feta cheese on top and served with honey. Can’t wait for everyone to try.