
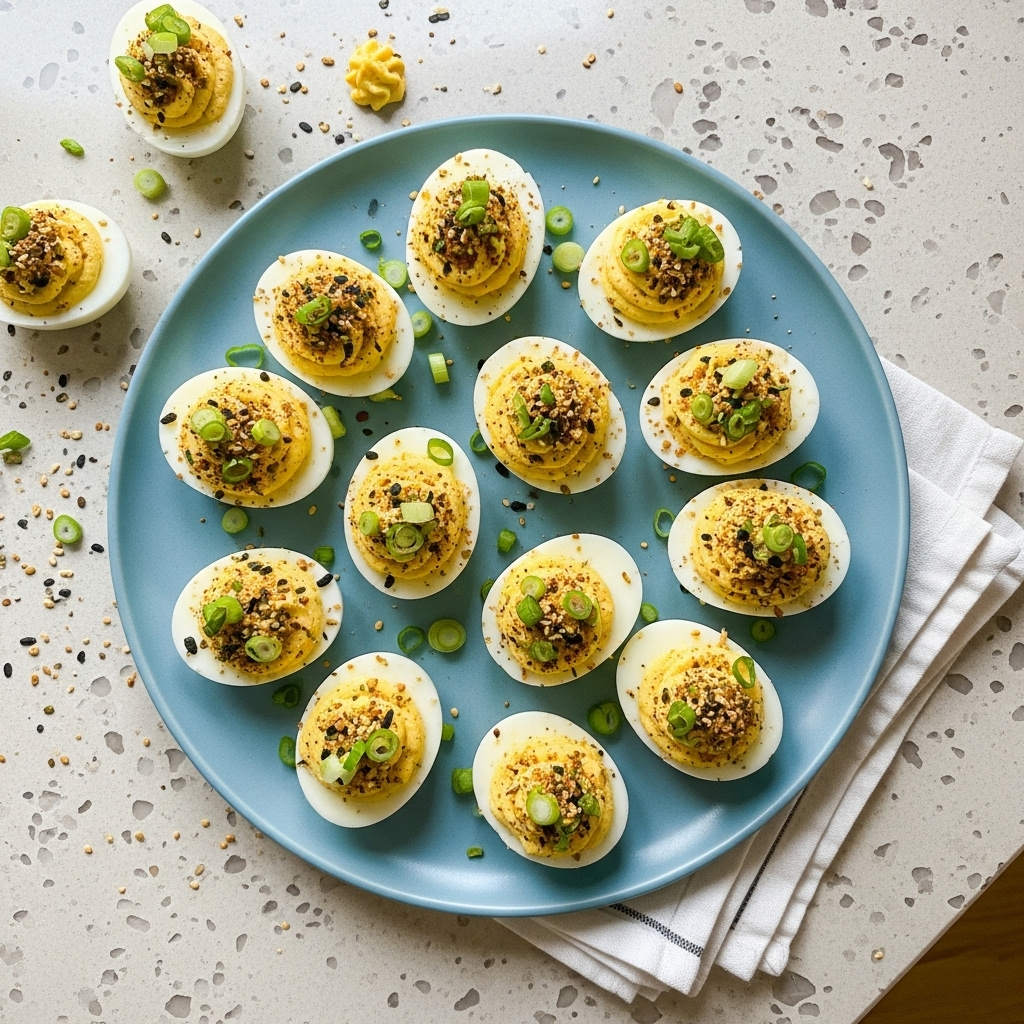
Savory Miso Deviled Eggs with Furikake
These are not your grandmother’s deviled eggs, but I promise they are about to become your new family favorite.
I’ll be the first to admit that I’m a stickler for tradition when it comes to classic Southern recipes. For years, my deviled eggs recipe was a carbon copy of my mother’s, which was a copy of hers. It involved mayonnaise, a splash of pickle juice, a little mustard, and a sprinkle of paprika. It was perfect, or so I thought.
That all changed on a weekend trip to Savannah with my husband. We ducked into a little restaurant with a modern take on coastal cuisine. On the menu was an appetizer called “Umami Eggs.” I was intrigued, and what arrived at our table looked like deviled eggs but tasted like something entirely new and incredible.
The filling was impossibly creamy, deeply savory, and had this salty-sweet depth I couldn’t place. I took one bite and immediately knew I had to figure out the secret. After a little sweet-talking with our server, I got a one-word hint from the chef: miso. The lightbulb went off. Back home in my own kitchen, I started experimenting, and this spectacular recipe for Miso Deviled Eggs was born. It has all the comforting creaminess of the classic but with a secret-weapon ingredient that makes everyone ask, “What is in these?”
Why This Miso Deviled Eggs Recipe Works
Deviled eggs are the undisputed star of any Southern potluck, family reunion, or holiday spread. Their history stretches back to ancient Rome, but the version we know and love, with mayonnaise-based fillings, became popular in America in the post-war era. They are simple, elegant, and universally adored. It’s hard to improve on a classic, but this recipe truly does.
The problem with some traditional deviled eggs is that they can be a bit one-note. You get the creaminess from the mayo and a little tang from mustard or vinegar, and that’s about it. They’re good, but they don’t always leave a lasting impression.
This is where the magic of white miso paste comes in. Miso is a fermented soybean paste, a staple in Japanese cooking, and it is the absolute master of umami. Umami is often called the fifth taste, alongside sweet, sour, salty, and bitter. It’s a deep, savory, mouth-watering flavor that makes food taste richer and more complex.
By adding just a tablespoon of white miso to the yolk filling, we’re not making the eggs taste overtly Japanese. Instead, we are amplifying the natural savory flavor of the egg yolks themselves. It creates a creamy, profound flavor that is both familiar and excitingly new. The rice vinegar and touch of sugar perfectly balance the saltiness of the miso, creating a filling that is perfectly harmonious. This isn’t just a twist, it’s an upgrade.
Ingredients for Deviled Eggs
The beauty of this recipe is its simplicity. We’re using mostly classic ingredients but introducing one key player that changes the entire game. The quality of your ingredients, especially the mayo and the miso, will really shine through here.
Here is exactly what you’ll need to gather from your pantry and fridge:
- 6 large eggs
- ¼ cup high-quality mayonnaise
- 1 tablespoon white miso paste
- 1 teaspoon rice vinegar
- ½ teaspoon Dijon mustard
- ¼ teaspoon sugar
- Salt and fresh black pepper, to taste
- Furikake seasoning, for garnish
- 1 scallion, thinly sliced, for garnish
A Note on Key Ingredients:
White Miso Paste: This is our star ingredient. You’ll find it in the refrigerated section of most grocery stores, often near the tofu or other fermented products. White miso, also known as shiro miso, is fermented for a shorter time, giving it a milder, sweeter flavor compared to its red or yellow counterparts. This subtlety is perfect for our deviled eggs, as it enhances the flavor without overpowering it.
High-Quality Mayonnaise: This is no place for watery, bland mayonnaise. The mayo forms the creamy foundation of our filling. I’m a Southern gal, so I am partial to Duke’s, which has a wonderful richness and tang. Use your favorite full-fat, high-quality brand for the best results.
Furikake Seasoning: This Japanese condiment is a blend of dried fish, sesame seeds, seaweed, sugar, and salt. It adds a fantastic crunchy texture and a salty, oceanic flavor that complements the creamy filling beautifully. It’s an absolute must for the garnish and takes these deviled eggs over the top.
Step-by-Step Instructions For Making Deviled Eggs
Making these deviled eggs is a straightforward process, but a few key techniques will ensure you get perfectly cooked eggs, an ultra-creamy filling, and a beautiful final presentation. Let’s walk through it together.
Step 1: Cook the Eggs
Place your six large eggs in a single layer at the bottom of a saucepan. It’s important they aren’t crowded. Cover them with cold water, ensuring the water level is at least one inch above the eggs. Bring the water to a full, rolling boil over high heat. The moment it boils, put the lid on the pan, and immediately turn off the heat. Let the pan stand, covered, for exactly 11 minutes. This method gently cooks the eggs, preventing overcooking and that unappealing green ring around the yolk.
Step 2: Prepare the Ice Bath
While your eggs are resting in the hot water, fill a medium bowl with ice and cold water. This ice bath is a critical step. Once the 11 minutes are up, use a slotted spoon to immediately transfer the hot eggs into the ice bath. This shocks the eggs, stops the cooking process instantly, and makes them much easier to peel later on. Let them cool completely in the bath, which should take about 10 minutes.
Step 3: Peel and Halve the Eggs
Once the eggs are completely cool, gently tap one on the counter to crack the shell all over. I find it easiest to peel them under a thin stream of cool running water, as the water helps separate the shell from the egg white. After peeling, pat them dry and use a sharp knife to slice each egg in half lengthwise. Gently pop out the yolks and place them in a separate medium bowl. Arrange your pristine egg white halves on your serving platter.
Step 4: Mash the Yolks
This is a small step that makes a huge difference in the final texture. Before adding any other ingredients, use a fork to mash the cooked yolks until they are a very fine, sandy crumble. For an even more luxurious, silky-smooth filling, you can press the yolks through a fine-mesh sieve or use a potato ricer. Getting the yolks perfectly smooth now prevents a lumpy filling later.
Step 5: Mix the Filling
To your bowl of mashed yolks, add the mayonnaise, white miso paste, rice vinegar, Dijon mustard, and sugar. Use a flexible spatula or a small whisk to stir everything together until it is completely smooth and creamy. Give it a taste. The miso is already quite salty, so you may not need much salt. Add a pinch of salt and some fresh black pepper to your liking.
Step 6: Prepare for Piping
For that classic, elegant look, transfer the yolk mixture to a piping bag fitted with a star tip. If you don’t have a piping bag, no worries at all. A simple zip-top plastic bag works just as well. Spoon the filling into the bag, push it down to one corner, and snip a small piece off the corner. This gives you great control for filling the eggs neatly.
Step 7: Fill the Egg Whites
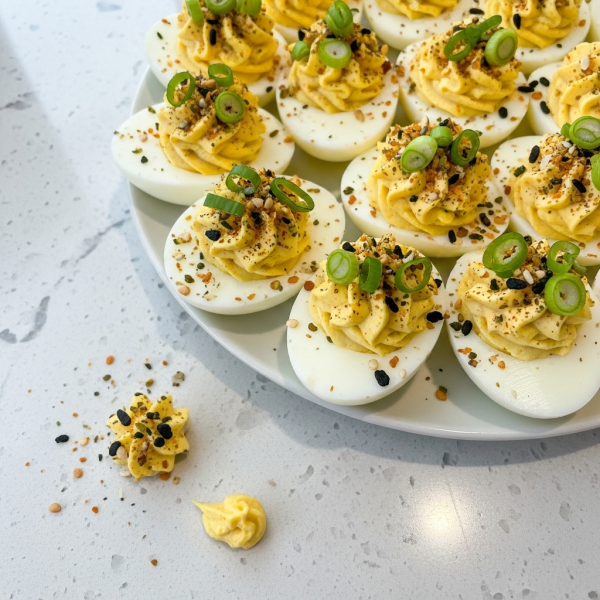
Carefully pipe the creamy yolk filling into the cavity of each egg white half. Start from the bottom and swirl your way up to create a beautiful rosette. Be generous with the filling, a nice tall swirl looks so much more appetizing than a small scoop.
Step 8: Garnish and Serve
Now for the finishing touch that makes these deviled eggs so special. Just before serving, sprinkle the filled eggs generously with the furikake seasoning and a few thinly sliced scallions. The crunch and color are just perfect. Serve them right away, or keep them chilled in the refrigerator until you’re ready to impress your guests.
Deviled Eggs Recipe
How To Serve Deviled Eggs
These Miso Deviled Eggs are a showstopper on their own, but how you present them can make them feel even more special. Of course, a classic deviled egg platter with those little indentations is always a perfect choice. It keeps them from sliding around and looks wonderfully traditional.
But don’t feel limited to a special plate. You can arrange them beautifully on any simple white platter, letting their elegant swirls and colorful garnish be the star of the show. For a more modern or rustic look, a wooden board or a slate serving platter can provide a beautiful contrast.
Here are a few of my favorite ways to serve them:
- As the Star Appetizer: For a dinner party or holiday gathering, let these eggs have their moment. Serve them as the first bite when guests arrive, perhaps with a glass of crisp white wine or a light beer. Their unique flavor is a fantastic conversation starter.
- On a Snack Board: Add these deviled eggs to a larger charcuterie or snack board. They pair wonderfully with crisp crackers, thinly sliced cured meats, and tangy pickles. The creamy texture of the eggs is a lovely contrast to crunchy and chewy elements.
- An Unexpected Brunch Addition: Move over, scrambled eggs. A plate of these Miso Deviled Eggs on a brunch buffet adds a touch of elegance and surprise. They are fantastic alongside a fresh green salad or some smoked salmon.
No matter how you serve them, I recommend serving them chilled. The filling sets up nicely in the refrigerator, and the cool temperature is wonderfully refreshing, especially on a warm day. Just be sure to add the furikake and scallion garnish right before they hit the table to maintain their fresh crunch.
How To Store & Reuse Deviled Eggs Leftovers
In my house, leftover deviled eggs are a rare occurrence, but if you do find yourself with a few extras, proper storage is key to keeping them fresh and delicious. Because they contain mayonnaise and eggs, they must be refrigerated promptly.
To store them, arrange the deviled eggs in a single layer in an airtight container. If you have a deviled egg carrier, that’s the absolute best option. If not, a shallow food storage container will work just fine. Storing them in a single layer prevents the delicate piped filling from getting squished. They will keep well in the refrigerator for up to two days.
Beyond two days, the filling can start to get a little watery, and the texture just isn’t as good. I would not recommend freezing deviled eggs, as the freezing and thawing process does terrible things to the texture of both the egg whites and the creamy filling.
Now, what to do with those leftovers? While they are perfectly good eaten as is, here’s my favorite trick:
- Create Instant Egg Salad: This is the best way to reuse leftover deviled eggs. Simply place the leftovers in a bowl and mash them up with a fork. The filling is already seasoned and creamy, so you have an instant, incredibly flavorful egg salad. It’s fantastic for a quick sandwich or served with crackers. The miso and furikake add a unique twist that makes it the best egg salad you’ve ever had.
So don’t worry if you make a big batch. Enjoy them the first day as the perfect appetizer, and look forward to a delicious and easy lunch the next day. It’s a win-win.
Substitutions & Variations For Deviled Eggs
While I believe this recipe is pretty perfect as is, I know that sometimes you need to work with what you have in your kitchen or cater to different tastes. This recipe is quite flexible, so feel free to make it your own with a few simple swaps and additions.
This is a naturally gluten-free recipe, but always double-check your miso paste and furikake labels to be sure, as some brands may have additives. Here are some fun ways to change things up:
- Mayonnaise Swap: For an even richer, more distinct Japanese-inspired flavor, you could substitute the regular mayonnaise with Kewpie mayo. Kewpie is made with only egg yolks and has a touch more rice vinegar, giving it a uniquely rich and tangy flavor that works beautifully with the miso.
- Spice It Up: If you like a little heat, add a dot of sriracha or a pinch of shichimi togarashi (a Japanese seven-spice blend) on top of each egg along with the other garnishes. A small amount of wasabi paste mixed into the filling also adds a nice, sharp kick.
- Garnish Variations: If you can’t find furikake, don’t worry. A simple sprinkle of toasted black and white sesame seeds will provide a similar nutty crunch. Finely chopped chives are a great substitute for scallions. Crispy fried shallots would also be a delicious and crunchy topping.
- Vinegar and Mustard: If you don’t have rice vinegar, apple cider vinegar is the next best substitute for its mild flavor. In place of Dijon, you could use a spicy brown mustard for a more robust flavor or even a touch of hot Chinese mustard for some sinus-clearing heat.
Think of this recipe as a fantastic starting point. The core technique of adding miso to the yolk filling is the key, and you can build upon that foundation to create a deviled egg that is perfectly suited to your palate.
Miso Deviled Eggs with Furikake
Description: A classic Southern appetizer gets a modern, savory twist. Creamy egg yolk filling is infused with the rich umami of white miso paste and topped with a crunchy, flavorful furikake seasoning for a truly unforgettable deviled egg experience.
Yield: 12 deviled egg halves | Category: Appetizer | Cuisine: American, Japanese
Prep Time: 15 minutes | Cook Time: 11 minutes
Ingredients
- 6 large eggs
- ¼ cup high-quality mayonnaise
- 1 tablespoon white miso paste
- 1 teaspoon rice vinegar
- ½ teaspoon Dijon mustard
- ¼ teaspoon sugar
- Salt and fresh black pepper, to taste
- Furikake seasoning, for garnish
- 1 scallion, thinly sliced, for garnish
Instructions
- Place eggs in a saucepan, cover with 1 inch of cold water. Bring to a boil, then cover, remove from heat, and let stand for 11 minutes.
- Transfer cooked eggs to an ice bath to cool completely.
- Peel eggs, slice in half lengthwise, and remove yolks into a bowl.
- Mash yolks until fine. Add mayonnaise, miso, rice vinegar, Dijon, and sugar. Mix until completely smooth. Season with salt and pepper.
- Transfer filling to a piping bag (or zip-top bag with the corner snipped) and pipe into the egg white halves.
- Garnish with a generous sprinkle of furikake and sliced scallions just before serving.
Notes
For the smoothest filling, press the cooked egg yolks through a fine-mesh sieve before mixing with the other ingredients. Garnish just before serving to ensure the furikake stays crunchy.
Servings: 6 | Calories: 110 kcal | Fat: 9g | Carbohydrates: 2g | Protein: 6g
5 FAQs About Deviled Eggs
Here are some straightforward answers to the most common questions I receive about this deviled eggs recipe.
How do I get my Deviled Eggs filling perfectly smooth?
Achieving that luxurious, silky-smooth filling is the goal, and a lumpy texture is a common frustration. The secret starts with how you treat the yolks. It is absolutely essential to mash the cooked yolks by themselves, before adding any of the wet ingredients like mayonnaise or vinegar. Mashing them first allows you to break them down into a fine, powdery crumble without any fight.
For a good result, a simple fork will do the job if you’re patient. For a guaranteed perfect result, I highly recommend pushing the yolks through a fine-mesh sieve with the back of a spoon or using a potato ricer. This method is foolproof and breaks up every single tiny lump, creating a powdery base. Once you add the mayo and other liquids, it will come together into a wonderfully smooth, almost mousse-like consistency with minimal effort.
Why do my hard-boiled eggs for Deviled Eggs have a green ring around the yolk?
Ah, the dreaded green ring. That grey-green layer that can form around the yolk is a sign of one thing: overcooking. It’s a chemical reaction between the sulfur in the egg white and the iron in the yolk, which occurs when the egg is cooked for too long or at too high a temperature. While it’s perfectly safe to eat, it’s not very visually appealing and can sometimes be accompanied by a slightly sulfuric smell.
The method I outline in this recipe is specifically designed to prevent this. By bringing the water to a boil and then removing the pot from the heat to let the eggs cook in the residual hot water, you are cooking them gently and precisely. The 11-minute stand time is just enough to fully cook the yolk without overdoing it. Transferring them immediately to an ice bath is the second part of the solution, as it stops the cooking process cold, ensuring the yolks stay bright and perfectly yellow.
Can I make these Miso Deviled Eggs ahead of time?
Yes, you absolutely can, which is one of the reasons they are such a great party food. However, for the best possible results, I recommend making the components ahead of time but assembling them closer to when you plan to serve. The filling can be made up to two days in advance and stored in an airtight container or right in your sealed piping bag in the refrigerator. The eggs can also be cooked, peeled, and halved, then stored in a separate airtight container in the fridge.
When you’re ready to serve, simply give the filling a quick stir if needed, pipe it into your chilled egg white halves, and add the fresh garnish. Assembling them just before serving ensures the filling is at its creamiest, the whites haven’t dried out, and the crunchy furikake topping hasn’t become soft. This method gives you a freshly-made taste and appearance with all the convenience of advance prep.
What is white miso and why is it in this Deviled Eggs recipe?
White miso, also known as shiro miso, is a traditional Japanese seasoning produced by fermenting soybeans with rice. The higher percentage of rice and shorter fermentation time gives it a much milder, sweeter, and less salty flavor compared to its longer-fermented counterparts like yellow or red miso. It has a smooth, peanut butter-like consistency and a light beige color.
The reason it works so magically in this deviled eggs recipe is its ability to add a powerful punch of umami, that savory fifth taste. It adds a background depth and richness that you can’t quite identify but makes the filling taste incredibly satisfying and complex. Instead of just tasting like mayonnaise and egg, the filling becomes more savory and “eggy” in the best way possible. The mildness of the white miso is key, as it enhances the other flavors without overpowering them, which a stronger red miso might do.
What is the best way to transport Deviled Eggs to a party?
Transporting these delicate little bites can be a nerve-wracking experience. No one wants to arrive at a party with a container of scrambled deviled eggs. The absolute best tool for the job is a dedicated deviled egg carrier. These plastic containers have molded inserts that hold each egg half securely in place, preventing any sliding or tipping.
If you don’t have one and don’t want to buy one, the next best thing is a standard muffin tin. Line each cup with a paper liner, and place one deviled egg half in each cup. The cups will hold them snugly and prevent them from bumping into each other. You can then cover the whole tin tightly with plastic wrap. For a small batch, even an empty egg carton can work in a pinch. The key is to immobilize them so they arrive looking just as beautiful as when you made them.
Deviled Eggs Recipe
Try These Recipes Next
If you loved this fun twist on a classic appetizer, I know you’ll enjoy some of the other collections I’ve put together for easy and delicious entertaining. Take a peek at these posts for more inspiration!