
Easy, Homemade Auntie Anne’s Pretzels (Copycat Recipe)
There is nothing quite like the buttery, salty aroma of a freshly baked soft pretzel.
I swear, you can be clear on the other side of the mall, minding your own business, and that scent will find you. It’ll lead you right by the nose to that glowing pretzel stand. For years, my family would make a beeline for the pretzel shop every time we went out for a day of shopping. It was our little tradition.
One afternoon, sitting there with a warm pretzel in hand, I thought to myself, “Julie, you can make this at home. And I bet you can make it even better.” That’s when I set out to perfect my own copycat Auntie Anne’s Pretzels recipe. I tried and tweaked for weeks, and just when I thought I had it, I had a flash of inspiration.
Instead of just plain melted butter, what if I used browned butter in the dough itself? Well, let me tell you, that was it. That one little change took these pretzels from simply delicious to absolutely unforgettable. The nutty, toasted flavor of the browned butter adds a depth and richness that makes these homemade pretzels truly special. Now, our tradition is making them right here in my own kitchen.
Why This Auntie Anne’s Pretzels Recipe Works
The magic of Auntie Anne’s pretzels is rooted in nostalgia and pure, simple comfort. That signature soft, chewy texture and buttery, salty flavor is a combination that’s universally loved. It reminds us of fun days out, special treats, and simple pleasures. The company itself started at a farmer’s market in Pennsylvania back in the late 80s, and its popularity just exploded from there. They mastered the art of the perfect soft pretzel, and it became a staple in malls and airports across the country.
This recipe works because it captures the very essence of that beloved classic while elevating it with higher quality, homemade ingredients. We’re not cutting any corners here. The process, from activating the yeast to giving the pretzels a quick baking soda bath, is designed to replicate that authentic texture and appearance. The baking soda bath is a crucial step that many homemade recipes skip, but it’s the secret to achieving that deep golden-brown crust and classic pretzel flavor.
What really sets this particular recipe apart is the addition of browned butter directly into the dough. It’s my Southern twist on a Pennsylvania Dutch classic. This one ingredient adds a layer of warm, nutty complexity that you just don’t get from the original. It makes the dough richer and the final product taste more gourmet and thoughtfully crafted. It’s a simple change, but it makes a world of difference, turning a good copycat recipe into a great one that will have your family begging for more.
Ingredients for Auntie Anne’s Pretzels
To create these heavenly pretzels, you’ll need a handful of simple pantry staples. The real star, my secret weapon, is the browned butter. Don’t skip this step, honey, it’s what makes all the difference.
For the Pretzel Dough:
- 1 ½ cups warm water (about 110°F)
- 1 tablespoon granulated sugar
- 2 ¼ teaspoons active dry yeast (1 standard packet)
- 4 ½ cups all-purpose flour, plus more for dusting (see notes)
- 1 teaspoon salt
- ¼ cup unsalted butter, browned and cooled
For the Baking Soda Bath:
- 8 cups water
- ½ cup baking soda
For the Topping:
- ¼ cup unsalted butter, melted
- Coarse pretzel salt, for sprinkling
A few notes on these ingredients. For the flour, you can substitute bread flour if you have it on hand. Bread flour has a higher protein content, which will result in an even chewier pretzel. But a good quality all-purpose flour works just beautifully.
Now, for our key ingredient: the browned butter. It’s so important to use real, unsalted butter here. The process involves melting the butter and continuing to cook it until the milk solids toast and turn a lovely brown color, releasing an incredible nutty aroma. Let it cool slightly before adding it to your other ingredients so you don’t harm the yeast. This simple, two-minute process adds a layer of flavor that is just divine.
Step-by-Step Instructions For Making Auntie Anne’s Pretzels
Follow these steps closely, and you’ll have warm, buttery pretzels in no time. The shaping part might take a little practice, but don’t you worry, even the misshapen ones taste just as delicious!
- Proof the Yeast: In the bowl of a stand mixer or a large mixing bowl, combine the warm water, sugar, and yeast. Give it a gentle stir and let it sit for about 5 to 10 minutes until it becomes foamy. This tells you the yeast is active and ready to go.
- Make the Dough: Add the flour, salt, and your cooled browned butter to the yeast mixture. Using the dough hook attachment on your stand mixer, mix on low speed until the dough comes together. Increase the speed to medium and knead for 5 to 7 minutes, until the dough is smooth and elastic. If mixing by hand, combine the ingredients with a wooden spoon, then turn the dough out onto a lightly floured surface and knead for 8 to 10 minutes.
- First Rise: Lightly oil a clean bowl and place the dough inside, turning it over to coat. Cover the bowl with plastic wrap or a clean kitchen towel and let it rise in a warm, draft-free spot for about 1 hour, or until it has doubled in size.
- Prepare for Baking: Preheat your oven to 425°F. Line two baking sheets with parchment paper. Prepare the baking soda bath by bringing the 8 cups of water to a boil in a large pot. Once boiling, carefully stir in the baking soda. It will fizz up, so be mindful. Reduce the heat to a simmer.
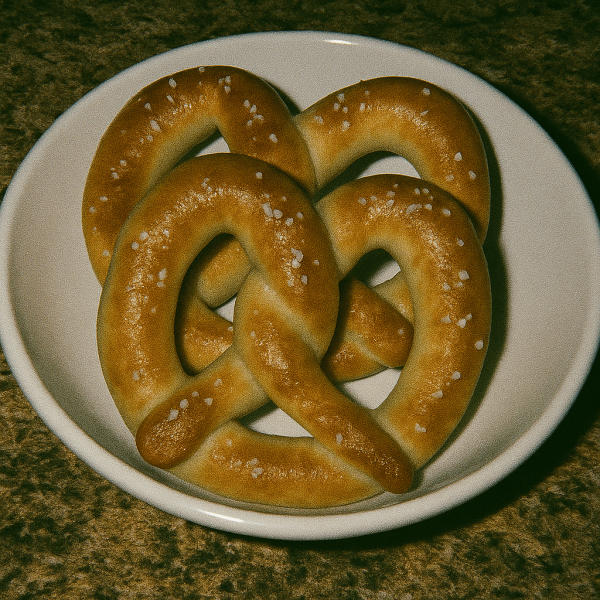
- Shape the Pretzels: Punch down the risen dough and divide it into 8 equal pieces. Roll each piece into a long rope, about 20-24 inches long. To shape, make a U-shape with the rope, then cross the ends over each other twice. Bring the twisted ends down and press them onto the bottom of the U. Place the shaped pretzel on the parchment-lined baking sheet.
- The Soda Bath: Working one or two at a time, carefully lower each pretzel into the simmering baking soda bath for about 30 seconds. Use a large slotted spoon or spatula to flip it once. This step is what gives the Auntie Anne’s Pretzels their signature color and crust, so don’t skip it! Remove the pretzel, let the excess water drip off, and place it back on the baking sheet.
- Bake to Perfection: Sprinkle the pretzels generously with coarse pretzel salt. Bake for 12 to 15 minutes, or until they are a deep golden brown. Once out of the oven, immediately brush them with the ¼ cup of melted butter. Let them cool for a few minutes before serving warm.
How To Serve Auntie Anne’s Pretzels
Serving these pretzels warm from the oven is an absolute must. That’s when they are at their softest and the butter is just perfectly melted into every nook and cranny. There’s something so comforting about pulling apart a warm, salty pretzel.
Of course, you can’t have pretzels without some delicious dips! Setting out a little dipping bar is a wonderful way to serve these, especially if you have company over. It lets everyone customize their own pretzel experience. It’s always fun to see which dip disappears first.
Here are a few of my family’s favorite ways to enjoy these homemade treats:
- Classic Cheese Sauce: A warm, gooey nacho cheese or a more sophisticated beer cheese dip is the quintessential pretzel pairing. You just can’t go wrong.
- A Variety of Mustards: Offer a trio of mustards for different tastes. A spicy brown mustard, a sweet honey mustard, and a tangy Dijon are all fantastic choices.
- Sweet Cream Cheese Dip: For a sweet and savory twist, whip some cream cheese with a little powdered sugar and a splash of vanilla. It’s surprisingly delicious with the salty pretzel.
- My Signature Pimento Cheese: Being a Southern girl, I have to recommend serving these with a bowl of homemade pimento cheese. The creamy, sharp dip is a perfect match for the rich, browned butter flavor in the pretzels.
No matter how you serve them, make sure you have plenty of napkins on hand. These buttery pretzels are a delicious, hands-on treat that’s worth every single bite.
How To Store & Reuse Auntie Anne’s Pretzels Leftovers
On the rare occasion that we have any of these pretzels left over, storing them properly is key to enjoying them later. Because they’re best fresh, they can lose their signature softness if left out for too long. But with the right approach, you can keep them tasting great.
The best way to store leftovers is to let them cool completely first. Trapping steam will make them soggy. Once cool, you have a couple of options depending on how soon you plan to eat them. I find the oven is the best way to bring them back to life.
Here’s how I handle storing and reheating:
- Room Temperature Storage: For short-term storage, place the cooled pretzels in an airtight container or a zip-top bag. They’ll keep at room temperature for up to two days. They will lose some of their softness, but a quick reheat will fix that.
- Freezing for Later: If you want to save them for longer, freezing is the way to go. Wrap each pretzel individually in plastic wrap, then place them all in a freezer-safe bag. They can be frozen for up to two months. This is a great way to have a quick snack on hand!
- Reheating: To reheat, preheat your oven to 350°F. Place the pretzels on a baking sheet and bake for 3-5 minutes if they were at room temperature, or 8-10 minutes if they were frozen. This will make them warm, soft, and just a little bit crisp again.
- Creative Reuse: If your pretzels get a bit stale, don’t you dare throw them out! Cut them into bite-sized pieces, toss with a little olive oil and seasoning, and bake until crisp to make pretzel croutons for a salad. Or, crush them up to make a fantastic, salty crust for chicken or fish.
A little planning means you can enjoy every last crumb of these delicious homemade Auntie Anne’s Pretzels, even days after you’ve baked them.
Substitutions & Variations For Auntie Anne’s Pretzels
While my browned butter version of this recipe is just about perfect in my book, one of the joys of home cooking is making a recipe your own. There are plenty of ways to put your own spin on these classic soft pretzels. Whether you have dietary needs or are just feeling a little creative, these simple swaps can yield delicious results.
Feel free to experiment with toppings. The classic coarse salt is wonderful, but the possibilities are truly endless. Just be sure to add your toppings before baking so they adhere properly to the dough.
Here are some fun substitutions and variations to try with this Auntie Anne’s Pretzels recipe:
- Cinnamon Sugar Pretzels: For a sweet treat, skip the salt. After the pretzels come out of the oven and you brush them with melted butter, immediately dredge them in a mixture of cinnamon and granulated sugar. These are divine with a cream cheese frosting dip.
- Everything Bagel Pretzels: Instead of salt, sprinkle the pretzels generously with everything bagel seasoning before baking. This savory version is fantastic on its own or dipped in cream cheese.
- Herb-Infused Dough: Add a tablespoon of finely chopped fresh herbs like rosemary or thyme to the dry ingredients when making the dough. This adds a lovely, aromatic flavor that pairs beautifully with the browned butter.
- Whole Wheat Version: For a heartier pretzel, you can substitute up to half of the all-purpose flour with whole wheat flour. You may need to add an extra tablespoon or two of water, as whole wheat flour is a bit thirstier.
- Pretzel Bites: Instead of shaping the dough into large pretzels, roll the ropes and cut them into 1-inch pieces. Proceed with the soda bath and baking as directed, just reduce the baking time to about 10 minutes. These are perfect for parties and easy dipping.
Don’t be afraid to play with your food, y’all. That’s how the best family recipes are born. Let me know in the comments if you discover a new favorite combination!
5 FAQs About Auntie Anne’s Pretzels
Here are some straightforward answers to the most common questions I receive about this homemade Auntie Anne’s Pretzels recipe.
Why is the baking soda bath necessary for Auntie Anne’s Pretzels?
Oh, this is such a great question, and it’s truly the most important step for getting that authentic pretzel experience! The baking soda bath is a non-negotiable part of the process. Skipping it will leave you with what is essentially just pretzel-shaped bread. It will be pale, and it won’t have that classic, slightly crisp, and chewy crust.
What’s happening on a scientific level is that the baking soda creates an alkaline solution. When you dip the pretzel dough in this hot alkaline water, it gelatinizes the starches on the surface of the dough. This process is what kickstarts the Maillard reaction in the oven, allowing the pretzels to brown beautifully and develop that deep, mahogany color we all know and love. It also gives them their signature tangy flavor. So, while it might seem like an extra fussy step, it’s the secret that transforms plain dough into a real pretzel.
How do I get the classic Auntie Anne’s Pretzels shape?
Getting that perfect pretzel twist can feel a little intimidating at first, but I promise it’s easier than it looks. A little practice is all it takes! The key is to work with a relaxed dough and not to rush. After you’ve divided your dough, let the pieces rest for a minute or two if they keep springing back when you try to roll them. This lets the gluten relax.
Start by rolling one piece of dough into a long, even rope about 20 to 24 inches long. Lay the rope on your work surface in a “U” shape with the curve facing you. Now, take the two ends of the rope, cross them over each other, and then cross them one more time to create a double twist. Finally, lift the twisted ends up and bring them down to the bottom curve of the “U”. Gently press the ends onto the dough to secure them. Don’t press too hard, just enough so they stick. And there you have it! Don’t worry if your first few look a little wonky, they’ll still taste amazing.
Can I make the dough for these Auntie Anne’s Pretzels ahead of time?
Yes, you absolutely can, which makes this a great recipe for planning ahead! You have a couple of options. You can prepare the dough through the first rise, then punch it down, cover it tightly with plastic wrap, and refrigerate it for up to 24 hours. The cold temperature will slow down the yeast activity. This slow, cold fermentation can actually develop a more complex and delicious flavor in the dough.
When you’re ready to bake, just take the dough out of the refrigerator and let it sit at room temperature for about 30-60 minutes to take the chill off. Then, you can proceed with dividing, shaping, and the rest of the recipe as written. This method is wonderful for busy days or when you want fresh pretzels for a party without having to start from scratch the day of.
What’s the best flour to use for homemade Auntie Anne’s Pretzels?
The type of flour you use will definitely have an impact on the final texture of your pretzels. For this recipe, I call for all-purpose flour because it’s what most home cooks have in their pantry, and it produces a wonderfully soft and delicious pretzel. It creates a tender crumb that is very similar to what you’d find at the mall pretzel stand.
However, if you are a true pretzel aficionado and want an even chewier texture, I highly recommend using bread flour. Bread flour has a higher protein (gluten) content than all-purpose flour. This extra gluten develops into a stronger, more elastic dough, which in turn bakes up into a pretzel with a more substantial, satisfying chew. You can substitute it one-for-one in this recipe without any other adjustments. Both are excellent choices, so it really just comes down to personal preference for a softer pretzel versus a chewier one.
My Auntie Anne’s Pretzels came out hard instead of soft. What did I do wrong?
Oh, that’s so frustrating when that happens! A hard pretzel is usually the result of a few common issues, but they are all easily fixable. The most likely culprit is the amount of flour. It’s very easy to add too much flour, especially if you’re measuring by scooping your cup directly into the flour bag. This compacts the flour, and you can end up with significantly more than the recipe calls for. Too much flour creates a dense, dry dough that bakes up hard. Always try to spoon your flour into the measuring cup and level it off.
Another reason could be overbaking. Ovens can vary, so keep a close eye on your pretzels. You’re looking for a deep golden brown color. If you leave them in too long, they will dry out and become hard. Lastly, make sure your yeast is fresh and properly activated. If the yeast doesn’t get foamy in the first step, it might be old, and your dough won’t rise properly, leading to a denser, harder final product. Double-checking these few things should get you perfectly soft pretzels every time.