
I Perfected This Classic Cheesecake Recipe With Brown Butter
This is, without a doubt, the best cheesecake recipe you will ever make.
I know, I know, that’s a mighty bold claim. But hear me out. For years, my go-to special occasion dessert was a classic cheesecake recipe passed down from my husband’s grandmother. It was lovely, dependable, and always a crowd pleaser. But one afternoon, while making a batch of brown butter for some pecan sandies, that incredible nutty aroma filled my kitchen, and a little lightbulb went off.
What if I took that same toasty, complex flavor and worked it into Grandma’s cheesecake? It felt a little scandalous, like I was messing with a sacred text. I started with the crust, swapping melted butter for brown butter. The result was so much deeper and more flavorful. Then, I got brave and worked a little liquid gold into the filling itself.
The first bite was a revelation. It was still the creamy, tangy cheesecake everyone loved, but with a new layer of warmth and nutty richness that was absolutely intoxicating. It transformed a classic dessert into something truly special. This Brown Butter Cheesecake is now my signature, the one recipe everyone begs me for, and I am so excited to share it with y’all.
Why This Cheesecake Recipe Works
Classic New York style cheesecake is a culinary icon for a reason. Its dense, smooth texture and tangy flavor profile have made it a beloved dessert across the world. It’s rich, satisfying, and serves as a perfect canvas for all sorts of toppings and flavors. For many, it represents the gold standard of what a cheesecake should be, a benchmark against which all others are measured.
Our recipe honors that tradition. We use full-fat cream cheese and sour cream to get that signature dense creaminess, and a touch of fresh lemon juice to provide the necessary tang that cuts through all that richness. We bake it in a gentle water bath to ensure a perfectly even texture and a crack-free top. It has all the hallmarks of a truly great, traditional cheesecake.
But the secret, the little twist that takes this recipe from great to absolutely unforgettable, is brown butter. Known in classic French cooking as beurre noisette, brown butter is simply butter that has been cooked until the milk solids toast and turn a beautiful amber brown. This simple process creates an incredibly nutty, toasty, and almost caramel-like aroma and flavor.
We use it in both the graham cracker crust and the filling. In the crust, it adds a remarkable depth that regular melted butter just can’t match. In the filling, it lends a subtle warmth and complexity that complements the tangy cream cheese beautifully. This one simple step elevates the entire cheesecake, creating a sophisticated and deeply satisfying dessert that will have everyone asking for your secret.
Ingredients for My Brown Butter Cheesecake
The beauty of a good cheesecake lies in its simple, high-quality ingredients. For this recipe, it’s especially important to use full-fat dairy and to make sure your cold ingredients are truly at room temperature. This is the key to a lump-free, perfectly smooth filling.
Our star ingredient, of course, is the unsalted butter that we will transform into nutty, fragrant brown butter. This one ingredient is what elevates the entire dessert, so don’t be tempted to skip the browning process. It only takes a few extra minutes and the payoff is immense. You’ll use this liquid gold in both the crust and the filling.
For the Brown Butter Graham Cracker Crust:
- 1 ½ cups (150g) graham cracker crumbs
- ¼ cup (50g) granulated sugar
- A pinch of fine sea salt
- 6 tablespoons (85g) unsalted butter
For the Brown Butter Cheesecake Filling:
- 32 ounces (904g) full-fat block cream cheese, softened to room temperature
- 1 ⅔ cups (330g) granulated sugar
- 4 large eggs, at room temperature
- 1 cup (240g) full-fat sour cream, at room temperature
- 3 tablespoons (43g) unsalted butter
- 1 ½ teaspoons vanilla bean paste or pure vanilla extract
- 2 tablespoons fresh lemon juice
- ¼ teaspoon freshly grated nutmeg
- ¼ teaspoon fine sea salt
A few notes on these ingredients can make all the difference. For the cream cheese, be sure to use the full-fat, brick-style kind, not the whipped kind sold in tubs. The block cream cheese has a lower water content, which is crucial for the dense texture we want. For the vanilla, I adore using vanilla bean paste because you get those beautiful little black specks in the final cheesecake, but a high-quality pure vanilla extract works wonderfully too. Lastly, using freshly grated nutmeg provides a much warmer and more aromatic spice note than the pre-ground variety.
Step-by-Step Instructions For Making Cheesecake
Making a showstopping cheesecake is all about technique and patience. Don’t rush the process. Read through the steps before you begin, and you’ll find it’s much simpler than it seems. The most important things are using room temperature ingredients and being gentle with your mixing.
Step 1: Prep Your Oven and Pan
First things first, get your oven ready. Position a rack right in the middle, which ensures the most even heat circulation, preventing the top from browning too quickly or the bottom from being underdone. Preheat it to 350°F. While it’s heating, lightly grease your 9-inch springform pan. This little step will help you release the cheesecake cleanly later on.
Step 2: Create the Brown Butter
This is where the magic starts. In a small, light-colored saucepan, melt all 9 tablespoons of butter over medium heat. A light-colored pan is important so you can see the color change. The butter will melt, then foam, then subside. Keep swirling the pan occasionally. Soon, you’ll see little amber-brown specks forming at the bottom and smell a wonderful, nutty aroma. Remove it from the heat immediately. Measure out 3 tablespoons for the filling and set it aside to cool. The remaining 6 tablespoons, including all those toasty brown bits, will go into our crust.
Step 3: Make the Crust
In a medium bowl, mix your graham cracker crumbs, sugar, and salt. Pour in the 6 tablespoons of brown butter and mix it all together with a fork until it looks like wet sand and all the crumbs are evenly moistened. Press this mixture firmly into the bottom of your prepared springform pan. Use the bottom of a measuring cup to pack it down tightly. Make sure to press it about an inch up the sides to create a nice edge.
Step 4: Par-Bake the Crust
Bake the crust for 10 minutes. This quick bake, called par-baking, makes the crust crisp and helps prevent a soggy bottom once you add the filling. It will be fragrant and just starting to turn golden. Set it on a wire rack to cool down completely while you make the filling. Now, turn your oven temperature down to 325°F for the cheesecake itself.
Step 5: Mix the Cream Cheese Base
In a large bowl with a hand mixer or in a stand mixer with the paddle attachment, beat the room-temperature cream cheese and sugar together on medium-low speed. This is the most important step for a smooth texture. Let it go for a good 3 to 4 minutes, stopping to scrape down the sides and bottom of the bowl frequently. You want it to be completely smooth, with absolutely no lumps.
Step 6: Gently Add the Eggs
Switch your mixer to low speed. Add the room-temperature eggs one at a time, mixing only until the yellow of the yolk disappears into the batter after each addition. The biggest mistake people make is overmixing the eggs. This incorporates too much air, which causes the cheesecake to puff up in the oven and then crack as it cools.
Step 7: Finish the Filling
With the mixer still on low, add the sour cream, the reserved 3 tablespoons of cooled brown butter, vanilla, lemon juice, nutmeg, and salt. Mix just until everything is blended and the batter is smooth. Give the bowl one final scrape to make sure no bits are stuck to the bottom.
Step 8: Prepare for the Water Bath
A water bath is the secret to a perfect cheesecake. It creates steam in the oven for gentle, even baking. Take your cooled springform pan and wrap the outside with two layers of heavy-duty aluminum foil, making sure it’s snug and watertight. Place the wrapped pan inside a larger roasting pan.
Step 9: Assemble and Pour the Water
Pour your beautiful filling over the cooled crust and smooth the top with a spatula. Now, carefully pour hot water into the roasting pan, around the outside of your springform pan, until the water comes about halfway up the sides. Be very careful not to splash any water into the cheesecake itself.
Step 10: Bake the Cheesecake
Carefully place the whole setup into your preheated 325°F oven. Bake for 60 to 70 minutes. You’ll know it’s done when the edges look set and a little puffed, but the very center, about a 2 to 3-inch circle, still has a slight wobble to it when you gently nudge the pan. It should jiggle like set Jell-O, not slosh like liquid.
Step 11: Cool Down Slowly
Sudden temperature changes are the enemy of cheesecake. To prevent cracks, turn the oven off completely. Prop the oven door open just a crack with a wooden spoon and let the cheesecake cool down in the oven for one full hour.
Step 12: Cool at Room Temperature
After an hour, remove the cheesecake from the oven and the water bath. Carefully peel off the foil and place the pan on a wire rack. Let it continue to cool completely to room temperature on your counter.
Step 13: Chill, Chill, Chill
Once it’s at room temperature, cover the cheesecake loosely with plastic wrap and move it to the refrigerator. It needs to chill for at least 6 hours, but overnight is truly best. This time allows the cheesecake to set up fully and for the flavors to deepen and meld. Be patient, it’s worth the wait!
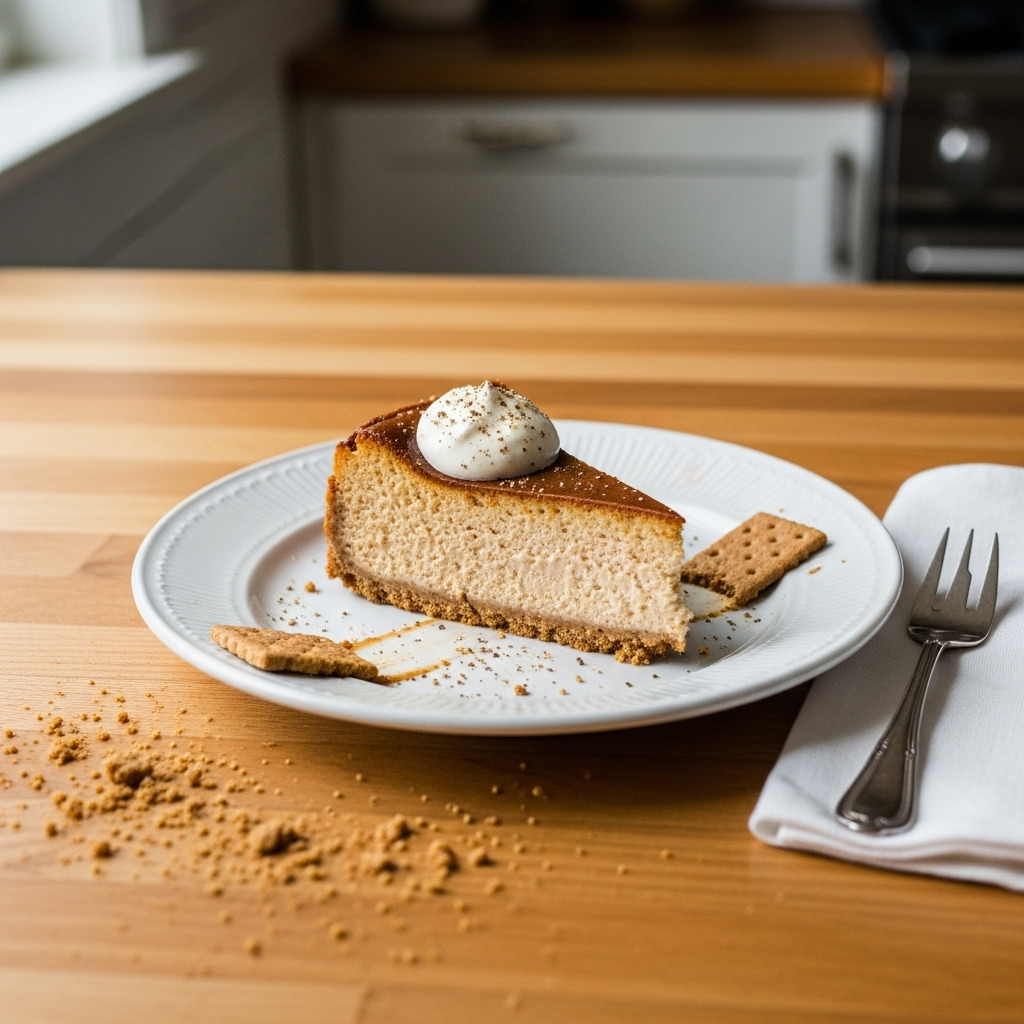
How To Serve Cheesecake
After all that patient waiting, it’s finally time to enjoy a slice of your incredible Brown Butter Cheesecake. Honestly, this cheesecake has such a wonderful, complex flavor from the nutty butter and warm spices that it needs absolutely nothing else. Serving a pure, unadorned slice is a perfect way to let those flavors truly shine. A hot cup of coffee or a cold glass of milk on the side is all you need.
Of course, if you’re looking to dress it up for a special occasion, there are plenty of toppings that pair beautifully with it. The key is to choose flavors that complement, not overpower, the star of the show.
- Salted Caramel Sauce: A drizzle of warm, homemade salted caramel sauce is a heavenly match for the nutty notes in the cheesecake.
- Fresh Berries: A simple pile of fresh raspberries, sliced strawberries, or blueberries provides a bright, tart contrast that cuts through the richness beautifully.
- Bourbon Whipped Cream: Elevate classic whipped cream by adding a tiny splash of good Kentucky bourbon and a hint of vanilla. It’s a subtle, sophisticated Southern touch.
- Toasted Pecans: Echo the nutty flavor by sprinkling some roughly chopped and lightly toasted pecans over the top right before serving.
- Dark Chocolate Ganache: For the ultimate indulgence, a light drizzle of rich, slightly bitter dark chocolate ganache creates a stunning presentation and a decadent flavor combination.
When you’re ready to serve, run a thin, sharp knife around the edge of the cheesecake before releasing the springform collar. For perfectly clean slices, dip your knife in a tall glass of hot water and wipe it clean between each and every cut. It’s an extra step that makes all the difference in presentation.
How To Store & Reuse Cheesecake Leftovers
If you find yourself with leftover cheesecake, which is a rare occasion in my house, proper storage is key to keeping it just as delicious as the first slice. Because it’s a dairy-rich dessert, it must always be stored in the refrigerator. The best way to store it is in an airtight container to protect it from drying out and from absorbing any other odors from the fridge.
If you don’t have a cake carrier, you can cover it loosely with plastic wrap. Just be mindful that the plastic wrap can sometimes stick to the top. It will stay fresh and delicious for up to 5 days in the refrigerator.
- Refrigerating Slices: If you’re storing individual slices, place them in an airtight container. This makes for a perfect grab-and-go treat when a craving strikes.
- Freezing a Whole Cheesecake: You can absolutely freeze this cheesecake. Let it chill completely in the fridge overnight. Then, place the whole, unsliced cheesecake on a baking sheet and freeze it until solid, about 2 hours. Once firm, wrap it tightly in a double layer of plastic wrap, followed by a layer of aluminum foil. It will keep for up to 3 months.
- Freezing Individual Slices: My favorite method is to freeze individual slices. Place the slices on a baking sheet to freeze until solid. Then, wrap each slice in plastic wrap and foil and store them in a freezer-safe zip-top bag. This way, you can thaw one perfect slice at a time.
To enjoy your frozen cheesecake, simply thaw it in the refrigerator. A single slice will take a few hours, while a whole cheesecake should be thawed overnight. Never try to thaw cheesecake on the counter, as it can affect the texture. Leftover slices are perfect as they are, but you could also crumble a slice over a bowl of vanilla ice cream for a truly decadent dessert experience.
Substitutions & Variations For This Cheesecake
While I believe this Brown Butter Cheesecake recipe is perfect as is, I know how much fun it can be to put your own personal spin on things in the kitchen. This recipe is a wonderful base for experimentation. As long as you keep the core ratios of cream cheese, sugar, and eggs the same, you have some room to play.
The easiest place to start is with the crust. Graham crackers are classic, but you can create a completely different flavor profile by swapping them out. Just make sure you grind your substitute into fine crumbs.
- Crust Variations: Try using Biscoff cookie crumbs for a spiced, caramelized flavor that pairs wonderfully with the brown butter. Gingersnaps would add a zesty, spicy kick, perfect for the holidays. For a sweet and salty twist, try using finely crushed pretzels.
- Flavor Add-Ins: For a richer cheesecake, you could gently fold in a half cup of toffee bits into the batter at the very end. A tablespoon of bourbon or dark rum added with the vanilla would also add a lovely warmth and complexity.
- Spice It Up: If you love warm spices, feel free to add a quarter teaspoon of ground cinnamon or cardamom to the filling along with the nutmeg. It will make the cheesecake feel even cozier.
- Make It Gluten-Free: This recipe is easily adapted for a gluten-free diet. Simply substitute the graham crackers in the crust with your favorite gluten-free graham-style crackers or crunchy cookies. The filling itself is naturally gluten-free.
No matter what little tweaks you make, the key techniques remain the same. Use room temperature ingredients, don’t overmix your eggs, and use that slow cooling method to prevent cracks. Happy experimenting!
Julie’s Brown Butter Cheesecake
Description: A classic, creamy cheesecake elevated with the nutty, toasty flavor of brown butter in both the crust and the filling. This is a showstopping dessert perfect for any special occasion.
Yield: 12 servings | Category: Dessert | Cuisine: American
Prep Time: 30 minutes | Cook Time: 1 hour 10 minutes
Ingredients
- For the Crust: 1 ½ cups graham cracker crumbs, ¼ cup granulated sugar, pinch of salt, 6 tbsp unsalted butter.
- For the Filling: 32 oz full-fat block cream cheese (softened), 1 ⅔ cups granulated sugar, 4 large eggs (room temp), 1 cup full-fat sour cream (room temp), 3 tbsp unsalted butter, 1 ½ tsp vanilla bean paste, 2 tbsp fresh lemon juice, ¼ tsp freshly grated nutmeg, ¼ tsp fine sea salt.
Instructions
- Preheat oven to 350°F. Grease a 9-inch springform pan.
- Make brown butter with all 9 tbsp of butter. Reserve 3 tbsp for filling; use remaining 6 tbsp for crust.
- Mix crust ingredients, press into pan, and bake for 10 minutes. Cool completely. Reduce oven to 325°F.
- Beat softened cream cheese and sugar until completely smooth.
- On low speed, add eggs one at a time, mixing just until combined.
- Mix in sour cream, cooled brown butter, vanilla, lemon juice, nutmeg, and salt until just blended.
- Wrap pan in foil, place in a roasting pan. Pour filling into crust. Add hot water to the roasting pan to create a water bath.
- Bake 60-70 mins, until center has a slight jiggle.
- Turn off oven, prop door open, and cool in oven for 1 hour.
- Cool to room temp on a wire rack, then chill in refrigerator for at least 6 hours, preferably overnight.
Notes
Using room temperature cream cheese, sour cream, and eggs is absolutely essential for a smooth, lump-free cheesecake filling. Do not skip the water bath or the slow cooling process, as these are the keys to preventing cracks.
Servings: 12 | Calories: 650 kcal | Fat: 45g | Carbohydrates: 55g | Protein: 9g
5 FAQs About This Brown Butter Cheesecake
Here are some straightforward answers to the most common questions I receive about this cheesecake recipe.
Why did my cheesecake crack?
Oh, the dreaded crack. It’s the number one fear for any cheesecake baker, but it’s usually preventable. The most common culprit is overmixing the batter after the eggs have been added. When you beat the eggs too much or on too high a speed, you incorporate excess air. In the oven, that air expands, causing the cheesecake to puff up like a souffle and then, as it cools and contracts, it cracks down the middle. Always mix on low speed and just until the eggs are combined.
Another major cause is a drastic change in temperature. Taking a cheesecake from a hot oven directly into the cool air of your kitchen can shock it, causing it to contract too quickly and crack. This is why the slow cooling method, first in the turned-off oven and then on the counter, is so critical. Finally, a dry oven environment can lead to cracks, which is why the water bath is your best friend. The steam it creates keeps the cheesecake moist and helps it bake gently and evenly.
Can I make this cheesecake without a springform pan?
A springform pan, with its removable sides, is truly the ideal piece of equipment for making cheesecake because it allows for a beautiful, clean presentation without having to invert the delicate dessert. However, if you find yourself without one, you do have a couple of options, though they come with challenges. You could use a 9-inch round cake pan that is at least 3 inches deep. You must line the bottom and sides with parchment paper, leaving a few inches of overhang on two sides to act as “handles” to lift the cheesecake out after it’s thoroughly chilled. Be very careful with the water bath, as it’s harder to make a regular cake pan fully watertight.
Alternatively, you can bake the cheesecake in a deep-dish pie plate. You won’t be able to remove it from the plate, so you’ll serve it in wedges directly from the dish. While it might not look as grand as a freestanding cheesecake, it will taste just as delicious. Just be sure not to overfill the pie plate.
How do I know when my cheesecake is done baking?
Knowing when to pull a cheesecake from the oven can feel like a bit of a mystery, but there’s a simple test. The cheesecake is ready when the edges are set and slightly puffed, and the center still has a distinct wobble when you gently nudge the pan. We’re looking for a 2 to 3-inch circle in the very middle that jiggles as a whole, like Jell-O. If the center looks liquid or sloshy, it needs more time. If there’s no jiggle at all, it’s likely overbaked, which can lead to a dry, crumbly texture and cracks.
For those who prefer a more scientific method, the internal temperature of the cheesecake should be between 145°F and 150°F when measured in the very center with an instant-read thermometer. Remember that the cheesecake will continue to set as it cools and chills, so you want to pull it when that center is just barely set.
What is the purpose of the water bath for a cheesecake?
The water bath, or bain-marie, might seem like a fussy extra step, but it is the single most important technique for achieving a perfect cheesecake texture. Its purpose is twofold. First, the large pan of hot water acts as an insulator, protecting the delicate custard of the cheesecake from the direct, harsh heat of the oven. This allows the cheesecake to bake slowly and evenly from the outside in, preventing the edges from getting overcooked and rubbery before the center is set.
Second, the water creates a very humid, steamy environment inside the oven. This moisture on the surface of the cheesecake prevents it from drying out and, you guessed it, cracking. A water bath is the secret to a cheesecake that is ultra-creamy, smooth, and dense from edge to center, with a perfectly flat, beautiful top. Don’t skip it!
Can I use low-fat ingredients to make this cheesecake?
I know it’s tempting to try and lighten up such a rich dessert, but for this specific recipe, I have to give you a firm but loving “no.” Cheesecake is an indulgence, and its signature creamy texture and rich flavor rely heavily on the fat content of the dairy. Full-fat, block-style cream cheese and full-fat sour cream are essential.
Low-fat or fat-free versions of these ingredients contain more water and often have gums and other stabilizers added to them to mimic the texture of their full-fat counterparts. When baked in a cheesecake, these ingredients can fail to set up properly, resulting in a texture that is watery, grainy, or overly soft. The flavor will also be noticeably less rich and satisfying. For the best possible result that is worth every single calorie, stick with the full-fat ingredients the recipe calls for.
Try These Recipes Next
If you loved making this Brown Butter Cheesecake, I know you’ll enjoy these other recipes from my kitchen. Whether you’re planning a holiday feast or just looking for your next delicious meal, these are some of my family’s favorites!
- 110 Easy Dinner Ideas: Find the perfect main course to serve before you present your showstopping cheesecake for dessert.
- Thanksgiving Dinner Ideas: Cheesecake is a fantastic alternative to pie for the holidays, and you’ll find plenty of other festive recipes here to complete your menu.
- Easy Breakfast Ideas: Because a good day always starts with a good meal, here are some of my favorite simple and delicious breakfast recipes.