
The Ultimate Brown Butter Miso Banana Bread
This brown butter miso banana bread is about to become your new obsession.
I feel like every Southern family has a treasured banana bread recipe scribbled on a faded index card. Mine came from my great-aunt Carol, and for years, it was my go-to. It was simple, reliable, and perfectly sweet. But one evening, my husband and I were at a fancy little restaurant downtown, and I had a dessert with a miso caramel sauce. My world tilted on its axis a little bit.
That salty, savory, deeply complex flavor was unlike anything I’d ever tasted, and I couldn’t stop thinking about it. On the drive home, a crazy idea popped into my head. What if I added a little bit of that magic to Aunt Carol’s banana bread recipe? It felt almost sacrilegious, but the idea wouldn’t leave me alone.
The next weekend, I got to work. I decided to brown the butter first, to get that nutty, toasty flavor I love so much. Then, I whisked in a little bit of white miso paste along with the sugar and eggs. I held my breath as it baked, the aroma filling my kitchen with something new and exciting. The result was nothing short of a miracle. It was still the comforting banana bread I grew up with, but with an incredible depth of flavor. This is that recipe.
Why This Banana Bread Recipe Works
Banana bread has been a staple in American kitchens for nearly a century. Most food historians agree that it gained popularity during the Great Depression, when resourceful home cooks were looking for ways to use up every last scrap of food, including those overripe, brown-spotted bananas sitting on the counter. The invention of baking soda and baking powder made these quick breads possible, and a classic was born.
Its enduring popularity is no mystery. It is incredibly simple to make, fills the house with an intoxicating aroma, and transforms humble ingredients into a moist, comforting treat. It’s the perfect solution for those bananas that are just a little too far gone for your morning cereal. Everyone loves a good banana bread.
But this recipe takes that beloved classic to a whole new level with two simple, yet transformative, additions. The first is brown butter. By melting the butter and continuing to cook it until the milk solids toast, you create a liquid gold with an intense, nutty, and slightly caramelized flavor. It adds a layer of warmth and complexity that plain melted butter just can’t match.
The second, my secret weapon, is white miso paste. Before you get nervous, hear me out. Miso is a fermented soybean paste that is a cornerstone of Japanese cooking. The white variety, called shiro miso, is the mildest and has a subtle sweetness. When added to the batter, it doesn’t make the bread taste like soup. Instead, it provides a gentle, savory saltiness that balances the sweetness of the bananas and brown sugar beautifully. It adds a powerful umami quality that actually makes the banana flavor taste more intense and vibrant. It’s the ingredient you won’t be able to name, but you’ll never want to bake without again.
Ingredients for Banana Bread
A truly great loaf of banana bread starts with good ingredients. While most of these are pantry staples, a couple of key players are responsible for the unique and incredible flavor of this recipe. Pay close attention to them, as they make all the difference between a good loaf and an unforgettable one.
Here’s everything you’ll need to gather:
- 2 cups all-purpose flour
- 1 tsp baking soda
- 1/2 tsp baking powder
- 1/2 tsp ground cinnamon
- 1/4 tsp ground nutmeg
- 1/2 tsp fine sea salt
- 1/2 cup (1 stick) unsalted butter
- 1 cup packed light brown sugar
- 2 large eggs, at room temperature
- 2 tbsp white (shiro) miso paste
- 1 tsp vanilla extract
- 1 ½ cups mashed very ripe bananas (about 3-4 large bananas)
- 1/2 cup full-fat sour cream or Greek yogurt
- 1 tbsp turbinado sugar, for topping (optional)
The two most important ingredients here are the unsalted butter and the white (shiro) miso paste. Using unsalted butter is crucial because you’ll be browning it, which concentrates its flavor, and you want to control the salt level yourself, especially since miso is salty. The miso paste is the star of the show. You can find it in the refrigerated section of most well-stocked grocery stores, often near the tofu or other fermented products. Be sure to get white miso, as red or yellow varieties are much stronger and would overpower the delicate flavors here.
Don’t skimp on the ripeness of your bananas. You want them to be heavily speckled with brown, or even mostly black. These bananas are much sweeter and have a more intense flavor, which is essential for a great banana bread. Finally, the full-fat sour cream adds necessary fat and acidity, resulting in an incredibly moist and tender crumb that stays fresh for days.
Step-by-Step Instructions For Making Banana Bread
Making this banana bread is a straightforward process, but paying attention to a few key techniques will guarantee a perfect loaf every single time. We’ll walk through it together, step by step.
Step 1: Preheat Oven and Prepare Your Pan
First things first, get your oven preheating to 350°F. You want it to be fully heated by the time your batter is ready. Properly preparing your 9×5-inch loaf pan is also key. I like to grease the pan with butter or nonstick spray, then line it with a strip of parchment paper that overhangs on the two long sides. This creates a little “sling” that makes it incredibly easy to lift the finished loaf out of the pan without any risk of it sticking or breaking.
Step 2: Whisk Together Dry Ingredients
In a medium-sized bowl, combine your flour, baking soda, baking powder, cinnamon, nutmeg, and salt. Whisk them together for about 30 seconds. This step seems small, but it’s important. It ensures that the leavening agents and spices are evenly distributed throughout the flour, which will help your banana bread rise evenly and have consistent flavor in every bite.
Step 3: Brown the Butter
This is where the magic begins. Place your stick of unsalted butter in a small, light-colored saucepan over medium heat. A light-colored pan is essential so you can see the color changing. The butter will melt, then foam up. Swirl the pan occasionally. Soon, the sizzling will quiet down, and you’ll see little brown specks forming at the bottom. It will smell incredibly nutty and toasty. The moment you see those specks and smell that aroma, pull it off the heat immediately and pour it, brown bits and all, into your large mixing bowl. Don’t walk away during this step, as it can go from brown to burnt in seconds.
Step 4: Add Sugar, Eggs, Miso, and Vanilla
Let the browned butter cool in the bowl for just a few minutes so it doesn’t scramble your eggs. Add the packed brown sugar and whisk it vigorously into the butter. Next, whisk in the room-temperature eggs, one at a time, until they are fully incorporated. Now, add your miso paste and vanilla extract. It is very important to whisk until the miso is completely dissolved and the mixture is smooth. You don’t want any little clumps of miso in your finished bread.
Step 5: Fold in Bananas and Sour Cream
Switch from a whisk to a rubber spatula. Add your mashed bananas and sour cream to the bowl. Gently fold them into the wet ingredients until they are just combined. A few streaks are perfectly fine at this stage.
Step 6: Combine Wet and Dry Ingredients
Pour the dry ingredient mixture into the bowl with the wet ingredients. Now, this is the most important rule of making any quick bread: do not overmix. Gently fold the dry ingredients in with your spatula only until you no longer see big streaks of flour. A few lumps in the batter are not only okay, they are desirable. Overmixing develops gluten, which will make your banana bread tough and dense instead of tender and moist.
Step 7: Bake to Perfection
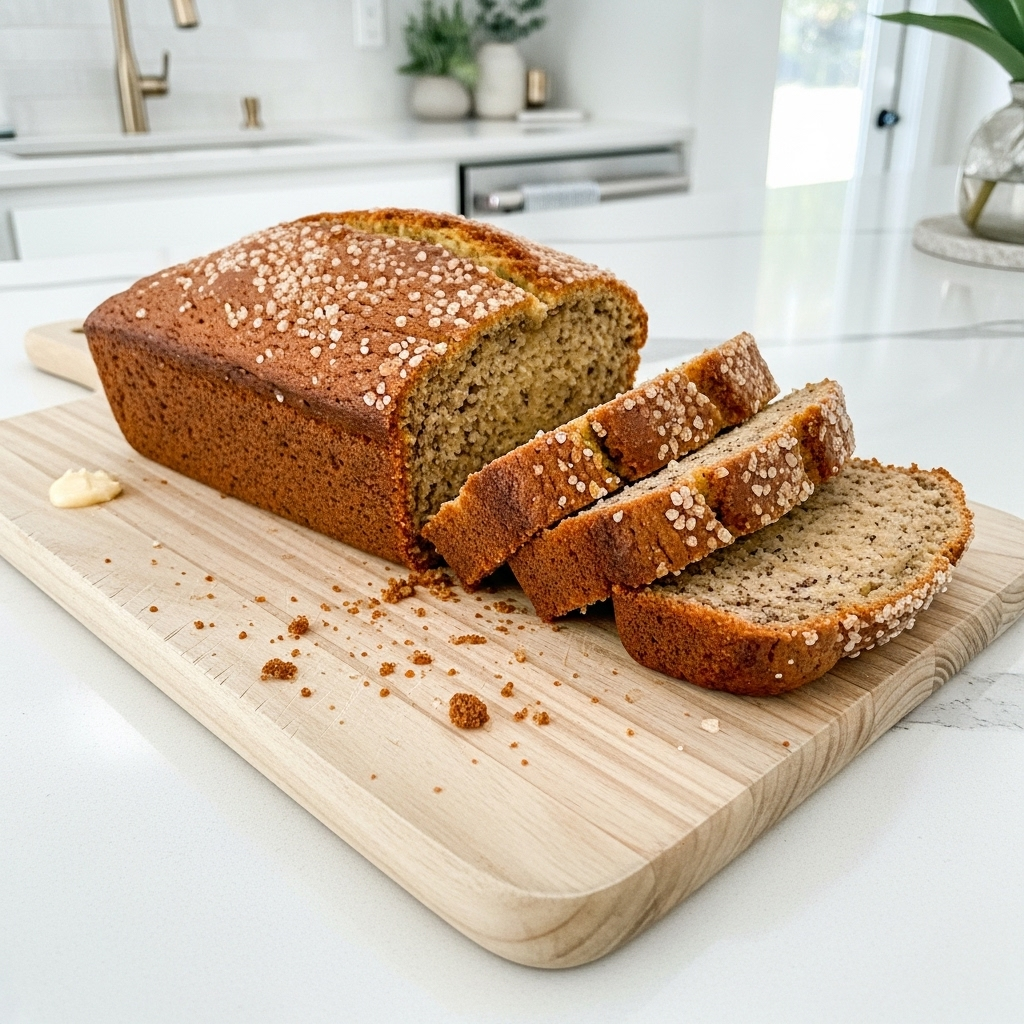
Pour the finished batter into your prepared loaf pan and use your spatula to spread it into an even layer. For a beautiful, crunchy, bakery-style crust, sprinkle the top evenly with turbinado sugar. Place the pan in your preheated oven and bake for 55 to 65 minutes. Ovens can vary, so start checking around the 55-minute mark. The bread is done when a wooden skewer or toothpick inserted into the center comes out clean, or with just a few moist crumbs attached.
Step 8: Cool Completely Before Slicing
Once the bread is done, place the pan on a wire rack to cool for about 15 minutes. This allows the bread to set up a bit. Then, use your parchment paper sling to lift the loaf out of the pan and place it directly on the wire rack to cool completely. I know it’s tempting to slice into it while it’s warm, but patience is a virtue here. Slicing a warm quick bread can cause it to be gummy and crumbly. Letting it cool completely ensures clean, beautiful slices.
How To Serve Banana Bread
There is absolutely nothing wrong with serving a thick, simple slice of this banana bread all on its own. It’s truly delicious enough to stand alone, perhaps with a cup of coffee or a cold glass of milk. But if you’re looking to dress it up for a special breakfast, brunch, or dessert, there are so many wonderful ways to serve it.
A warm slice is a perfect canvas for a variety of toppings that can complement its unique flavor profile. Think about textures and temperatures to create a truly memorable bite. Here are a few of my favorite ways to serve this Brown Butter Miso Banana Bread:
-
- Classic with a Twist: Gently toast a slice and spread it with high-quality, salted butter. The extra salt will make the savory notes from the miso pop. A dollop of cream cheese is also a fantastic choice, as its tangy flavor cuts through the richness of the bread.
- Decadent Dessert: Turn this bread into a show-stopping dessert. Warm a slice and top it with a scoop of vanilla bean or caramel swirl ice cream. For extra credit, drizzle it all with a warm caramel sauce. The combination is pure bliss.
* Brunch Superstar: Create the most incredible French toast you have ever had. Cut the loaf into thick, one-inch slices. Dip them in a classic egg, milk, and cinnamon mixture, and pan-fry them in butter until golden brown on both sides. Serve with a dusting of powdered sugar and a side of maple syrup.
- A Simple Drizzle: For a simple touch of extra sweetness that looks beautiful on a plate, a light drizzle of honey or pure maple syrup over a slice is just perfect.
No matter how you choose to serve it, this banana bread is sure to be a hit. It’s sophisticated enough for a special occasion but comforting enough for a simple weekday treat. Let your creativity guide you and enjoy every single bite.
How To Store & Reuse Banana Bread Leftovers
If you find yourself with leftovers of this delicious banana bread, which is a big “if” in my house, storing it properly will ensure it stays moist and delicious for days. Quick breads are prone to drying out, so the key is to limit their exposure to air as much as possible.
Your storage method will depend on how long you plan on keeping it. For short-term storage, the counter is fine, but for anything longer, the freezer is your best friend. Here’s how I recommend storing your banana bread to keep it tasting as fresh as the day it was baked:
- Room Temperature (2-3 Days): Once the loaf has cooled completely, wrap it tightly in plastic wrap or aluminum foil. You can also place it in a large, airtight container. I sometimes place a paper towel inside the container to help absorb any excess moisture that might make the top of the loaf soggy.
- Refrigerator (Up to 1 Week): While you can store it in the fridge, I find it tends to dry out the bread’s texture more quickly than storing it at room temperature. If you do choose the fridge, make sure it is wrapped very well. Slices from a refrigerated loaf are best when toasted or gently warmed.
- Freezer (Up to 3 Months): The freezer is the best option for long-term storage. You can freeze the entire loaf or, my personal favorite, freeze individual slices. For a whole loaf, wrap it securely in plastic wrap, then a layer of aluminum foil, and place it in a freezer-safe bag. For slices, wrap each one individually in plastic wrap and place them all in a freezer bag. This way, you can pull out a single serving whenever a craving strikes.
To enjoy your stored banana bread, you can thaw frozen slices on the counter for about 30 minutes. To get that fresh-baked taste, I love to pop a slice in the toaster oven for a few minutes until it’s warmed through and slightly crisp on the edges. A quick 10-15 seconds in the microwave also works beautifully to soften it up.
Substitutions & Variations For Banana Bread
While I believe this Brown Butter Miso Banana Bread recipe is pretty close to perfect just as it is, I know that sometimes you need to make a swap based on what’s in your pantry, or you just want to get creative. This recipe is wonderfully adaptable, so feel free to make it your own. It’s a great base for all sorts of fun additions and variations.
Whether you’re dealing with dietary needs or just want to experiment with new flavors, here are some tried-and-true substitutions and variations that work beautifully:
- Delicious Mix-ins: This is the easiest way to add your own spin. Fold in about a cup of chopped toasted walnuts or pecans for a classic crunch. For a richer treat, add a cup of semi-sweet or dark chocolate chips; the slight bitterness of dark chocolate is incredible with the sweet and savory notes of the bread.
- Flour Alternatives: For a heartier, nuttier loaf, you can substitute up to half of the all-purpose flour with whole wheat flour or white whole wheat flour. The texture will be a bit denser, but still wonderfully moist and delicious.
- Spice Things Up: If you love warm spices, feel free to enhance the cinnamon and nutmeg. A pinch of ground ginger, allspice, or cardamom would be a lovely addition to the dry ingredients, adding another layer of aromatic warmth.
- Dairy-Free Options: To make this banana bread dairy-free, you can use your favorite plant-based butter substitute. While it may not brown in the exact same way as dairy butter, it will still provide the necessary fat. For the sour cream, use a dairy-free sour cream or a thick, unsweetened plant-based yogurt.
- If You Can’t Find Miso: The miso is what makes this recipe truly special, but if you absolutely cannot find it or need to omit it, the recipe will still work. Simply leave it out and add an extra 1/4 teaspoon of fine sea salt to the dry ingredients to ensure the bread is properly seasoned. The result will be a delicious brown butter banana bread, just without that secret savory depth.
Experimenting in the kitchen is half the fun of cooking. Don’t be afraid to try new combinations. You might just discover your new favorite version of this already fantastic recipe.
Brown Butter Miso Banana Bread
Description: A classic banana bread recipe elevated with the nutty, toasty flavor of brown butter and the savory, salty depth of white miso paste. Incredibly moist, tender, and packed with complex flavor, this is a loaf that will impress everyone.
Yield: 1 Loaf | Category: Breakfast, Snack | Cuisine: American
Prep Time: 20 minutes | Cook Time: 60 minutes
Ingredients
- 2 cups all-purpose flour
- 1 tsp baking soda
- 1/2 tsp baking powder
- 1/2 tsp ground cinnamon
- 1/4 tsp ground nutmeg
- 1/2 tsp fine sea salt
- 1/2 cup (1 stick) unsalted butter
- 1 cup packed light brown sugar
- 2 large eggs, at room temperature
- 2 tbsp white (shiro) miso paste
- 1 tsp vanilla extract
- 1 ½ cups mashed very ripe bananas (about 3-4 large bananas)
- 1/2 cup full-fat sour cream or Greek yogurt
- 1 tbsp turbinado sugar, for topping (optional)
Instructions
- Preheat oven to 350°F (175°C). Grease and line a 9×5-inch loaf pan with parchment paper.
- In a medium bowl, whisk together flour, baking soda, baking powder, spices, and salt.
- In a light-colored saucepan, melt butter over medium heat. Continue cooking, swirling pan, until nutty-smelling brown specks appear. Immediately pour into a large bowl to cool for 5 minutes.
- Whisk brown sugar into the brown butter. Whisk in eggs one at a time, followed by the miso paste and vanilla, until smooth.
- Fold in the mashed bananas and sour cream.
- Add the dry ingredients and fold gently with a spatula until just combined. Do not overmix.
- Pour batter into the prepared pan and sprinkle with turbinado sugar.
- Bake for 55-65 minutes, or until a skewer inserted into the center comes out clean.
- Cool in the pan for 15 minutes before transferring to a wire rack to cool completely before slicing.
Notes
Ensure your bananas are very ripe (heavily speckled or black) for the best flavor and moisture. Do not overmix the batter after adding the flour, as this can result in a tough, dense bread.
Servings: 10 slices | Calories: 350 kcal | Fat: 14g | Carbohydrates: 52g | Protein: 5g
5 FAQs About Banana Bread
Here are some straightforward answers to the most common questions I receive about this banana bread recipe.
Why is my banana bread dry or tough?
The number one reason for dry or tough banana bread is overmixing the batter. When you mix flour with wet ingredients, you begin to develop gluten. A little gluten is good, as it gives the bread structure, but too much will result in a tough, chewy, and dense texture instead of a soft, tender one. To avoid this, switch to a rubber spatula once you add the dry ingredients and fold them in gently, stopping as soon as you no longer see large streaks of flour. A few lumps are perfectly fine and are a sign of a well-mixed batter.
Another common culprit is overbaking. Every oven is a little different, so it’s wise to start checking for doneness a few minutes before the recipe suggests. The toothpick test is reliable, look for a clean skewer or just a few moist crumbs clinging to it. If it comes out with wet batter, it needs more time, but if it’s perfectly clean and dry, you may have already gone a little too far. Lastly, make sure you are measuring your flour correctly. Instead of scooping directly from the bag, which compacts the flour, spoon it into your measuring cup and then level it off with a straight edge. This prevents you from accidentally adding too much flour, which can quickly dry out the final product.
Can I use regular melted butter instead of brown butter for this banana bread?
You certainly can use regular melted butter in a pinch, and you will still end up with a very tasty banana bread. However, you will be missing the key flavor element that makes this particular recipe so special. The process of browning butter, known as the Maillard reaction, toasts the milk solids in the butter, transforming its flavor from simple and creamy to complex, nutty, and deeply caramelized. It adds a warmth and richness that you just can’t get from standard melted butter.
If you choose to use melted butter instead, the final loaf will have a more classic, straightforward banana bread flavor. It will be sweet and pleasant, but it won’t have that extra layer of toasty complexity. If you have an extra five minutes, I strongly urge you to try browning the butter. It’s a simple technique that yields a huge flavor payoff and is one of the two secrets to making this the best banana bread you’ve ever had.
What is the best way to mash bananas for banana bread?
The best way to mash bananas really comes down to personal preference and the texture you prefer in your finished loaf. The most common and easiest method is to simply use a fork. Place your peeled, ripe bananas in a medium bowl and press down with the back of a fork until they reach your desired consistency. This method usually leaves some small, tender lumps of banana in the batter, which many people, myself included, enjoy for a more rustic texture.
If you have a lot of bananas or prefer a smoother mash, a potato masher works wonderfully and is very efficient. For a completely smooth, almost puréed consistency, you can use a stand mixer with the paddle attachment or even an immersion blender. Just be careful not to overdo it, as you can end up with a texture that is too liquidy. Ultimately, as long as the bananas are broken down enough to be incorporated into the batter, any of these methods will work just fine. The most important factor is the ripeness of the bananas, not the mashing technique.
How can I make my banana bread more moist?
This recipe is specifically designed to be incredibly moist, thanks to the inclusion of full-fat sour cream and the use of very ripe bananas. The fat and acidity in the sour cream work together to create a super tender crumb that stays fresh for days. If you want to ensure maximum moistness, the first step is to use the ripest bananas you can find. Bananas that are almost entirely black on the outside contain more sugar and moisture, which translates directly into a moister loaf.
Accurate measurement of your flour is also crucial, as adding too much flour is a fast track to a dry loaf. Use the “spoon and level” method. Finally, be very careful not to overbake the bread. Keep a close eye on it towards the end of its baking time and pull it out of the oven as soon as a skewer inserted in the center comes out with just a few moist crumbs attached. Letting it cool properly, wrapped, will also help lock in the moisture.
Why did my banana bread sink in the middle?
A sunken center is a common and frustrating problem when baking quick breads. There are several potential reasons for this collapse. The most likely cause is that the bread was underbaked. Even if the top and sides look perfectly golden, the internal structure may not have had enough time to fully set. When you pull it out of the oven too early, the unstable center deflates as it cools. Always use the skewer test and make sure it comes out clean from the very center of the loaf.
Another cause could be an issue with your leavening agents, baking soda and baking powder. If they are old or expired, they won’t have the power to lift the batter properly, leading to a dense and sunken loaf. It’s also possible that you opened the oven door too frequently or too early during the baking process. This can cause a sudden drop in temperature, shocking the batter and causing it to collapse before it has a chance to set. Finally, overmixing the batter can incorporate too much air, which causes the bread to rise rapidly in the oven and then fall dramatically as it cools.
Try These Recipes Next
I hope you love this Brown Butter Miso Banana Bread as much as my family does. It’s a perfect example of how one or two small twists can turn a familiar favorite into something truly spectacular. If you enjoyed this recipe and are looking for more kitchen inspiration, I think you’ll love some of these other collections from the blog.
Whether you need a quick weeknight meal or something for a lazy weekend morning, there’s always something delicious to cook. Here are a few places to start:
- Easy Breakfast Ideas and Recipes: Start your day off right with these simple and delicious breakfast recipes. From fluffy pancakes to savory egg dishes, you’ll find plenty of ideas to make your mornings a little brighter.
- 110 Easy Dinner Ideas: Stuck in a dinner rut? This massive list of easy dinner recipes is your ticket out. You’ll find everything from 30-minute meals to comforting casseroles that the whole family will love.
- Cheap Meal Ideas on a Budget: Eating well doesn’t have to break the bank. This collection is packed with budget-friendly recipes that are big on flavor without being hard on your wallet.
Happy cooking, y’all! I can’t wait to see what you make next.