
My Go-To Bone Broth Soup Recipe with a Secret Savory Twist
I’ll never forget the first time I truly understood the magic of a good bone broth soup. It was after a particularly hectic holiday season, and I was feeling utterly run down. A dear friend, who swears by all things nourishing, dropped off a jar of her homemade broth. It was comforting, yes, but I couldn’t help but think it was missing something. A little spark. A little something to make you close your eyes and say, “Now, that’s special.”
My mind wandered back to a fantastic little Japanese spot my husband and I love. They have this broth, this dashi, that’s so deeply savory it feels like a warm hug from the inside out. I started wondering if I could bring that kind of depth to a classic beef and chicken bone broth. That’s when the lightbulb went off. Two little additions from the pantry that would change everything: dried shiitake mushrooms and a piece of kombu, which is a type of dried kelp.
The result was nothing short of a revelation. The kombu and shiitake didn’t make the soup taste like seaweed or mushrooms. Instead, they unlocked a new layer of rich, savory, umami flavor that made the beef and chicken notes sing even louder. It transformed a simple, healthy drink into a complex, satisfying soup I could proudly serve to anyone. It’s my little secret for the most flavorful bone broth soup you’ll ever taste.
Why This Bone Broth Soup Recipe Works
Bone broth has been a cornerstone of cuisines around the world for centuries. Long before it was a trendy wellness drink, our grandmothers and their grandmothers knew the secret. Simmering bones and connective tissues for a long, long time breaks them down, releasing collagen, gelatin, amino acids, and minerals into the water. This creates a liquid that is not only deeply flavorful but also incredibly nourishing.
The popularity of bone broth soup today comes from this dual benefit. It’s a foundational ingredient for countless recipes, from simple soups to complex sauces and gravies. It is also cherished on its own as a restorative, comforting beverage. A good bone broth should be rich and, when chilled, set into a firm, jiggly gel. That gel is the sign you’ve successfully extracted all that wonderful collagen.
So what makes this recipe stand out in a sea of others? It’s the umami. While a traditional bone broth is delicious, it can sometimes taste a little flat or one-dimensional. My secret is adding kombu, a type of dried sea kelp, and dried shiitake mushrooms during the last hour of simmering. These two ingredients are umami powerhouses. They introduce a deep, savory, and almost meaty flavor that complements the beef and chicken beautifully without tasting distinctly of seaweed or mushroom.
The kombu adds a clean, savory depth and a host of minerals, while the shiitakes provide a rich, earthy note. This little twist elevates the broth from a simple health food to a gourmet soup base. It creates a more complex, rounded, and intensely satisfying flavor profile that makes you want to sip cup after cup. It’s the secret to making your bone broth soup truly unforgettable.
Ingredients for Bone Broth Soup
Gathering the right ingredients is the most important step for a truly spectacular bone broth. Quality really matters here, especially with the bones. If you can, get your bones from a local butcher or a farmer’s market. Grass fed beef bones will yield a broth with a richer flavor and a better nutritional profile.
The combination of different types of bones is also key. Marrow bones provide richness, knuckle bones are full of cartilage for that beautiful gel, and oxtail adds a deep, beefy flavor. The chicken feet are my secret for getting a super gelatinous broth, as they are almost entirely made of skin, cartilage, and tendons. Here is exactly what you will need for my special bone broth soup.
- 4 lbs beef bones (a mix of marrow, knuckle, and oxtail)
- 2 lbs chicken feet or wings (for extra collagen)
- 2 large carrots, roughly chopped
- 2 celery stalks, roughly chopped
- 1 large onion, quartered (skin on)
- 1 head of garlic, sliced in half horizontally
- 2 tablespoons apple cider vinegar
- 1 tablespoon whole black peppercorns
- 2 bay leaves
- 1/4 cup dried shiitake mushrooms
- 1 (4-inch) piece of kombu (dried kelp) – THE TWIST
- 1 bunch of fresh parsley
- Sea salt to taste
A note on our special ingredient: kombu. You can find this dried kelp in the international aisle of most well stocked grocery stores or at any Asian market. It’s a staple in Japanese cooking, used to make dashi broth. A little goes a long way in lending a deep, savory flavor. It’s a simple addition that makes a world of difference, turning a good broth into a great one. Don’t skip it!
Step-by-Step Instructions For Making Bone Broth Soup
Making bone broth soup is a labor of love, but it’s mostly a hands off process. The magic happens during the long, slow simmer. Following these steps carefully will ensure you get a clear, flavorful, and gelatinous broth every single time. Don’t rush the process, and your patience will be rewarded handsomely.
1. Roast the Bones and Vegetables
First, preheat your oven to a nice and hot 450°F. Roasting is a crucial step for developing a deep, rich, and brown broth. Spread your beef bones and chicken feet in a single layer on a large, heavy duty roasting pan. You want them to have space, so use two pans if needed. Roast them for 30 to 40 minutes. They should be beautifully browned and smell amazing. About five minutes before they’re done, toss the chopped carrots, celery, onion, and garlic onto the pan to get a little color on them as well. This caramelization builds the first layer of incredible flavor.
2. Deglaze and Transfer to a Pot
Once everything is roasted, carefully transfer the bones and vegetables to a very large stockpot. I use at least a 12 quart pot for this. Don’t leave those browned bits stuck to the bottom of the roasting pan. That’s pure flavor! Pour a little water into the hot pan and use a wooden spoon to scrape it all up. Pour this liquid gold right into your stockpot. Add the apple cider vinegar, which helps draw minerals out of the bones, along with the black peppercorns and bay leaves.
3. Cover with Water and Simmer Gently
Now, pour in enough cold, filtered water to cover everything by at least two inches. Using cold water helps create a clearer broth. Bring the pot to a boil over high heat, then immediately reduce the heat to the lowest possible setting. You want the barest of simmers, with just a few bubbles breaking the surface every few seconds. During the first hour, you’ll see some foamy scum rise to the top. Use a large spoon to skim this off and discard it. This helps ensure your final soup is clean and clear.
4. The Long, Slow Simmer
Cover the pot, but leave the lid slightly ajar to allow steam to escape. Let it simmer for a minimum of 12 hours, but for a beef broth, I truly recommend going for a full 24 hours. A slow cooker is also wonderful for this step. The longer it simmers, the more collagen and flavor you’ll extract. It’s very important to keep it at a gentle simmer, never a rolling boil, which can make the broth cloudy and bitter.
5. Add the Flavor Boosters
During the last hour of your total simmer time, it’s time to add our secret weapons. Drop in the dried shiitake mushrooms and the piece of kombu. In the very last 10 minutes, add the whole bunch of fresh parsley. Adding these ingredients at the end preserves their more delicate flavors and prevents any bitterness from developing.
6. Strain and Cool the Broth
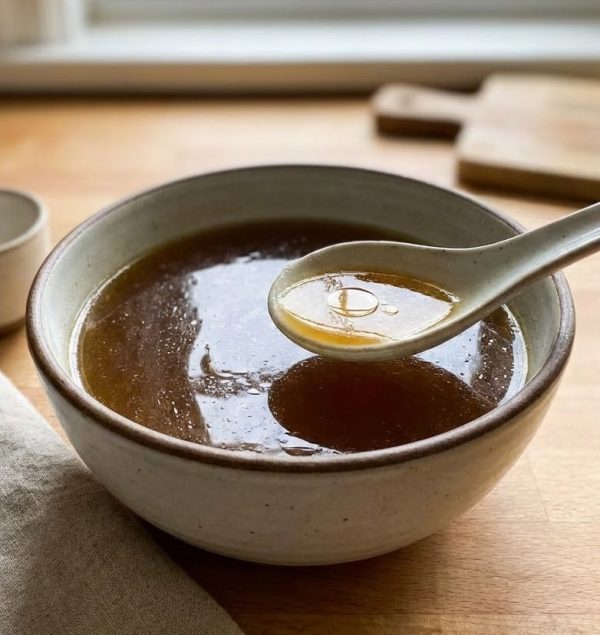
Turn off the heat and let the pot cool down slightly so it’s easier to handle. Place a large, fine mesh sieve over another large pot or heatproof bowl. For an exceptionally clear broth, line the sieve with a layer of cheesecloth. Carefully ladle the broth through the strainer. Let gravity do the work, don’t press down on the solids. Discard all the bones and vegetables. Season your beautiful, finished broth with sea salt to your personal taste. Let it cool completely in the refrigerator, where a layer of fat will form on top. You can skim this off and use it for cooking, or discard it. The broth underneath should be as jiggly as gelatin.
How To Serve Bone Broth Soup
Once you have this liquid gold in your kitchen, the possibilities are truly endless. While sipping it warm from a mug is my favorite way to enjoy it, especially on a chilly morning, there are so many ways to turn this simple broth into a satisfying meal or a flavorful base for other dishes.
Serving this bone broth soup can be as simple or as elaborate as you like. It provides a wonderful canvas for creativity in the kitchen. The key is to let its deep, savory flavor shine. Here are a few of my favorite ways to serve it up for my family.
- As a Simple Sipping Broth: Gently reheat the broth on the stove until it’s steamy. Pour it into a mug and garnish with a sprinkle of fresh chopped chives, parsley, or a thin slice of lemon. It’s a perfect, nourishing start or end to any day.
- Create a Quick Noodle Soup: Bring the broth to a simmer and add your favorite cooked noodles, like ramen, soba, or udon. Toss in some shredded rotisserie chicken, wilted spinach, and a soft boiled egg for a complete and comforting meal in minutes.
- As a Base for Heartier Soups: This bone broth is the perfect foundation for more complex soups. Use it as the liquid for a vegetable soup, lentil soup, or my personal favorite, a rich and hearty French onion soup. Its flavor is so much deeper than anything you can buy in a carton.
- For Cooking Grains: Elevate your side dishes by cooking rice, quinoa, or farro in bone broth instead of water. It infuses the grains with incredible flavor and added nutrients, making even a simple side dish feel special.
You can also freeze the broth in ice cube trays. These little flavor bombs are perfect for adding a splash of richness to pan sauces, sautés, or when you’re reheating leftovers. A little bit of this broth can revive almost any dish, adding moisture and a savory depth that water just can’t provide.
How To Store & Reuse Bone Broth Soup Leftovers
Making a large batch of bone broth soup is an investment in time, so proper storage is key to making sure none of your hard work goes to waste. Thankfully, it stores beautifully and can be used for weeks, or even months, to come. I always make the biggest batch my stockpot can handle for this very reason.
Once your broth has cooled completely in the refrigerator, a solid layer of fat will have formed on top. I like to leave this fat cap on for storage, as it creates a protective seal that helps keep the broth fresh underneath. When you’re ready to use it, you can easily lift the fat cap off with a spoon. Here’s how I store my liquid gold for both the short and long term.
- In the Refrigerator: You can store the bone broth in an airtight container, like large mason jars, in the refrigerator for up to five to seven days. I find that glass jars work best as they don’t absorb any odors and are easy to clean. Make sure to leave an inch of headspace at the top.
- In the Freezer: For longer storage, the freezer is your best friend. Bone broth freezes exceptionally well. You can freeze it in larger, freezer safe containers, but be sure to leave at least an inch of headspace as the liquid will expand. It will keep for at least six months this way.
- Freezing in Portions: My favorite trick is to freeze the broth in smaller, more manageable portions. Silicone muffin tins or large ice cube trays are perfect for this. Once frozen solid, pop the broth pucks out and store them in a large freezer bag. This way, you can grab just what you need for a single serving or for adding to a pan sauce.
To reuse your stored bone broth, simply thaw it in the refrigerator overnight or gently reheat it in a saucepan over low heat. If using a frozen puck, you can drop it directly into a pot. It’s the ultimate kitchen hack, a secret weapon ready to add flavor, nutrition, and a little bit of homemade love to any meal.
Substitutions & Variations For Bone Broth Soup
While I believe this recipe is pretty perfect as is, I know that every cook likes to put their own spin on things. Cooking should be flexible and fun! This bone broth soup recipe is very forgiving and can be easily adapted based on what you have on hand or your dietary preferences. Think of this recipe as a wonderful template to build upon.
Whether you need to swap out a protein, accommodate a dietary need, or just want to experiment with different flavor profiles, there are plenty of simple adjustments you can make. Here are some of the most common and delicious substitutions and variations you can try.
- All-Chicken or All-Beef Broth: If you prefer, you can easily make this recipe using only one type of bone. For an all-chicken broth, use about 6 to 7 pounds of chicken parts, focusing on backs, necks, and especially feet for collagen. For an all-beef broth, simply use 6 to 7 pounds of beef bones. The cooking time for an all chicken broth can be a bit shorter, around 8 to 12 hours.
- Add Different Aromatics: Feel free to play with the aromatics. You could add a few star anise pods and a cinnamon stick for a pho inspired flavor profile. A knob of fresh ginger or some turmeric root can add warmth and anti inflammatory benefits. A handful of fresh thyme or rosemary sprigs added at the end with the parsley would also be lovely.
- For a Spicier Kick: If you enjoy a bit of heat, you can add a dried chili or a teaspoon of red pepper flakes to the pot along with the other aromatics. This will infuse the broth with a gentle, warming spice that is especially nice on a cold day.
- Pork and Lamb Bones: Don’t be afraid to use other types of bones. Pork bones, especially trotters, make a wonderfully rich and gelatinous broth. Lamb bones will create a broth with a more distinct, gamier flavor that is absolutely delicious as a base for stews.
The core technique of roasting the bones and simmering them low and slow remains the same, no matter what you choose to include. The goal is to extract as much flavor and goodness as possible. So go ahead and clean out your freezer, use up those vegetable scraps, and make a pot of bone broth soup that is uniquely yours.
The Ultimate Umami-Rich Bone Broth Soup
Description: A deeply nourishing and flavorful bone broth soup made with a mix of beef and chicken bones. A secret ingredient twist using kombu and shiitake mushrooms creates an unparalleled savory umami depth, elevating this classic recipe into something truly special.
Yield: Approx. 4 quarts | Category: Soup | Cuisine: American
Prep Time: 15 minutes | Cook Time: 12-24 hours
Ingredients
- 4 lbs beef bones (a mix of marrow, knuckle, and oxtail)
- 2 lbs chicken feet or wings
- 2 large carrots, roughly chopped
- 2 celery stalks, roughly chopped
- 1 large onion, quartered (skin on)
- 1 head of garlic, sliced in half horizontally
- 2 tablespoons apple cider vinegar
- 1 tablespoon whole black peppercorns
- 2 bay leaves
- 1/4 cup dried shiitake mushrooms
- 1 (4-inch) piece of kombu (dried kelp)
- 1 bunch of fresh parsley
- Sea salt to taste
Instructions
- Preheat oven to 450°F. Roast beef bones and chicken feet for 30-40 minutes until deeply browned. Add vegetables for the last 5 minutes of roasting.
- Transfer bones and vegetables to a large stockpot. Deglaze the roasting pan with water and add the liquid to the pot.
- Add apple cider vinegar, peppercorns, and bay leaves. Cover with cold water by two inches.
- Bring to a boil, then immediately reduce to a very gentle simmer. Skim any foam that rises in the first hour.
- Cover partially and simmer for 12-24 hours. Do not let it boil.
- Add dried shiitake mushrooms and kombu for the last hour of cooking. Add fresh parsley for the final 10 minutes.
- Strain the broth through a fine-mesh sieve. Discard solids.
- Season with salt to taste. Cool completely in the refrigerator, then skim the solidified fat from the top.
Notes
For the clearest broth, line your sieve with cheesecloth before straining. The broth is done when it cools to a firm, gelatinous texture. Store in the refrigerator for up to 7 days or in the freezer for up to 6 months.
Servings: 16 (1-cup servings) | Calories: 80 | Fat: 4g | Carbohydrates: 2g | Protein: 10g
5 FAQs About Bone Broth Soup
Here are some straightforward answers to the most common questions I receive about this bone broth soup recipe.
Why isn’t my bone broth soup gelling?
This is probably the most frequent question I get, and it’s a frustrating problem when you’ve waited 24 hours for your broth. The “gel” is the holy grail of bone broth, and it’s a direct indicator of a high collagen content. If your broth remains liquid like water when it’s fully chilled, it almost always comes down to one of three things: the ratio of water to bones, the types of bones used, or the simmer time.
First, you may have used too much water. You want just enough water to cover the bones by about two inches. Too much water will dilute the concentration of gelatin. Second, the type of bones is critical. You need bones that are rich in cartilage and connective tissue. That’s why I insist on using things like chicken feet, knuckle bones, and oxtail in my recipe. If you only use marrow bones, which are great for flavor, you won’t get as much of that gelling power. Finally, you may not have simmered it long enough. For beef bones, 12 hours is the absolute minimum, with 24 hours being ideal to fully break down all that connective tissue into gelatin.
Can I make this bone broth soup in an Instant Pot?
You absolutely can! A pressure cooker like an Instant Pot is a fantastic tool for making bone broth soup in a fraction of the time. The high pressure environment is incredibly efficient at extracting all the goodness from the bones. To adapt this recipe, you would still start by roasting the bones and vegetables in the oven for that deep flavor. Then, transfer everything to the Instant Pot, add the water, and be careful not to fill it past the max fill line.
Seal the lid and cook on high pressure for about 2 to 3 hours. Let the pressure release naturally for at least 30 minutes before doing a quick release. You can then add the kombu, shiitakes, and parsley, switch the pot to the “Sauté” function, and let it simmer gently for another 15 to 20 minutes to infuse those final flavors. While the flavor might be slightly less nuanced than a 24 hour simmered broth, it’s an excellent, time saving alternative that still produces a wonderfully gelatinous and delicious result.
What is the difference between bone broth and stock?
This is a great question, as the terms are often used interchangeably. While they are very similar, there are a few key differences. The primary distinction lies in the cooking time. A traditional stock is typically simmered for a shorter period, usually 4 to 6 hours. Its main purpose is to be a flavorful liquid base for other dishes, and while it might have some body, it doesn’t typically gel when chilled.
Bone broth, on the other hand, is defined by its long cooking time, anywhere from 8 to 24 hours or more. This extended simmer is specifically intended to break down the cartilage and connective tissues to release collagen and minerals. The result is a much more nutrient dense liquid that is often consumed on its own for its health benefits. So, in short: all bone broth can be used as stock, but not all stock has the gelatinous, nutrient dense qualities of a true bone broth.
How long does homemade bone broth soup last?
Properly stored homemade bone broth has a decent shelf life, which is great since you typically make a large batch at once. After you’ve strained and cooled your broth, you can keep it in an airtight container, like a mason jar, in the refrigerator. In the fridge, it will stay fresh and delicious for about five to seven days. I find that leaving the fat layer on top helps to preserve it even better, creating a natural seal.
For long term storage, the freezer is the way to go. Your bone broth soup will last for at least six months in the freezer without any loss in quality or flavor. I highly recommend freezing it in various portion sizes. Large containers for making big batches of soup, and smaller portions in ice cube trays or muffin tins for adding a quick flavor boost to sauces or single servings. Just make sure whatever container you use is freezer safe and you leave a little room at the top for the liquid to expand as it freezes.
What are the best bones for making bone broth soup?
The secret to an amazing bone broth soup is using a variety of bones. Each type of bone brings something different to the party, and a good mix is what creates a balanced, flavorful, and super gelatinous final product. You want a combination of meaty bones, marrow bones, and bones with lots of cartilage and connective tissue.
For a beef broth like this one, I recommend a mix of knuckle or neck bones, which are loaded with cartilage that creates that coveted gel. Then, add in some marrow bones, like femur bones, for richness and a silky mouthfeel. Finally, include some meaty bones like oxtail or short ribs for a deep, beefy flavor. For the chicken component, nothing beats chicken feet. They are almost entirely skin and cartilage and are the ultimate secret weapon for a jello like consistency. Chicken wings and backs are also excellent choices.
Try These Recipes Next
If you loved the deep, savory flavors of this bone broth soup, I know you’ll enjoy these other comforting and rich recipes from my kitchen.
- Fall Off The Bone Braised Oxtail Recipe: Use your homemade bone broth as the base for this incredibly rich and tender oxtail dish. It’s pure comfort food.
- The Very Best French Onion Soup: A truly great French onion soup starts with an exceptional beef broth. This recipe will put your homemade bone broth to perfect use.
- Easy Beef Stew Recipe with Red Wine: Elevate your classic beef stew by swapping out store bought stock for your nutrient dense homemade bone broth. The difference in flavor is incredible.
I hope you give these a try and they bring as much joy to your table as they do to mine!