
The Best Baked Potato Recipe for Crispy Skin and a Fluffy Center
This is, without a doubt, the very best baked potato you will ever eat.
I know that’s a bold statement, but hear me out. For years, my idea of a baked potato was something I made out of pure convenience. I’d poke it with a fork, toss it in a hot oven, and hope for the best. Sometimes it was good, but often it was just… fine. The skin was usually a little tough, a little dry, and the inside was never quite as fluffy as the ones you get at a really great steakhouse.
My potato perspective changed entirely during a weekend trip to Charleston with my husband. We went to this old, established steakhouse, the kind with dark wood and leather booths. I ordered a filet, and it came with a baked potato that looked like something out of a magazine. The skin was deep golden brown, almost shattered when I touched it with my fork, and it was covered in huge flakes of sea salt.
I took one bite of just the skin, and I was sold. It was crispy, savory, and full of flavor. It wasn’t just a container for the fluffy insides, it was the star of the show. I spent the rest of the meal trying to figure out their secret. After a little sweet-talking our waiter, he hinted that it involved more than just an oven. Back home, I became a woman on a mission. I tried different fats, different cooking times, and different temperatures. The real breakthrough came when I combined a technique I use for crispy roasted potatoes, a quick boil in alkaline water, with my new favorite cooking fat, duck fat. The result is this very recipe, a truly perfect baked potato with skin so crispy and flavorful, you’ll never look back.
Why This Baked Potato Recipe Works
The baked potato is a cornerstone of American comfort food. It’s a simple, humble ingredient that can be a side dish or a main course, a blank canvas for countless toppings. Its popularity lies in its accessibility and its satisfying nature. It’s the trusty sidekick to a sizzling steak, the hearty base for a loaded lunch, and a simple pleasure all on its own.
But for something so simple, it’s surprisingly easy to get wrong. So often, homemade versions end up with pale, leathery skin and a dense, watery interior. This recipe is designed to fix all of that, transforming the humble potato into something truly special.
The secret lies in a two-part technique. First, we par-boil the potatoes in water that’s been made alkaline with baking soda. This process does something magical to the potato’s exterior. It helps break down the pectin in the skin, creating a micro-thin layer of starch on the surface. When you drain them and rough them up a bit, you create a huge amount of surface area.
Then comes the second part of our master plan, the duck fat. When that starchy, scuffed-up surface hits the hot oven coated in rich duck fat, it crisps up in a way that regular oil just can’t replicate. The duck fat has a high smoke point and a savory flavor that seasons the potato from the outside in. This method guarantees a baked potato with a shatteringly crisp, deep golden, and intensely flavorful skin, while the inside steams to a perfectly light and fluffy texture. It’s the science of cooking meeting a little bit of kitchen luxury.
Ingredients for Baked Potato
The beauty of a perfect baked potato is that it starts with very few, very simple ingredients. That’s why the quality of each one, and the technique you use to combine them, matters so much. Here’s exactly what you’ll need to create a steakhouse-worthy potato experience right in your own kitchen.
- 4 large Russet potatoes, scrubbed clean
- 1 tbsp baking soda
- 2 tbsp duck fat or ghee, melted (can substitute with avocado oil)
- 1 ½ tsp kosher salt
- ½ tsp freshly ground black pepper
- Flaky sea salt, for finishing
The undisputed star of the baked potato world is the Russet potato. Its high starch content and low moisture are what give you that incredibly light, fluffy, and absorbent interior. Its skin is also thicker than other varieties, which means it can stand up to our cooking method and get wonderfully crisp. Make sure to choose potatoes that are firm, with smooth skin and no soft spots or sprouts.
Our not-so-secret weapon for incredible flavor and crispiness is the duck fat. This is my special twist that really makes the recipe pop. It has a silky texture and a rich, savory flavor that is simply divine with potatoes. You can usually find it in tubs in the refrigerated section near the butter or in the oil aisle of well-stocked grocery stores. If you can’t find it, ghee is a fantastic substitute with a nutty flavor, and avocado oil works well for a neutral-flavored, high-heat option.
Don’t skip the baking soda in the boiling water. It’s a small amount, but it’s chemically crucial for helping the skin get ready for its crispy transformation. For salt, I use kosher salt during the cooking process because its texture adheres well to the potato skin, and I finish with a sprinkle of beautiful flaky sea salt, like Maldon, for that final crunch and burst of clean, salty flavor.
Step-by-Step Instructions For Making Baked Potato
Follow these steps closely, and I promise you will be rewarded with the best baked potato of your life. Every detail, from the wire rack to the final bake, is designed to build layers of texture and flavor.
Step 1: Preheat Oven and Prep Pan
First things first, preheat your oven to 400°F (200°C). The key to a great baked potato is even cooking. To achieve this, place a wire rack inside a rimmed baking sheet. This simple piece of equipment is a game-changer. It elevates the potatoes, allowing hot air to circulate all the way around them. This prevents the bottoms from getting soggy and steaming on the pan, ensuring a uniformly crisp skin on all sides.
Step 2: Boil the Potatoes
In a large pot or Dutch oven, bring about 3 quarts of water to a rolling boil. Once it’s bubbling away, add the baking soda and 1 teaspoon of the kosher salt. Stir it gently, then carefully lower your scrubbed potatoes into the pot. Be careful not to splash the hot water. Let them boil for 10 to 12 minutes.
Step 3: Check for Doneness
You’re not trying to cook the potatoes all the way through at this stage. You just want to soften the exterior. After about 10 minutes, test them by piercing the skin with a fork. It should go in with just a little bit of resistance. If it’s still very tough, give them another minute or two, but don’t let them get mushy.
Step 4: Drain and Scuff the Potatoes
Carefully drain the potatoes in a colander and let them sit for a couple of minutes. You want them to be completely dry, so the steam needs to evaporate off the surface. Return the dry potatoes to the now-empty pot, put the lid on, and give it a good, vigorous shake for about 5 seconds. This is my favorite part. It roughs up the surfaces, creating tons of little nooks and crannies that will catch the fat and become incredibly crispy.
Step 5: Coat with Fat and Seasoning
Now for the flavor. Drizzle the melted duck fat all over the warm, scuffed-up potatoes. Sprinkle on the remaining ½ teaspoon of kosher salt and the freshly ground black pepper. Don’t be shy, get in there with your hands and gently toss everything together to make sure every single potato is evenly coated in that glorious fat and seasoning.
Step 6: First Bake
Arrange the coated potatoes directly on the wire rack you prepared earlier, making sure to leave some space between them for air to circulate. Place the baking sheet in your preheated 400°F oven and bake for 30 minutes.
Step 7: Second Bake for Extra Crispiness
After 30 minutes, it’s time to really crisp things up. Increase the oven temperature to 425°F (220°C). Let the potatoes continue to bake for another 20 to 25 minutes. You’ll know they are done when the skins are a deep golden brown, feel rigid to the touch, and sound hollow when you give them a gentle tap.
Step 8: Rest and Serve
Patience is a virtue, even with potatoes. Let them rest on the rack for about 5 minutes before serving. This allows the internal steam to settle a bit. To serve, use a sharp knife to slice them open lengthwise. Use a fork to push the ends toward the center and fluff up that steamy, perfect interior. Finish with a generous sprinkle of flaky sea salt and your favorite toppings.
How To Serve Baked Potato
Once you’ve pulled these golden, crispy beauties from the oven, the real fun begins. A perfectly cooked baked potato is a fantastic starting point, but the toppings are what make it a meal or a truly decadent side dish. You can go classic and simple, or you can get creative and pile them high with all sorts of delicious things.
For a classic steakhouse experience that lets the potato itself shine, you can’t go wrong with the holy trinity of toppings. A generous pat of good-quality salted butter melting into the fluffy interior, a dollop of cool sour cream or tangy crème fraîche, and a sprinkle of fresh chives is a combination that never fails. It’s simple, elegant, and absolutely delicious.
But why stop there? Setting up a baked potato bar is one of my favorite ways to serve these for a casual family dinner or a get-together with friends. It’s interactive, fun, and lets everyone customize their own creation. Here are a few ideas to get your potato bar started:
- The Classic Loaded: Crumbled crispy bacon, shredded sharp cheddar cheese, sour cream, and sliced green onions.
- Chili Cheese: A hearty scoop of your favorite beef or turkey chili, more shredded cheddar, and a little jalapeño for a kick.
- Broccoli Cheddar: Steamed broccoli florets topped with a warm, creamy cheddar cheese sauce.
- Pulled Pork: Tender, smoky pulled pork (drizzled with a little extra BBQ sauce, of course) and a spoonful of coleslaw right on top.
- French Onion: Caramelized onions, melted Gruyère cheese, and a sprinkle of fresh thyme for a sophisticated twist.
No matter how you choose to top them, the best way to serve a baked potato is hot from the oven. Slit it open, give it a good fluff with a fork to create pockets for all the toppings, and let everyone dig in while that incredible skin is at its absolute crispiest.
How To Store & Reuse Baked Potato Leftovers
While these baked potatoes are certainly best when eaten fresh from the oven, life happens, and sometimes you have leftovers. The good news is that a leftover baked potato is a wonderful thing to have on hand for quick and easy meals later in the week. The key is to store them properly to maintain as much of their texture as possible.
First, allow the potatoes to cool completely to room temperature. Storing them while they are still warm will create condensation inside your storage container, which leads to a soggy potato. Once cooled, you can wrap them individually in foil or place them in an airtight container. They will keep well in the refrigerator for up to 4 days.
When it comes to reheating, you have a few options. Microwaving is the fastest, but it can make the skin soft. For a better texture, I recommend reheating them in the oven or an air fryer. Just pop them on a baking sheet in a 350°F oven for about 15 to 20 minutes, or until warmed through. This will help bring some of that crispiness back to the skin.
Beyond simply reheating, leftover baked potatoes are incredibly versatile. Here are some of my favorite ways to give them a second life:
- Twice-Baked Potatoes: Slice the potatoes in half lengthwise, scoop out the fluffy interior, and mash it with butter, sour cream, cheese, and chives. Spoon the mixture back into the potato skins, top with more cheese, and bake until hot and bubbly.
- Breakfast Hash: Dice the cold potato (skin and all) and pan-fry it with some onions, bell peppers, and leftover cooked meat like sausage or bacon. Top with a fried egg for a hearty breakfast.
- Crispy Smashed Potatoes: Cut the potatoes in half, place them on an oiled baking sheet, and use the bottom of a glass to gently smash them flat. Drizzle with a little more oil, season, and bake at 425°F until crispy and golden.
- Quick Potato Salad: Chop the leftover baked potato into cubes and use it as a base for a quick potato salad. The fluffy texture works beautifully with a creamy dressing.
So, don’t be afraid to make an extra baked potato or two. Your future self will thank you when you have a head start on another delicious meal.
Substitutions & Variations For Baked Potato
While I believe this recipe is pretty close to perfect as is, one of the best things about cooking is making a recipe your own. There are plenty of ways to tweak this baked potato recipe to suit your taste, your dietary needs, or simply what you have on hand in your pantry. It’s a wonderfully forgiving canvas for a little creativity.
The most impactful substitution you can make is with the cooking fat. The duck fat is what gives it that signature rich, savory flavor, but other fats work beautifully too. Ghee will give the skin a nutty, buttery flavor. High-quality rendered bacon fat is a classic Southern choice that infuses the skin with a smoky, delicious taste. For a vegan or dairy-free option, a good quality, high-heat oil like avocado oil is the perfect neutral choice that will still allow the skin to get incredibly crisp.
You can also play around with the seasonings to create different flavor profiles. Here are a few variations to inspire you:
- Garlic Herb: Mix a teaspoon of garlic powder and a teaspoon of dried rosemary or thyme into the melted fat before coating the potatoes. This adds a lovely aromatic, savory flavor.
- Smoky & Spicy: Add a half teaspoon of smoked paprika and a pinch of cayenne pepper to the salt and pepper mix for a potato with a warm, smoky kick.
- Everything Bagel: After coating the potatoes in fat, sprinkle them generously with everything bagel seasoning before baking. The toasted sesame, poppy seeds, and garlic are a fantastic match for the crispy skin.
- Different Potatoes: While Russets are the gold standard for fluffy interiors, you can absolutely use this method with other potatoes. Yukon Golds will have a creamier, more buttery interior and a slightly more delicate skin. Sweet potatoes also work well, just be sure to adjust the boiling and baking times as needed.
No matter what little changes you make, the core technique of par-boiling in alkaline water, scuffing the surface, and baking on a wire rack will still give you a superior baked potato. Have fun with it and discover your family’s new favorite version!
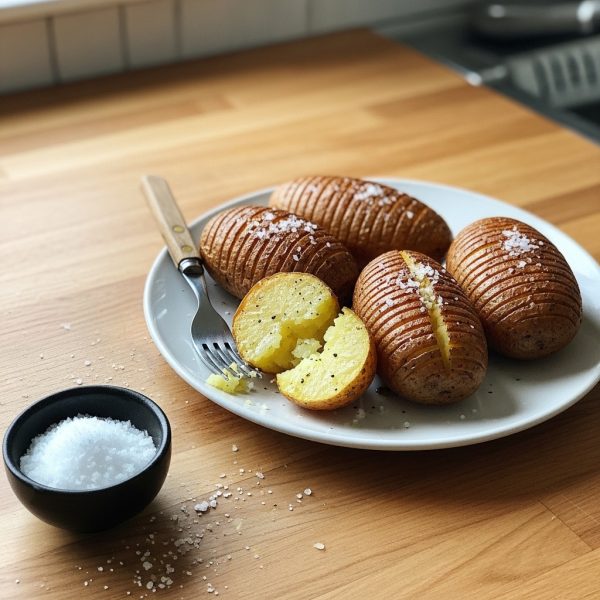
The Perfect Baked Potato with Crispy, Salty Skin
Description: The ultimate baked potato with a shatteringly crisp, salty skin and a perfectly fluffy interior, thanks to a special par-boiling technique and rich duck fat.
Yield: 4 | Category: Side Dish | Cuisine: American
Prep Time: 15 minutes | Cook Time: 1 hour 5 minutes
Ingredients
- 4 large Russet potatoes, scrubbed clean
- 1 tbsp baking soda
- 2 tbsp duck fat or ghee, melted
- 1 ½ tsp kosher salt, divided
- ½ tsp freshly ground black pepper
- Flaky sea salt, for finishing
Instructions
- Preheat oven to 400°F (200°C) and place a wire rack inside a rimmed baking sheet.
- Bring 3 quarts of water to a boil. Add baking soda and 1 tsp kosher salt, then boil potatoes for 10-12 minutes until skins are just softened.
- Drain potatoes well, let steam dry for 2 minutes. Return to the dry pot, cover, and shake for 5 seconds to scuff the surfaces.
- Toss the scuffed potatoes with melted duck fat, remaining ½ tsp kosher salt, and black pepper.
- Arrange potatoes on the wire rack and bake for 30 minutes.
- Increase oven temperature to 425°F (220°C) and bake for another 20-25 minutes, until skins are deep golden brown and crisp.
- Rest for 5 minutes. Slice lengthwise, fluff with a fork, and finish with flaky sea salt before serving.
Notes
Using a wire rack is essential for getting 360-degree crispiness on the potato skin. Don’t skip this step!
Servings: 4 | Calories: 320 kcal | Fat: 10g | Carbohydrates: 52g | Protein: 6g
5 FAQs About Baked Potato
Here are some straightforward answers to the most common questions I receive about this baked potato recipe.
Why do you boil the baked potato first?
This is the most important question, and it gets to the very heart of what makes this recipe so special. Boiling the potato before baking might seem like an unnecessary extra step, but it is the absolute key to achieving that perfectly crispy skin. We’re not just boiling it in plain water, we’re adding baking soda, which makes the water alkaline.
This alkaline environment helps to break down the potato’s pectin, which is like the glue that holds the skin cells together. This process softens the exterior and draws starch to the surface. When you drain the potatoes and shake them up, that starchy outer layer gets scuffed and creates an incredible texture, full of microscopic nooks and crannies. When this starchy, roughed-up surface is coated in fat and hits the high heat of the oven, it fries and crisps in a way that a raw potato simply cannot. It’s a bit of food science that yields a dramatically better result than just baking alone.
What is the best type of potato for a baked potato?
For a classic American-style baked potato with a light, fluffy, almost cloud-like interior, the Russet potato is the undisputed champion. Russets, sometimes called Idaho potatoes, are what’s known as a “starchy” or “mealy” potato. They are high in starch and have a low moisture content. When baked, the starch granules swell and separate, resulting in that wonderfully absorbent, crumbly texture that is perfect for soaking up butter and other toppings.
You can certainly use this method with other types of potatoes, like Yukon Golds, but you will get a different result. Yukon Golds are waxier potatoes with more moisture and less starch. Their flesh is creamier and denser, and their skin is thinner. They will still be delicious, but they won’t have that signature fluffy interior of a Russet. For this specific recipe, where the contrast between the crispy skin and the airy inside is the goal, I highly recommend sticking with Russets if you can find them.
Can I make this baked potato recipe without duck fat?
Absolutely! While I sing the praises of duck fat for its incredible flavor and crisping power, I understand it’s not always easy to find or may not fit everyone’s dietary preferences. The great news is that the par-boiling and scuffing technique will still give you a wonderfully crispy skin regardless of the fat you use. The key is to use a fat that can handle high heat.
Ghee, or clarified butter, is an excellent substitute. It provides a rich, nutty, buttery flavor that is fantastic on potatoes. Another great option, especially for a Southern-style take, is rendered bacon fat. It will give the potato skin a smoky, savory flavor that is simply irresistible. For a completely plant-based or vegan baked potato, use a neutral oil with a high smoke point, like avocado oil. Even a good quality olive oil can work in a pinch, though it may smoke a little at the higher temperature. The texture will still be amazing.
Is it safe to eat the skin of this baked potato?
Yes, not only is it safe, but it’s the best part of this recipe! The entire goal of this method is to transform the potato skin from a simple wrapper into a crispy, salty, flavorful treat. In fact, a lot of a potato’s nutrients, like fiber, B vitamins, and iron, are concentrated in or just below the skin, so eating it is good for you too. It’s a delicious and nutritious part of the vegetable.
The most important thing is to make sure you clean the potatoes thoroughly before you start cooking. I recommend using a stiff vegetable brush under cool running water to scrub away any dirt or debris from the surface. Since you’ll be enjoying every last bit of that crispy skin, you want to make sure it’s perfectly clean. Once they are scrubbed, pat them dry before they go into the boiling water, and you are good to go.
How can I get the inside of my baked potato extra fluffy?
The fluffiness of the interior comes down to three main factors: choosing the right potato, cooking it properly, and handling it correctly once it’s out of the oven. As we’ve discussed, starting with a high-starch Russet potato is the first and most crucial step. Its cellular structure is designed to create a light, airy texture when cooked.
Second, you need to bake it until it is truly, fully cooked through. An undercooked potato will be dense and waxy. You can test for doneness by inserting a skewer or a thin knife into the center. It should slide in with absolutely no resistance. The 50 to 55-minute total bake time in this recipe should be perfect for a large potato. Finally, the moment it comes out of the oven is key. Let it rest for just a few minutes, then slice it open lengthwise. Immediately use a fork to fluff up the insides by pushing the two ends toward the middle. This action releases steam and separates the cooked starch granules, preventing the interior from becoming gummy and dense as it cools.
Try These Recipes Next
Creating the perfect baked potato is such a satisfying kitchen victory, and it often gets me thinking about all the other wonderful, comforting meals it can be a part of. A great side dish like this one can be the starting point for a fantastic weeknight dinner or a special holiday feast.
If you enjoyed mastering this technique and are looking for more delicious meal ideas, you’re in the right place. Whether you need a full menu to go with your potatoes or just more inspiration for your weekly rotation, I have plenty of tried-and-true recipes that my family loves. These collections are packed with ideas that are approachable, full of flavor, and perfect for any occasion.
Take a look at some of these popular posts to plan your next meal. You’ll find everything from quick weeknight solutions to impressive holiday spreads that are sure to please everyone at your table.