
THE ULTIMATE FLAKY CHEDDAR AND CHIVE BISCUITS RECIPE
There is nothing, and I mean nothing, that says comfort quite like a warm, flaky biscuit fresh from the oven.
I remember the first time I had a truly spectacular savory biscuit. It was at a little brunch spot in Charleston with my husband, years ago. They served these incredible cheddar and chive biscuits that were so tender and flavorful, I just about fell off my chair. I went home determined to recreate them, but my first few batches were just… fine. They were good, but they didn’t have that melt-in-your-mouth quality I remembered.
For weeks, I tweaked and tested. I tried different butters, different flours, and played with the oven temperature. Then one Saturday morning, while staring into my refrigerator, I had a thought. I had a block of cream cheese leftover from making a dip for a get-together the night before. On a whim, I decided to cube it up, keep it ice cold, and work it into the dough along with the frozen butter.
Y’all, that was it. That was the magic. The cream cheese didn’t just add a subtle tang, it created these unbelievable pockets of steam in the oven, making the biscuits incredibly tender and moist on the inside while still having that perfect golden, slightly crisp exterior. It was the secret I didn’t know I was looking for, and it turned a good recipe into an unforgettable one. Now, these are the only Cheddar and Chive Biscuits I will ever make.
Why This Cheddar and Chive Biscuits Recipe Works
Savory biscuits have been a cornerstone of Southern cooking for generations. They are the perfect vehicle for butter and jam, a trusty sidekick to fried chicken, and the base for the best breakfast sandwiches. The classic combination of sharp cheddar cheese and fresh, oniony chives is a time-tested favorite for a reason. It is simple, satisfying, and tastes like home.
This recipe takes that beloved classic and elevates it to a whole new level of deliciousness. The popularity of Cheddar and Chive Biscuits comes from their robust flavor, but the texture can sometimes be a little dry or crumbly if you are not careful. My recipe solves that problem with one simple, game changing ingredient, cold cream cheese.
So, why does it work so well? While the frozen butter creates steam that gives us those beautiful, flaky layers, the cold cream cheese does something different. As it bakes, it melts into the dough, creating pockets of rich, tangy moisture. This results in an incredibly tender, soft crumb that stays moist for days. It adds a subtle richness that complements the sharp cheddar perfectly without overpowering it. The cream cheese ensures every single bite is decadent and soft, avoiding any risk of a dry biscuit. It is the secret to a truly foolproof, bakery-quality biscuit you can easily make right in your own kitchen.
This method combines the best of all worlds. You get the flaky layers from the butter, the savory punch from the cheddar and chives, and an unbeatable tenderness from the cream cheese. It makes these Cheddar and Chive Biscuits a standout recipe that will have everyone asking for your secret.
Ingredients for Cheddar and Chive Biscuits
The magic of these biscuits comes from simple, high-quality ingredients and, most importantly, keeping your fats cold. This is non-negotiable for achieving that perfect rise and tender texture. Every component plays a part, but my special addition truly sets this recipe apart.
The star of the show, my secret weapon, is the cold, block-style cream cheese. This is what gives the biscuits their signature tenderness and slight tang. It’s crucial to use the full-fat block kind, not the whipped variety in a tub, as it has the right consistency and fat content. Just like the butter, it needs to be very cold so it creates pockets of steam as it bakes.
Here is everything you will need to make these incredible Cheddar and Chive Biscuits.
- 2 ½ cups all-purpose flour, plus more for dusting
- 1 tbsp granulated sugar
- 1 tbsp baking powder
- 1 tsp kosher salt
- ½ tsp freshly cracked black pepper
- ¼ tsp baking soda
- ½ cup (1 stick) unsalted butter, frozen for 15 minutes and cut into small cubes
- 4 oz block-style cream cheese, very cold and cut into small cubes
- 1 ½ cups sharp cheddar cheese, shredded from a block
- ¼ cup fresh chives, finely chopped
- 1 cup full-fat buttermilk, very cold
- 3 tbsp unsalted butter, melted
- Flaky sea salt, for sprinkling
A few quick notes on some of the other key players. Please, if you can, shred your own cheddar cheese from a block. The pre-shredded bags are coated in starches to prevent clumping, which can make your biscuits a little drier and prevent the cheese from melting as beautifully. For the buttermilk, full-fat is best for richness and tenderness. And keeping your butter, cream cheese, and buttermilk as cold as possible until the moment they go into the bowl is the most important rule of biscuit making!
Step-by-Step Instructions For Making Cheddar and Chive Biscuits
Making biscuits from scratch can feel a little intimidating, but I promise it’s all about the technique, not about being complicated. Follow these steps closely, and you will be rewarded with the tallest, most tender biscuits you have ever had. The key is to work quickly and keep everything cold!
Step 1: Prep Your Oven and Pan
First things first, get your oven preheating to a nice and hot 425°F. A hot oven is crucial for getting that initial burst of steam that makes the biscuits rise high. While it is heating, line a large baking sheet with a piece of parchment paper. This prevents sticking and makes cleanup a breeze.
Step 2: Whisk the Dry Ingredients
In a large mixing bowl, combine the all-purpose flour, granulated sugar, baking powder, kosher salt, black pepper, and baking soda. Give it all a good whisk for about 30 seconds. This step is important because it evenly distributes all the leavening agents, so you get a consistent rise across all your biscuits.
Step 3: Cut in the Butter
Now, take your very cold, cubed butter and add it to the flour mixture. Using a pastry blender or just your fingertips, cut the butter into the flour. You want to work quickly to keep the butter from warming up. The goal is a mixture that looks like coarse crumbs with some larger, pea-sized pieces of butter still visible. Those little pieces are what will create our flaky layers.
Step 4: Add the Cream Cheese
Next, add the cold, cubed cream cheese. Work it in just like you did the butter, but be a little more gentle. We want to leave slightly larger, marble-sized pieces of cream cheese throughout the dough. These will melt during baking to create those wonderful pockets of tenderness.
Step 5: Stir in the Cheese and Chives
Gently stir in the shredded sharp cheddar and the finely chopped fresh chives. Use a spatula or wooden spoon to mix them in just until they are evenly distributed throughout the flour and fat mixture. Don’t overdo it!
Step 6: Add the Buttermilk
Make a well in the center of your dry ingredients and pour in all of the cold buttermilk at once. Using a fork, stir everything together just until a shaggy, slightly sticky dough comes together. It will not look smooth, and that is exactly what you want. Overmixing at this stage is the number one enemy of tender biscuits.
Step 7: Turn Out and Knead Briefly
Turn the shaggy dough out onto a lightly floured surface. It will be messy, and that’s okay. Gently press it together with your hands and knead it just two or three times to bring it into a cohesive ball. Any more than that and you will develop too much gluten.
Step 8: Fold for Flaky Layers
This is my favorite part! Pat the dough into a rectangle about ¾-inch thick. Fold one-third of the dough over the center, like you are folding a letter. Then fold the other third over top of that. Rotate the dough a quarter turn (90 degrees) and gently pat it back out into a ¾-inch rectangle. Repeat this folding and patting process two more times for a total of three folds. This process, called lamination, is what builds those irresistible flaky layers.
Step 9: Cut the Biscuits
After the final fold, pat the dough out to a final thickness of 1 inch. Using a sharp 2 ½-inch round biscuit cutter, press straight down to cut out your biscuits. A common mistake is twisting the cutter, but this seals the edges and prevents the biscuits from rising to their full potential. Just press straight down and pull straight up. Gather the scraps, gently re-pat them, and cut out more biscuits until you have used all the dough.
Step 10: Arrange on the Baking Sheet
Place the cut biscuits on your parchment-lined baking sheet. For biscuits with softer sides that rise extra tall, arrange them so their sides are just barely touching. This helps them support each other as they bake upwards.
Step 11: First Butter Brush
Using a pastry brush, gently brush the tops of the biscuits with about half of the melted butter. This will give them a head start on developing that beautiful golden-brown color.
Step 12: Bake Until Golden
Place the baking sheet in your preheated 425°F oven and bake for 13 to 16 minutes. You are looking for them to be tall, puffed up, and a deep golden brown on top. The smell in your kitchen will be absolutely heavenly.
Step 13: The Finishing Touch
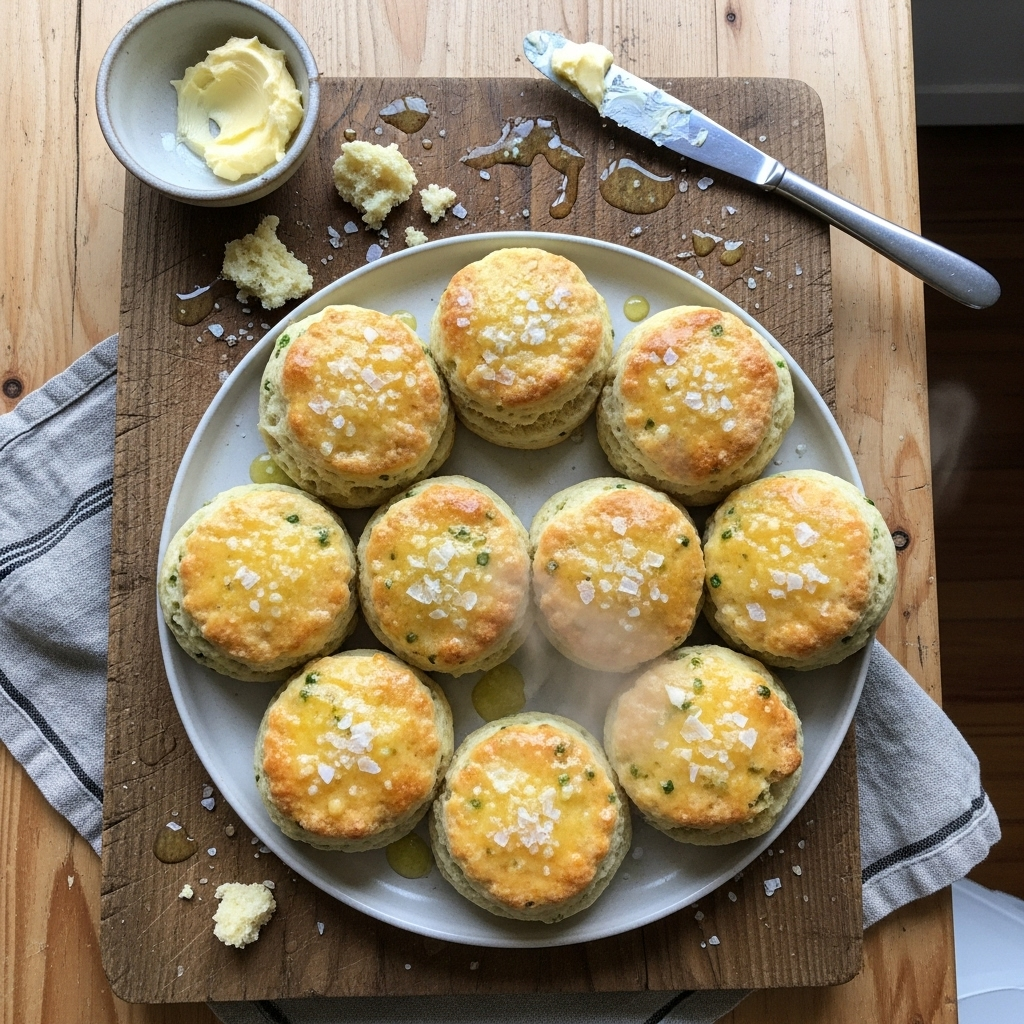
As soon as you pull the biscuits out of the oven, immediately brush the hot tops with the remaining melted butter. While the butter is still wet, give them a generous sprinkle of flaky sea salt. This final step adds a lovely bit of texture and a final pop of flavor. Serve them warm and watch them disappear!
How To Serve Cheddar and Chive Biscuits
One of the best things about these Cheddar and Chive Biscuits is how incredibly versatile they are. They feel special enough for a holiday meal but are simple enough to whip up for a weeknight dinner. They are truly an all-purpose bread that can elevate almost any meal.
Of course, the most classic way to serve them is straight from the oven, still warm, with a generous pat of good-quality salted butter melting into the top. It is simple, perfect, and lets the flavors of the sharp cheddar and fresh chives really shine. But do not stop there! My family has come to expect these biscuits for all sorts of occasions, and I have found so many wonderful ways to serve them.
Here are a few of my favorite ways to enjoy these biscuits:
- Breakfast Sandwiches: Split a biscuit in half and fill it with a fried egg, a sausage patty, and a slice of American cheese for the ultimate breakfast sandwich. The biscuit is sturdy enough to hold it all together.
- With Soup or Chili: These are the absolute best biscuits for dipping. Serve them alongside a hearty bowl of tomato soup, a comforting chicken noodle, or a big pot of chili. They are perfect for sopping up every last drop.
- Southern Dinner Side: They are a natural pairing for any classic Southern main course. Think fried chicken, pulled pork, or shrimp and grits. They are a welcome addition to the plate.
- Biscuits and Gravy: For a savory twist on a classic, split the biscuits and smother them in a creamy sausage gravy. The cheese and chives in the biscuit add a whole new layer of flavor to the dish.
- Holiday Bread Basket: These biscuits are a must-have in my bread basket for Thanksgiving or Easter dinner. They look beautiful and always get eaten first, even before the yeast rolls!
You can also just set out a platter of them for a party or get-together with some softened butter, honey butter, or even a pimento cheese spread. No matter how you choose to serve them, they are guaranteed to be a hit. Just be prepared to share the recipe!
How To Store & Reuse Cheddar and Chive Biscuits Leftovers
While these Cheddar and Chive Biscuits are certainly at their peak perfection when served warm from the oven, they are still absolutely delicious the next day. Thanks to the cream cheese in the dough, they stay surprisingly moist and tender. The key is storing them properly to maintain that wonderful texture.
First, make sure the biscuits have cooled completely to room temperature. Storing them while still warm will create condensation, which can make them soggy. Once cooled, you have a couple of good options for keeping them fresh.
Here is how I recommend storing and reheating any leftovers:
- Room Temperature Storage: For short-term storage (up to 2-3 days), place the cooled biscuits in an airtight container or a zip-top bag. Do not refrigerate them, as the cold air can actually dry them out and make them stale faster.
- Freezing for Later: These biscuits freeze beautifully! For longer storage, arrange the completely cooled biscuits in a single layer on a baking sheet and place them in the freezer for about an hour, or until firm. Once they are frozen solid, transfer them to a freezer-safe zip-top bag. They will keep well for up to 3 months.
- Reheating from Room Temp: The best way to bring a biscuit back to life is in the oven or toaster oven. Preheat to 350°F and bake the biscuits for 5-7 minutes, or until warmed through. This will re-crisp the outside while keeping the inside soft. A quick 30 seconds in an air fryer also works wonders. I would avoid the microwave, as it can make them tough and chewy.
- Reheating from Frozen: You can reheat biscuits directly from the freezer. Place them on a baking sheet, cover loosely with foil, and bake in a 350°F oven for 15-20 minutes, or until heated through. Remove the foil for the last few minutes to help them crisp up.
If you find yourself with a few leftover biscuits that are a day or two old, you can also get creative! I love to split them, butter them, and toast them in a skillet to make delicious savory croutons for a salad or soup. You could also crumble them up to use as a fantastic topping for a baked macaroni and cheese or a chicken pot pie. No biscuit should ever go to waste in my house!
Substitutions & Variations For Cheddar and Chive Biscuits
While I believe this Cheddar and Chive Biscuits recipe is pretty close to perfect as it is, I am all for making a recipe your own! The basic biscuit dough is a wonderful canvas for all sorts of flavor combinations. Once you master the technique of keeping your ingredients cold and folding the dough, you can play around with different add-ins to suit your taste or what you have on hand.
The most important thing to remember is to keep the ratios of dry to wet ingredients the same to ensure the texture remains spot-on. When swapping ingredients, especially the cheese and herbs, try to use similar quantities to what the original recipe calls for.
Here are some fun and delicious substitutions and variations you can try:
- Cheese Swaps: The sharp cheddar is classic, but do not be afraid to experiment! Try using a spicy Pepper Jack for a little kick, a nutty Gruyère for a more sophisticated flavor, or even a smoked Gouda. A combination of cheeses would also be wonderful.
- Herb Variations: If you do not have chives, you could substitute them with finely chopped green onions (scallions). Other herbs that work beautifully in this dough include fresh rosemary, thyme, or sage. A combination of parsley and dill would be fantastic with a seafood dinner.
- Add Some Spice: For those who like a little heat, add a pinch of cayenne pepper to the dry ingredients or stir in some finely diced jalapeños (with or without seeds) along with the cheese.
- Make it Meaty: Add about a half-cup of cooked and crumbled bacon or sausage to the dough when you add the cheese for an amazing all-in-one breakfast biscuit.
- Buttermilk Substitute: If you are in a pinch and do not have buttermilk, you can make your own. Simply add one tablespoon of white vinegar or lemon juice to a liquid measuring cup, then add enough whole milk to reach the 1-cup line. Let it sit for 5-10 minutes to curdle slightly before using.
Feel free to mix and match these ideas to create your own signature biscuit. A Gruyère and rosemary biscuit would be divine for a holiday meal, while a jalapeño and bacon version would be the star of any brunch. Have fun with it!
The Ultimate Cheddar and Chive Biscuits
Description: Incredibly tender, flaky, and flavorful Cheddar and Chive Biscuits made with a secret ingredient for the best texture. Perfect for breakfast, dinner, or as a savory snack!
Yield: 10-12 biscuits | Category: Bread | Cuisine: American, Southern
Prep Time: 20 minutes | Cook Time: 15 minutes
Ingredients
- 2 ½ cups all-purpose flour
- 1 tbsp granulated sugar
- 1 tbsp baking powder
- 1 tsp kosher salt
- ½ tsp freshly cracked black pepper
- ¼ tsp baking soda
- ½ cup (1 stick) unsalted butter, frozen for 15 minutes, cubed
- 4 oz block-style cream cheese, very cold, cubed
- 1 ½ cups sharp cheddar cheese, shredded from a block
- ¼ cup fresh chives, finely chopped
- 1 cup full-fat buttermilk, very cold
- 3 tbsp unsalted butter, melted
- Flaky sea salt, for sprinkling
Instructions
- Preheat oven to 425°F (220°C) and line a baking sheet with parchment paper.
- In a large bowl, whisk together flour, sugar, baking powder, salt, pepper, and baking soda.
- Cut in the cold butter until the mixture resembles coarse crumbs. Work in the cold cream cheese, leaving marble-sized pieces.
- Stir in the shredded cheddar and chives.
- Pour in the cold buttermilk and stir with a fork just until a shaggy dough forms. Do not overmix.
- Turn dough onto a floured surface, knead 2-3 times. Pat into a rectangle, fold into thirds like a letter. Rotate and repeat the process two more times.
- Pat dough to 1-inch thickness. Cut out biscuits with a 2 ½-inch cutter, pressing straight down.
- Arrange biscuits on the prepared sheet so their sides are just touching.
- Brush tops with half the melted butter. Bake for 13-16 minutes, until golden brown.
- Immediately brush hot biscuits with remaining butter and sprinkle with flaky sea salt.
Notes
For the best results, make sure your butter, cream cheese, and buttermilk are as cold as possible. Do not twist the biscuit cutter when cutting the dough, as this can seal the edges and prevent a tall rise.
Servings: 12 biscuits | Calories: 295 kcal | Fat: 18g | Carbohydrates: 26g | Protein: 8g
5 FAQs About Cheddar and Chive Biscuits
Here are some straightforward answers to the most common questions I receive about this Cheddar and Chive Biscuits recipe.
Why are my cheddar and chive biscuits dry or tough?
This is the most common biscuit problem, and it almost always comes down to one of two things: overworking the dough or the fat not being cold enough. When you mix or knead biscuit dough too much, you develop the gluten in the flour. Gluten is great for chewy breads like bagels, but for a tender biscuit, it is the enemy. It is what makes them tough instead of soft and flaky. To avoid this, handle the dough as little as possible. Stir just until the ingredients are combined, knead only two or three times, and be gentle when you pat it out.
The other culprit is warm fat. The magic of a flaky biscuit comes from small pieces of very cold butter and cream cheese creating pockets of steam as they melt in the hot oven. This steam pushes the layers of dough apart, creating height and flakiness. If your butter and cream cheese are soft when they go into the dough, they will just melt right into the flour instead of staying in distinct pieces. This results in a dense, greasy, or even tough biscuit. That is why I recommend freezing the butter for 15 minutes and using both the cream cheese and buttermilk straight from the fridge.
Can I make the dough for cheddar and chive biscuits ahead of time?
Yes, you can, which makes this a great recipe for holiday planning or easy morning baking! There are two good ways to do it. The first option is to prepare the dough all the way through the cutting stage. Place the cut, unbaked biscuits on your parchment-lined baking sheet, cover them tightly with plastic wrap, and refrigerate them for up to 24 hours. When you are ready to bake, you may need to add a minute or two to the baking time since they will be starting from a colder temperature. This is my preferred method for making them one day in advance.
For longer-term planning, you can freeze the unbaked biscuits. After cutting them out, place them on a baking sheet in a single layer and freeze until solid, about 1-2 hours. Then, transfer the frozen biscuit pucks to a freezer-safe bag. They can be stored in the freezer for up to 3 months. You can bake them straight from frozen. Just place them on your prepared baking sheet, brush with butter, and bake as directed, adding about 5-8 minutes to the total bake time. They turn out just as wonderful as when they are baked fresh.
What’s the secret to getting tall, flaky layers in cheddar and chive biscuits?
The secret to those beautiful, pull-apart layers is threefold: cold fat, the lamination technique, and a proper cut. As I mentioned before, using very cold, solid fat is non-negotiable. Those solid pieces of butter are what create the separation between layers.
The second secret is the folding process, which is a simple form of lamination. When you pat the dough out and fold it like a letter three times, you are creating dozens of thin, alternating layers of dough and butter. When the butter melts and steams in the oven, it forces those layers apart, creating that signature flaky texture and impressive height. Do not skip this step! It is the most important part of building the structure of your Cheddar and Chive Biscuits.
Finally, how you cut the biscuits matters immensely. You must use a sharp cutter and press straight down without twisting. Twisting the cutter pinches and seals the edges of the dough, which essentially glues those carefully created layers together and prevents the biscuit from rising to its full, flaky potential. A clean, straight cut leaves the layers open and ready to rise.
Can I use pre-shredded cheese for these cheddar and chive biscuits?
You can in a pinch, but I highly recommend shredding your own cheese from a block if at all possible. Bagged, pre-shredded cheese is convenient, but it is coated with anti-caking agents like potato starch or cellulose to keep the shreds from sticking together in the bag. These coatings can absorb moisture from your biscuit dough, which can make the final product slightly drier.
Additionally, cheese that you shred yourself just melts better. It does not have those extra additives, so it becomes gooey and incorporates more seamlessly into the biscuit. The flavor is often better as well. You will get a much richer, more pronounced cheddar flavor from a block of good-quality sharp cheddar. It is a small extra step, but it makes a noticeable difference in the final quality of your Cheddar and Chive Biscuits, both in texture and taste. Trust me on this one, it is worth the extra two minutes of effort!
My cheddar and chive biscuits didn’t rise, what went wrong?
Flat biscuits are so disappointing! There are a few common reasons this might happen. The first thing to check is your leavening agents, specifically your baking powder and baking soda. These ingredients can lose their potency over time. To test your baking powder, stir half a teaspoon into a small cup of hot water. If it fizzes and bubbles vigorously, it is still good. To test baking soda, add a splash of vinegar or lemon juice to it. If you do not get a strong reaction, it is time to buy a new box.
Another likely cause is overmixing the dough. If you work the dough too much after adding the buttermilk, you will develop gluten and knock all the air out, leading to tough, flat biscuits. Remember to mix just until a shaggy dough forms. Similarly, if your butter and cream cheese were too warm, they melted into the flour instead of creating steam pockets, which also leads to a lack of lift.
Lastly, as mentioned in another question, twisting your biscuit cutter when you cut the dough can seal the edges and prevent them from rising. Make sure you are pressing straight down for a clean cut. A hot oven is also key. If your oven is not fully preheated to 425°F, you will not get that initial blast of heat needed for a powerful rise.
Try These Recipes Next
If you loved these Cheddar and Chive Biscuits, I know you will enjoy some of my other favorite recipes. Whether you are looking for another breakfast treat or a side dish for a big family meal, these are some of the most popular recipes here at This Gal Cooks.
- Easy Breakfast Ideas & Recipes: Find your next morning favorite! This collection is packed with everything from sweet to savory to get your day started right.
- Thanksgiving Dinner Ideas: These biscuits are a star on my Thanksgiving table, and here you can find all the other dishes that I love to serve alongside them for a perfect holiday feast.
- 110 Easy Dinner Ideas: Looking for a main course to serve with these biscuits? This huge list of easy dinner recipes has something for everyone, any night of the week.