
I Made This Easy, Healthy Quinoa Stuffing Recipe For My Friend
For years, my contribution to any family get-together was my classic cornbread stuffing. Everybody loved it, and I never had leftovers. But one Thanksgiving, my sweet niece came home from college just full of new ideas about “superfoods” and healthy eatin’.
She politely asked if I could make a gluten-free side, and I’ll admit, my first thought was that it would taste like cardboard. But then I saw it as a challenge. If I was going to make a Quinoa Stuffing, I was gonna make it so downright delicious that nobody, not even my meat-and-potatoes brother-in-law, would miss the bread one bit.
The secret, I discovered, isn’t in just swapping ingredients. It’s about buildin’ layers of flavor from the ground up. Most folks just throw everything into a bowl. We’re gonna do better than that.
Our little twist, the thing that takes this dish from “Oh, that’s nice” to “Honey, I need this recipe,” is some beautifully caramelized, maple-glazed onions with a generous splash of good bourbon. Oh, the aroma alone will have the neighbors peekin’ over the fence. It adds this deep, sweet, savory, and slightly smoky character that just makes the whole dish sing a glorious tune.
This isn’t just a side dish. It’s a conversation starter. It’s proof that you can have something that’s good for you and still tastes like a little piece of heaven. So let’s get to it!
Why This Quinoa Stuffing Recipe Works
Stuffing, or dressing as we sometimes call it down here, is the heart of the holiday table for so many of us. Traditionally, it’s a wonderful, comforting mix of bread, broth, herbs, and vegetables. It’s a classic for a reason. But let’s be honest, it can also be a little heavy, leaving you ready for a nap before you’ve even had a slice of pie.
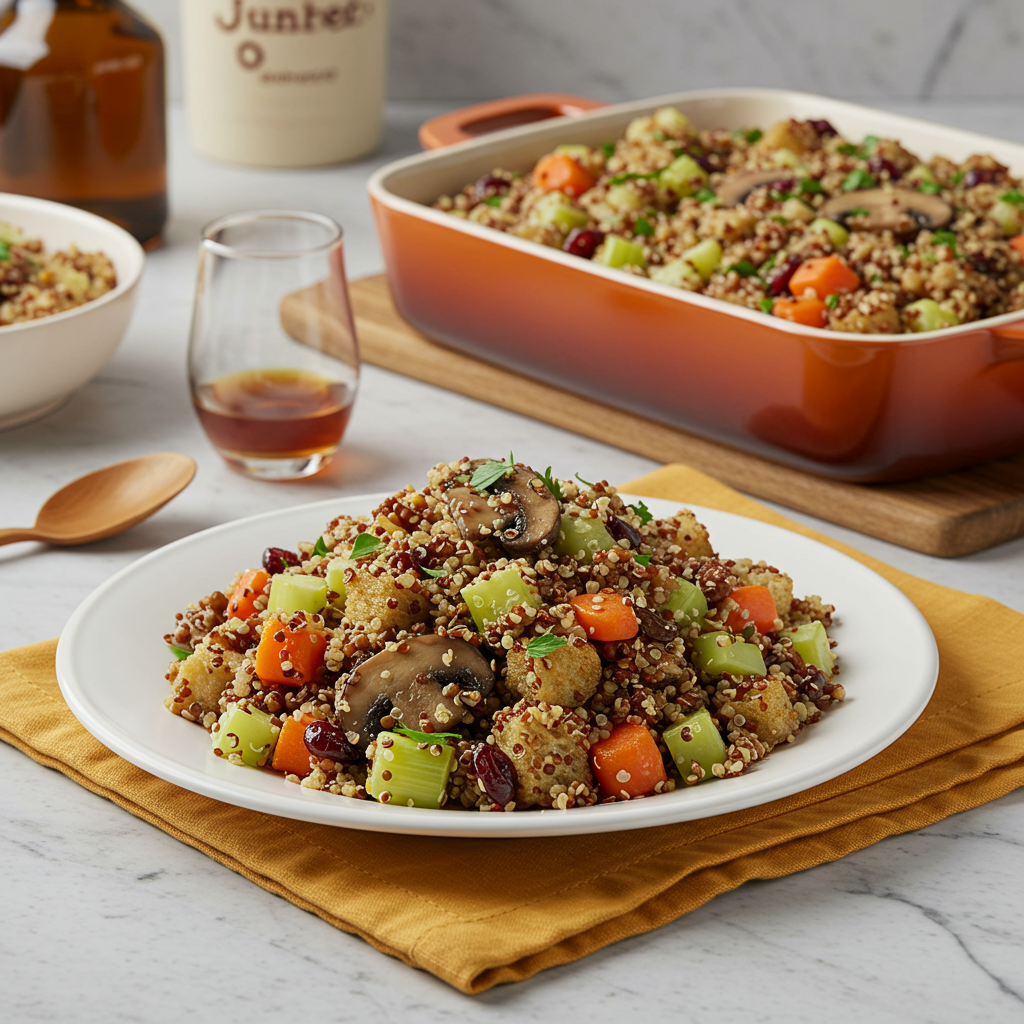
That’s where this Quinoa Stuffing comes in to save the day. It has all the familiar, savory flavors we crave, like sage, thyme, celery, and onions, but it’s built on a lighter, healthier foundation. Quinoa provides a wonderful, slightly nutty flavor and a delightful texture that’s a far cry from soggy bread. It’s also a complete protein and naturally gluten-free, which means more of your loved ones can enjoy it without a worry.
What really makes this recipe a show-stopper, though, is the method. We don’t just boil quinoa and toss things in. We build flavor at every single step. We start by sautéing the classic mirepoix, the holy trinity of onion, celery, and carrot, until they’re sweet and tender. Then we brown the mushrooms properly to bring out their deep, earthy notes.
But the real magic is the maple-bourbon glaze. When you pour that bourbon into the hot pan, it sizzles and steams, lifting all those delicious browned bits off the bottom. That’s pure flavor, y’all. The bourbon adds a warmth and a subtle, smoky complexity that you just can’t get from anything else. Then, a touch of pure maple syrup balances it all out with a gentle sweetness that caramelizes the vegetables into something truly special. It transforms a simple grain side into a sophisticated, unforgettable dish.
Ingredients for Quinoa Stuffing
For this recipe to truly shine, the quality of your ingredients makes all the difference. We’re workin’ with simple things, so let’s make sure they’re the best they can be. Each one plays a part in creating those layers of flavor we talked about.
Here’s what you’ll need to have on hand:
- 1 cup tricolor quinoa, rinsed well under cold water
- 2 cups low-sodium chicken or vegetable broth
- 2 tablespoons olive oil
- 2 tablespoons unsalted butter
- 1 large yellow onion, diced
- 2 celery stalks, diced
- 1 large carrot, finely diced
- 8 ounces cremini mushrooms, wiped clean and sliced
- 2 cloves garlic, minced
- ¼ cup good-quality bourbon (don’t you dare use the cheap stuff!)
- 2 tablespoons pure maple syrup
- 1 teaspoon fresh thyme leaves, minced
- 1 teaspoon fresh sage, finely chopped
- ½ teaspoon fresh rosemary, minced
- ¾ cup toasted pecans, roughly chopped
- ⅔ cup dried cranberries
- ½ cup fresh parsley, chopped
- Salt and freshly ground black pepper to taste
A few little notes from my kitchen to yours. I prefer tricolor quinoa here because it looks so pretty and the different colors have slightly different textures, which adds interest. Using a low-sodium broth is important because it lets you control the salt level yourself. We add salt at the end, to taste.
Now, let’s talk about our star players: the bourbon and maple syrup. Please, please use a bourbon that you’d actually enjoy sippin’ on. The flavor really concentrates as it cooks, so a harsh, cheap bourbon will not do you any favors. The same goes for the maple syrup. We want pure maple syrup, not the corn syrup-based pancake syrup. The pure stuff has a complex, woody flavor that is just divine with the bourbon and herbs.
And always, always use fresh herbs if you can. They have a brightness that dried herbs just can’t match. This dish is all about fresh, vibrant flavors coming together in a beautiful way.
Step-by-Step Instructions For Making Quinoa Stuffing
Alright, let’s roll up our sleeves and get to cookin’. This process is simple, but doin’ it right makes all the difference. Follow along with me, and I promise you’ll have a perfect Quinoa Stuffing every time.
1. Cook the Quinoa Just Right
First things first, let’s cook that quinoa. Rinsing it under cold water is a step you cannot skip, honey. It removes a natural coating called saponin that can make the quinoa taste bitter. Put your rinsed quinoa in a medium saucepan with your broth and bring it to a boil. Once it’s boiling, give it one good stir, pop a lid on it, and turn the heat down to a low simmer. Let it be for about 15 minutes. The key is to not peek! Once the liquid is absorbed, take it off the heat and let it sit, still covered, for 5 more minutes. Then, fluff it up with a fork. This gives you perfectly cooked, separate grains, not a mushy mess.
2. Build Your Flavor Base
While that quinoa is doin’ its thing, grab a large, heavy-bottomed skillet or a Dutch oven. This is important because it holds heat well and will help everything cook evenly. Melt your butter and olive oil together over medium heat. Add the diced onion, celery, and carrot. Let them sauté, stirrin’ every so often, until they’re soft and sweet, which takes about 6 to 8 minutes. Don’t rush this part. This is the foundation of our stuffing’s flavor.
3. Brown the Mushrooms
Now, turn the heat up just a little and add your sliced mushrooms. The trick to beautifully browned mushrooms is to not overcrowd the pan and not to stir them too much at first. Let them sit and get a nice color on one side before you start movin’ them around. Cook them until they’ve released their water and are golden brown and a little crispy. This deepens their flavor immensely. Then, toss in the garlic and cook for just another minute until you can smell it. Any longer and it might burn.
4. Work That Maple-Bourbon Magic
Here comes the fun part! Make sure your pan is nice and hot over medium-high heat. Carefully pour in the bourbon. It will sizzle and steam up like crazy, and that’s exactly what you want! Use your spoon to scrape up all those wonderful browned bits from the bottom of the skillet. Let the bourbon cook for a couple of minutes until the strong alcohol smell is gone. Then, reduce the heat, drizzle in that glorious pure maple syrup, and stir in your fresh herbs. Your kitchen is about to smell like a holiday dream.
5. Bring It All Together
Turn the heat off completely. Add your perfectly fluffed quinoa to the skillet with the vegetables. Add the toasted pecans, the sweet dried cranberries, and the fresh, bright parsley. Use a spatula to gently fold everything together. We’re folding, not stirring like mad. We want to combine everything without breaking down those lovely quinoa grains. Finally, have a taste. Season it with salt and a good amount of freshly ground black pepper until it tastes absolutely perfect to you.
How To Serve Quinoa Stuffing
Once you’ve got this beautiful bowl of stuffing, all warm and fragrant from the kitchen, you’ll find it’s as versatile as it is delicious. It’s a star on the holiday table, but its talents don’t end there. It brings a touch of elegance and a whole lot of flavor to any meal.
For a traditional holiday spread, like Thanksgiving or Christmas, this Quinoa Stuffing is just perfect served right alongside your roasted turkey, glazed ham, or a beautiful beef roast. It sits so nicely next to mashed potatoes and green bean casserole, offering a lighter, brighter contrast to some of the richer dishes. I like to serve it in a big, warm ceramic bowl with a pretty serving spoon so everyone can help themselves.
But don’t just save it for the holidays! Here are a few other ways my family and I love to enjoy it:
- As a Main Course: Hollow out some acorn squash or bell peppers, fill them with the quinoa stuffing, and bake until the vegetables are tender. It makes for a stunning and satisfying vegetarian main dish.
- In a Grain Bowl: Use a scoop of the warm or cold stuffing as a base for a healthy lunch bowl. Top it with some leftover shredded chicken, a handful of spinach, and a little drizzle of vinaigrette.
- For Brunch: Reheat a portion in a skillet until it’s a little crispy, then top it with a perfectly fried or poached egg. The runny yolk creates a lovely sauce that is just to die for.
To make it look extra special when you serve it, you can sprinkle some extra toasted pecans, a few more dried cranberries, or some fresh chopped parsley right over the top. A few pomegranate seeds also add a beautiful jewel-like color and a wonderful pop of tartness that cuts through the richness beautifully. It’s a simple touch that makes it look like it came straight out of a magazine.
How To Store & Reuse Quinoa Stuffing Leftovers
One of the best things about making a big batch of this Quinoa Stuffing is that the leftovers are just as fantastic as the main event. Unlike bread-based stuffing, which can get a bit soggy, quinoa holds its texture wonderfully. Proper storage is key to enjoying it for days to come.
Once the stuffing has cooled down completely, just transfer it to an airtight container and pop it in the refrigerator. It will keep beautifully for up to four days. I actually think the flavors get even better on the second day as everything has a chance to meld together. I don’t recommend freezing this dish, as the texture of the vegetables can get a bit soft and watery upon thawing.
When you’re ready to enjoy your leftovers, you have a few options for reheating:
- In the Microwave: This is the quickest way. Place a serving on a plate, sprinkle it with a teaspoon or two of water or broth to add a little moisture, cover it with a damp paper towel, and heat it in 30-second bursts until it’s warmed through.
- On the Stovetop: My favorite method! Heat a little olive oil or butter in a nonstick skillet over medium heat. Add the stuffing and let it cook, stirring occasionally, until it’s heated through. This way, you can get some of the quinoa and pecans a little toasty and crisp again.
- In the Oven: If you’re reheating a larger amount, place it in a baking dish, add a splash of broth, cover it with foil, and warm it in a 350°F oven for about 15-20 minutes, or until hot.
Beyond just reheating and eating, the leftovers are fantastic for creating whole new meals. You can form the cold stuffing into little patties and pan-fry them in olive oil until they are golden and crispy on both sides. These little quinoa cakes are wonderful with a dollop of sour cream or a little applesauce. You can also toss a scoop into your favorite soup to make it heartier or use it as a delicious filling for a lunch wrap with some crisp lettuce.
Substitutions & Variations For Quinoa Stuffing
A good recipe is like a good story, it can be told in many different ways. This Quinoa Stuffing recipe is a fantastic starting point, but don’t be afraid to make it your own! It’s incredibly forgiving and easy to adapt based on what you have in your pantry or your family’s preferences.
Sometimes you just don’t have exactly what a recipe calls for, and that is perfectly alright. A little creativity in the kitchen is a good thing! Here are some simple swaps that work beautifully in this dish.
- For the Nuts: If you’re not a fan of pecans, toasted walnuts or slivered almonds would be just as delicious. For a nut-free version, try using toasted pumpkin seeds (pepitas) or sunflower seeds for that wonderful crunch.
- For the Dried Fruit: Chopped dried apricots or dried cherries are a wonderful substitute for cranberries, each adding their own unique sweet-tart flavor.
- For the Bourbon: If you don’t have bourbon, you can use brandy, cognac, or a dry sherry. For a non-alcoholic version, apple cider or even a splash of balsamic vinegar will work to deglaze the pan and add a touch of acidity and sweetness.
If you’re feeling a little more adventurous and want to put your own spin on things, here are a few variations my family loves:
- Sausage and Apple Quinoa Stuffing: Brown about a half-pound of your favorite sausage (spicy Italian or a sweet breakfast sausage both work well) and crumble it. Add it to the skillet along with one finely diced apple when you sauté the onions. The combination is just heavenly.
- Make It Vegan: This recipe is so easy to make vegan! Simply use vegetable broth instead of chicken broth, and swap the butter for a good quality vegan butter or just use a little extra olive oil.
- Add Some Cheese: For a little extra richness, try crumbling in about a half cup of feta or goat cheese at the very end when you add the parsley. The creamy, tangy cheese is a wonderful contrast to the sweet and savory flavors.
Show-Stopping Maple-Bourbon Quinoa Stuffing
Description: A festive, flavorful, and gluten-free stuffing alternative featuring fluffy quinoa, savory vegetables, toasted pecans, and a magical maple-bourbon glaze. It’s the perfect side dish to impress at any holiday gathering or special dinner.
Yield: 8 servings | Category: Side Dish | Cuisine: American
Prep Time: 15 minutes | Cook Time: 35 minutes
Ingredients
- 1 cup tricolor quinoa, rinsed well
- 2 cups low-sodium chicken or vegetable broth
- 2 tbsp olive oil
- 2 tbsp unsalted butter
- 1 large yellow onion, diced
- 2 celery stalks, diced
- 1 large carrot, finely diced
- 8 oz cremini mushrooms, sliced
- 2 cloves garlic, minced
- ¼ cup good-quality bourbon
- 2 tbsp pure maple syrup
- 1 tsp fresh thyme leaves, minced
- 1 tsp fresh sage, finely chopped
- ½ tsp fresh rosemary, minced
- ¾ cup toasted pecans, roughly chopped
- ⅔ cup dried cranberries
- ½ cup fresh parsley, chopped
- Salt and freshly ground black pepper to taste
Instructions
- In a saucepan, bring broth to a boil. Add rinsed quinoa, reduce heat, cover, and simmer for 15 minutes until liquid is absorbed. Let stand, covered, then fluff with a fork.
- In a large skillet over medium heat, melt olive oil and butter. Sauté onion, celery, and carrot for 6-8 minutes until soft.
- Add mushrooms and cook until browned, about 7-9 minutes. Stir in garlic and cook for 1 minute.
- Increase heat to medium-high, add bourbon, and scrape up browned bits from the pan. Cook until mostly evaporated, about 2 minutes.
- Reduce heat, stir in maple syrup, thyme, sage, and rosemary. Cook for 1 minute.
- Turn off heat. Gently fold in the cooked quinoa, pecans, cranberries, and parsley.
- Season to taste with salt and pepper. Serve warm.
Notes
Rinsing the quinoa is a crucial step to remove its natural bitter coating. For best results, use fresh herbs and a bourbon you would enjoy drinking.
Servings: 8 | Calories: 320 kcal | Fat: 16g | Carbohydrates: 38g | Protein: 8g
5 FAQs About Quinoa Stuffing
Here are some straightforward answers to the most common questions I receive about this Quinoa Stuffing recipe.
Can I make this quinoa stuffing ahead of time?
Oh, absolutely! That’s one of the things that makes this recipe such a lifesaver, especially around the busy holidays. You have a couple of options depending on how much you want to get done in advance. If you want to just do some prep work, you can chop all of your vegetables, toast the pecans, and mix your fresh herbs a day or two ahead. Store the veggies in an airtight container in the fridge and the nuts and herbs in separate baggies at room temperature. You can also cook the quinoa ahead of time. Let it cool completely and store it in the fridge for up to three days.
If you want to make the entire dish ahead, you can do that too. Prepare the recipe completely, then let it cool down before transferring it to an airtight container and refrigerating it for up to two days. When you’re ready to serve, you can reheat it gently on the stovetop with a splash of broth or in a covered baking dish in a 350°F oven until it’s warmed through. Making it ahead actually gives the flavors more time to meld together, so it’s a win-win!
Is this quinoa stuffing recipe gluten-free?
Yes, it certainly is! That was the whole reason I came up with it in the first place, for my sweet niece. Quinoa is a seed, not a grain, and it is naturally 100% gluten-free, which makes it a wonderful and safe option for anyone with celiac disease or a gluten sensitivity. It’s a fantastic way to offer a traditional-style side dish that everyone at the table can enjoy without worry.
The only thing you need to double-check to ensure the entire dish remains gluten-free is your chicken or vegetable broth. While most broths are gluten-free, some brands can contain hidden gluten from additives or flavorings. Just take a quick peek at the label to find one that is certified gluten-free. All the other ingredients in this recipe, from the fresh vegetables and herbs to the pecans and cranberries, are naturally free of gluten.
What’s the best kind of quinoa for this quinoa stuffing?
That’s a great question, as it can make a difference in the final dish. My personal favorite for this Quinoa Stuffing is tricolor quinoa, which is a blend of white, red, and black quinoa. I love it because it’s visually stunning in the finished dish, with all the beautiful flecks of color mixed in with the cranberries and parsley. The different colors also have slightly different textures. The white quinoa is the softest, while the red and black are a bit chewier, which adds a lovely textural contrast.
However, if you only have one type of quinoa on hand, don’t you worry. Plain white quinoa works perfectly well. It has the mildest flavor and the most delicate texture. Red quinoa is a little chewier and holds its shape very well, making it a great option if you’re worried about mushiness. Black quinoa has the firmest texture and a slightly earthier flavor. Any of them will be delicious, so feel free to use what you have or what you like best.
My quinoa stuffing turned out mushy, what did I do wrong?
Oh, honey, that is the most common pitfall when working with quinoa, but it’s an easy fix for next time. There are usually a few culprits when quinoa turns out mushy instead of light and fluffy. The most likely reason is the liquid ratio. It’s very important to use a 1-to-2 ratio of quinoa to liquid. For our recipe, that’s one cup of dry quinoa to two cups of broth. Using too much liquid will waterlog the grains.
Another common mistake is not letting the quinoa rest after it’s done simmering. That five-minute steaming period off the heat is crucial. It allows the grains to absorb the last bit of moisture and firm up. If you fluff it too soon, it can get a pasty texture. Lastly, be gentle when you’re folding everything together at the end. If you stir it too vigorously, you can break down the delicate grains and release their starches, which leads to a gummy consistency. Treat it gently, and you’ll have perfect, fluffy results every time.
Can I bake this quinoa stuffing in a casserole dish?
You absolutely can! Preparing this Quinoa Stuffing on the stovetop is the quickest method, but baking it gives it a wonderful new dimension. It gets a lovely, slightly crispy top and stays beautifully moist and tender on the inside, much like a traditional bread stuffing. It’s a great option if you want to serve it straight from a pretty baking dish on the table.
To do this, just follow the recipe all the way through the stovetop cooking process. Then, transfer the finished stuffing to a greased 9×13 inch baking dish or a similar-sized casserole dish. You can dot the top with a few extra pieces of butter if you like. Bake it uncovered in a preheated 375°F oven for about 20 to 25 minutes, or until it’s heated all the way through and the top is golden brown and a little bit crisp. It’s a wonderful way to finish the dish, especially for a holiday meal.
Try These Recipes Next
If you fell in love with this recipe and are lookin’ for more delicious ideas to bring to your family’s table, you’ve come to the right place. Here at This Gal Cooks, I’m all about sharing food that’s comforting, full of flavor, and made with a whole lot of love. Cooking should be a joy, not a chore!
When the holidays are on the horizon, planning the menu can be the most exciting part. For more dishes that are guaranteed to make your feast unforgettable, from the main course to all the fixin’s, you’ll want to take a peek at my collection of treasured recipes.
My Favorite Thanksgiving Dinner Ideas
Of course, we need delicious meals for all the other days of the year, too! If you’re ever stuck in a dinner rut and wondering what to make on a busy weeknight, I’ve gathered over a hundred of my go-to recipes that are simple enough for any night but tasty enough for company.
110 Easy Dinner Ideas That Taste Great
And because we all know that grocery bills can add up, I’m a firm believer that you don’t have to break the bank to eat well. I’ve put together a list of my most budget-friendly recipes that are packed with flavor and use simple, affordable ingredients to create something truly satisfying.